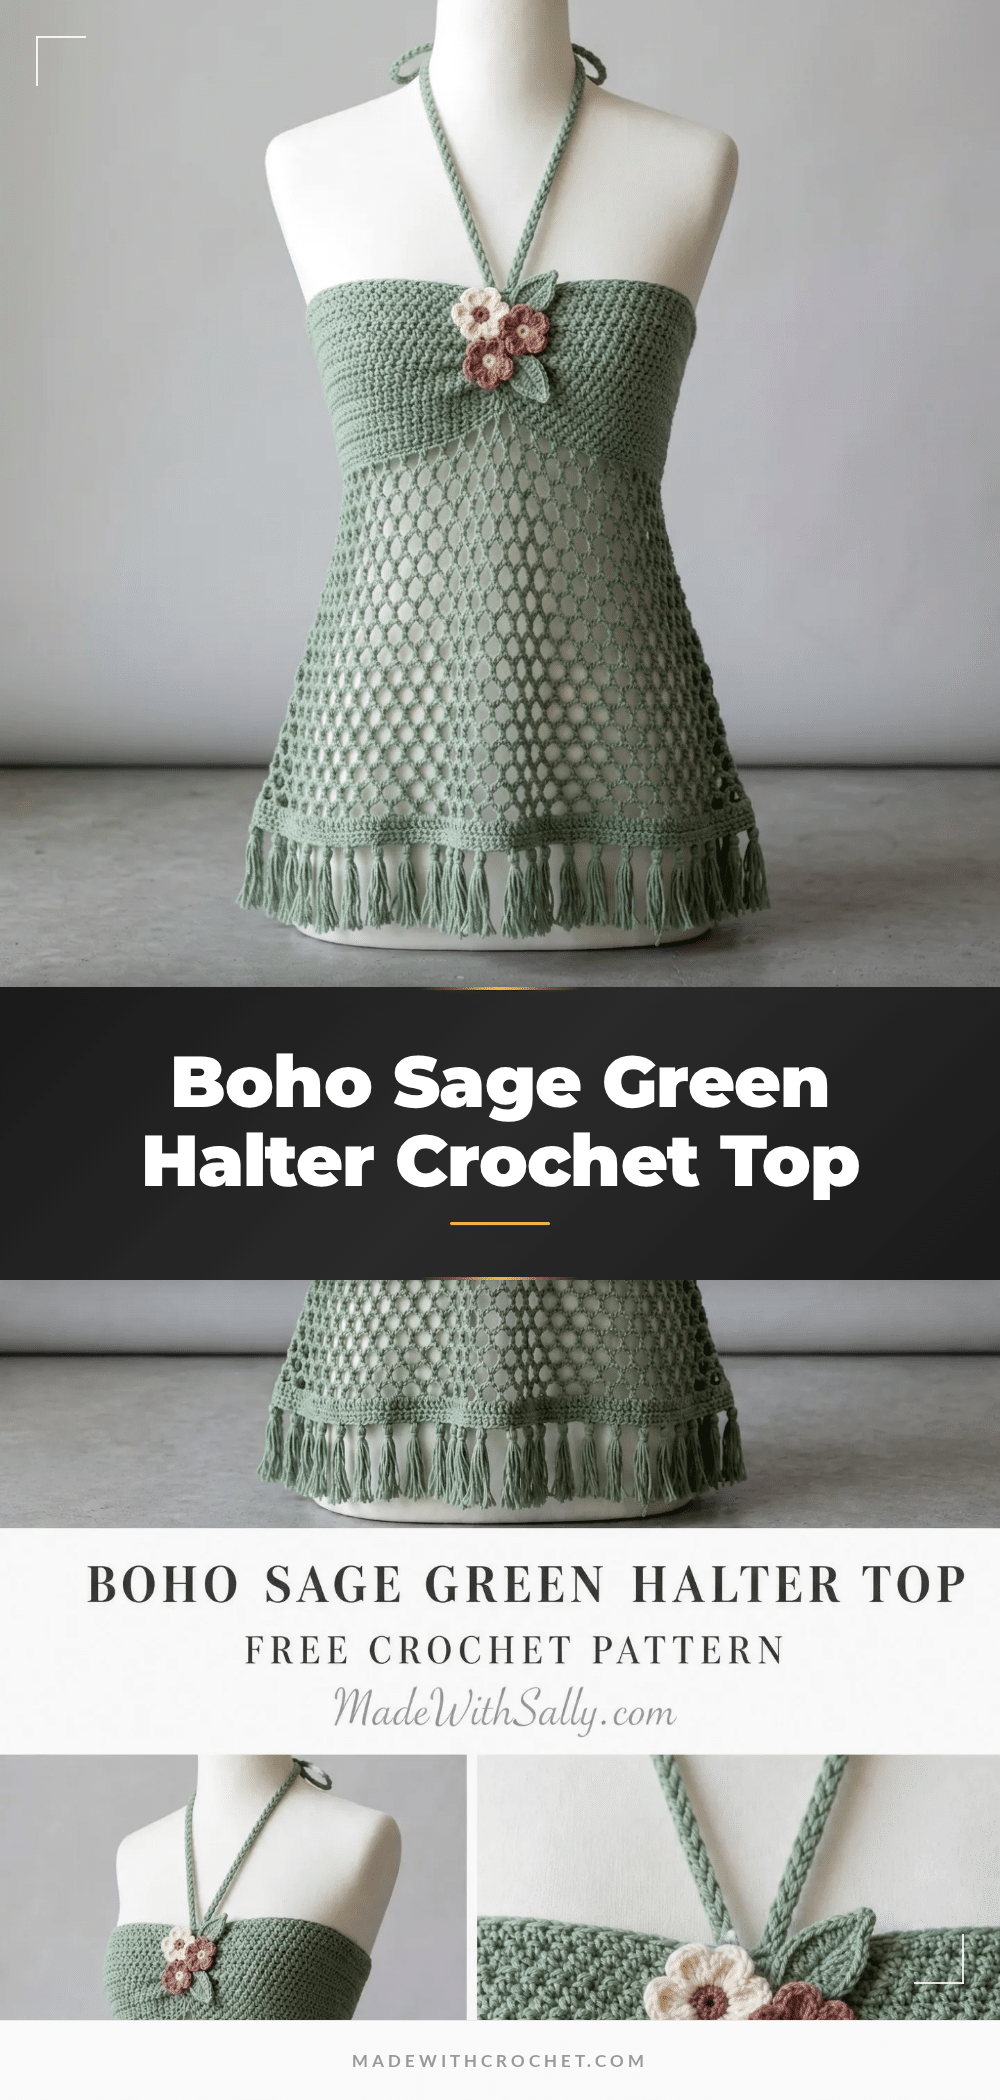
You’ve got your yarn on the table, hook in hand, and the first chain of a new project beginning to take shape. There’s something special about that moment—the quiet anticipation of watching a simple strand of cotton turn into something you’ll actually wear. This boho halter top is that kind of project. It’s the one you’ll reach for all summer long, the one that makes you feel put-together without trying too hard. Let’s get started.
Why This Project Works
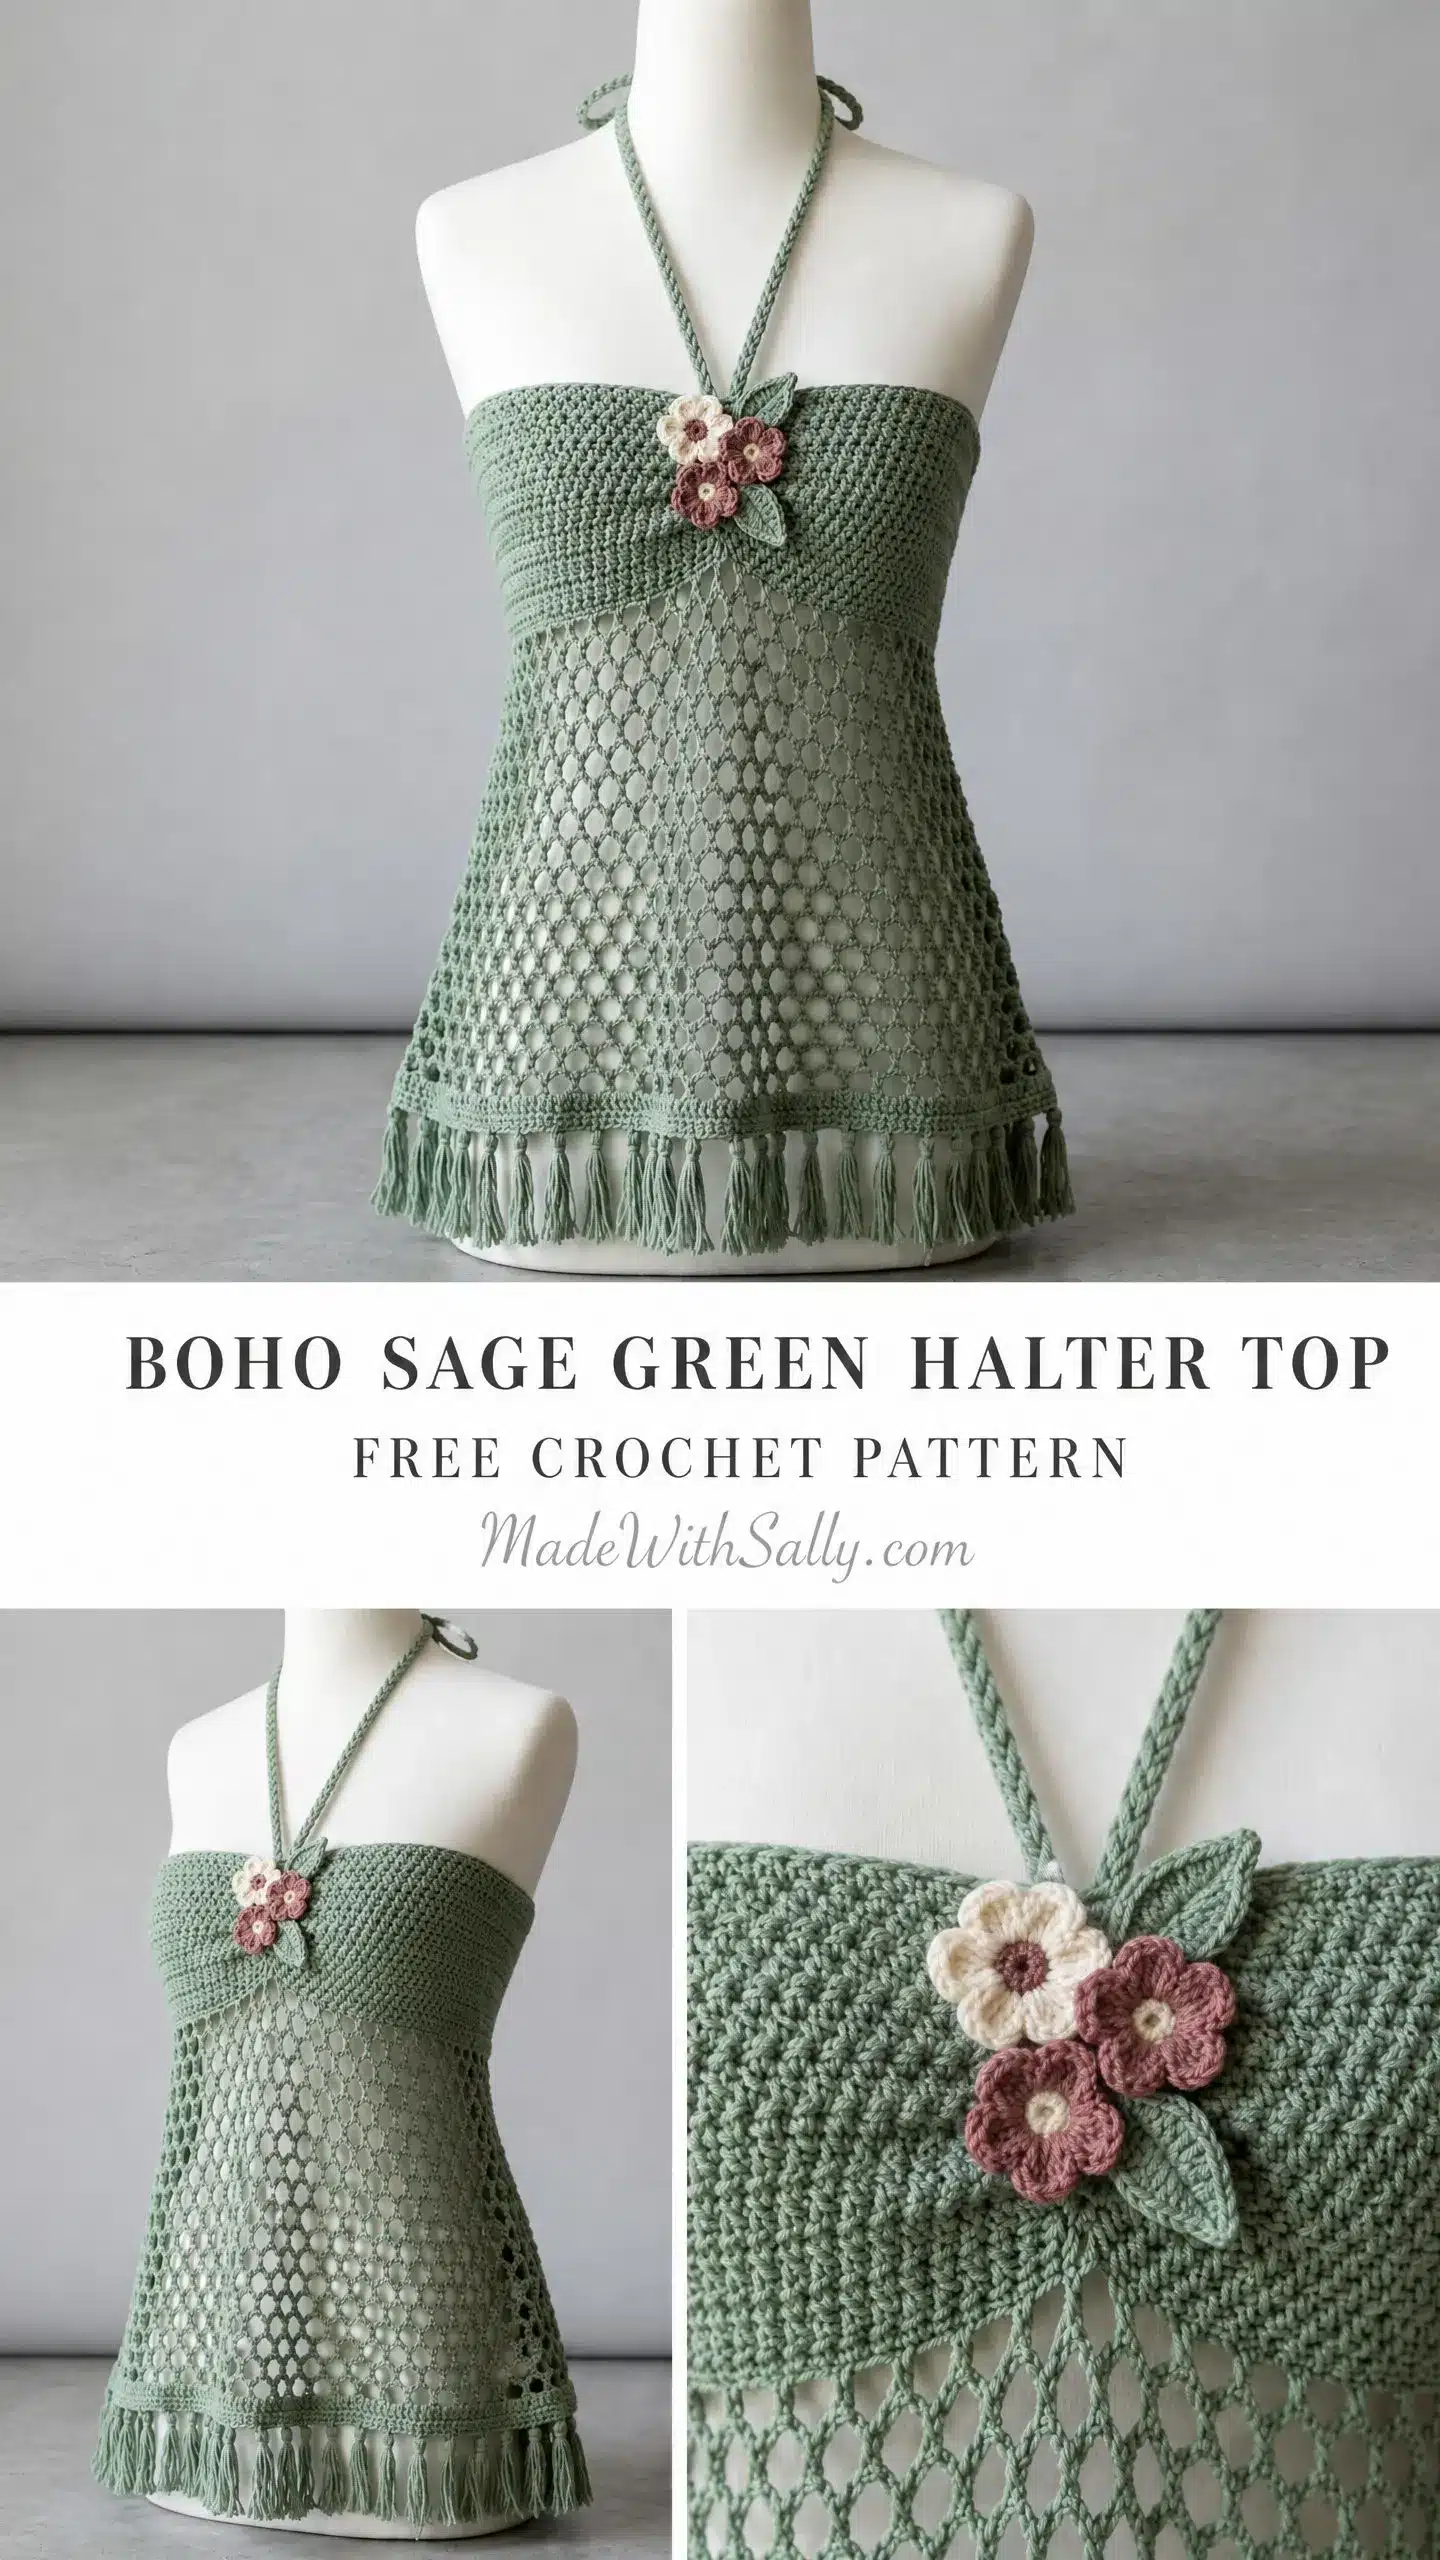
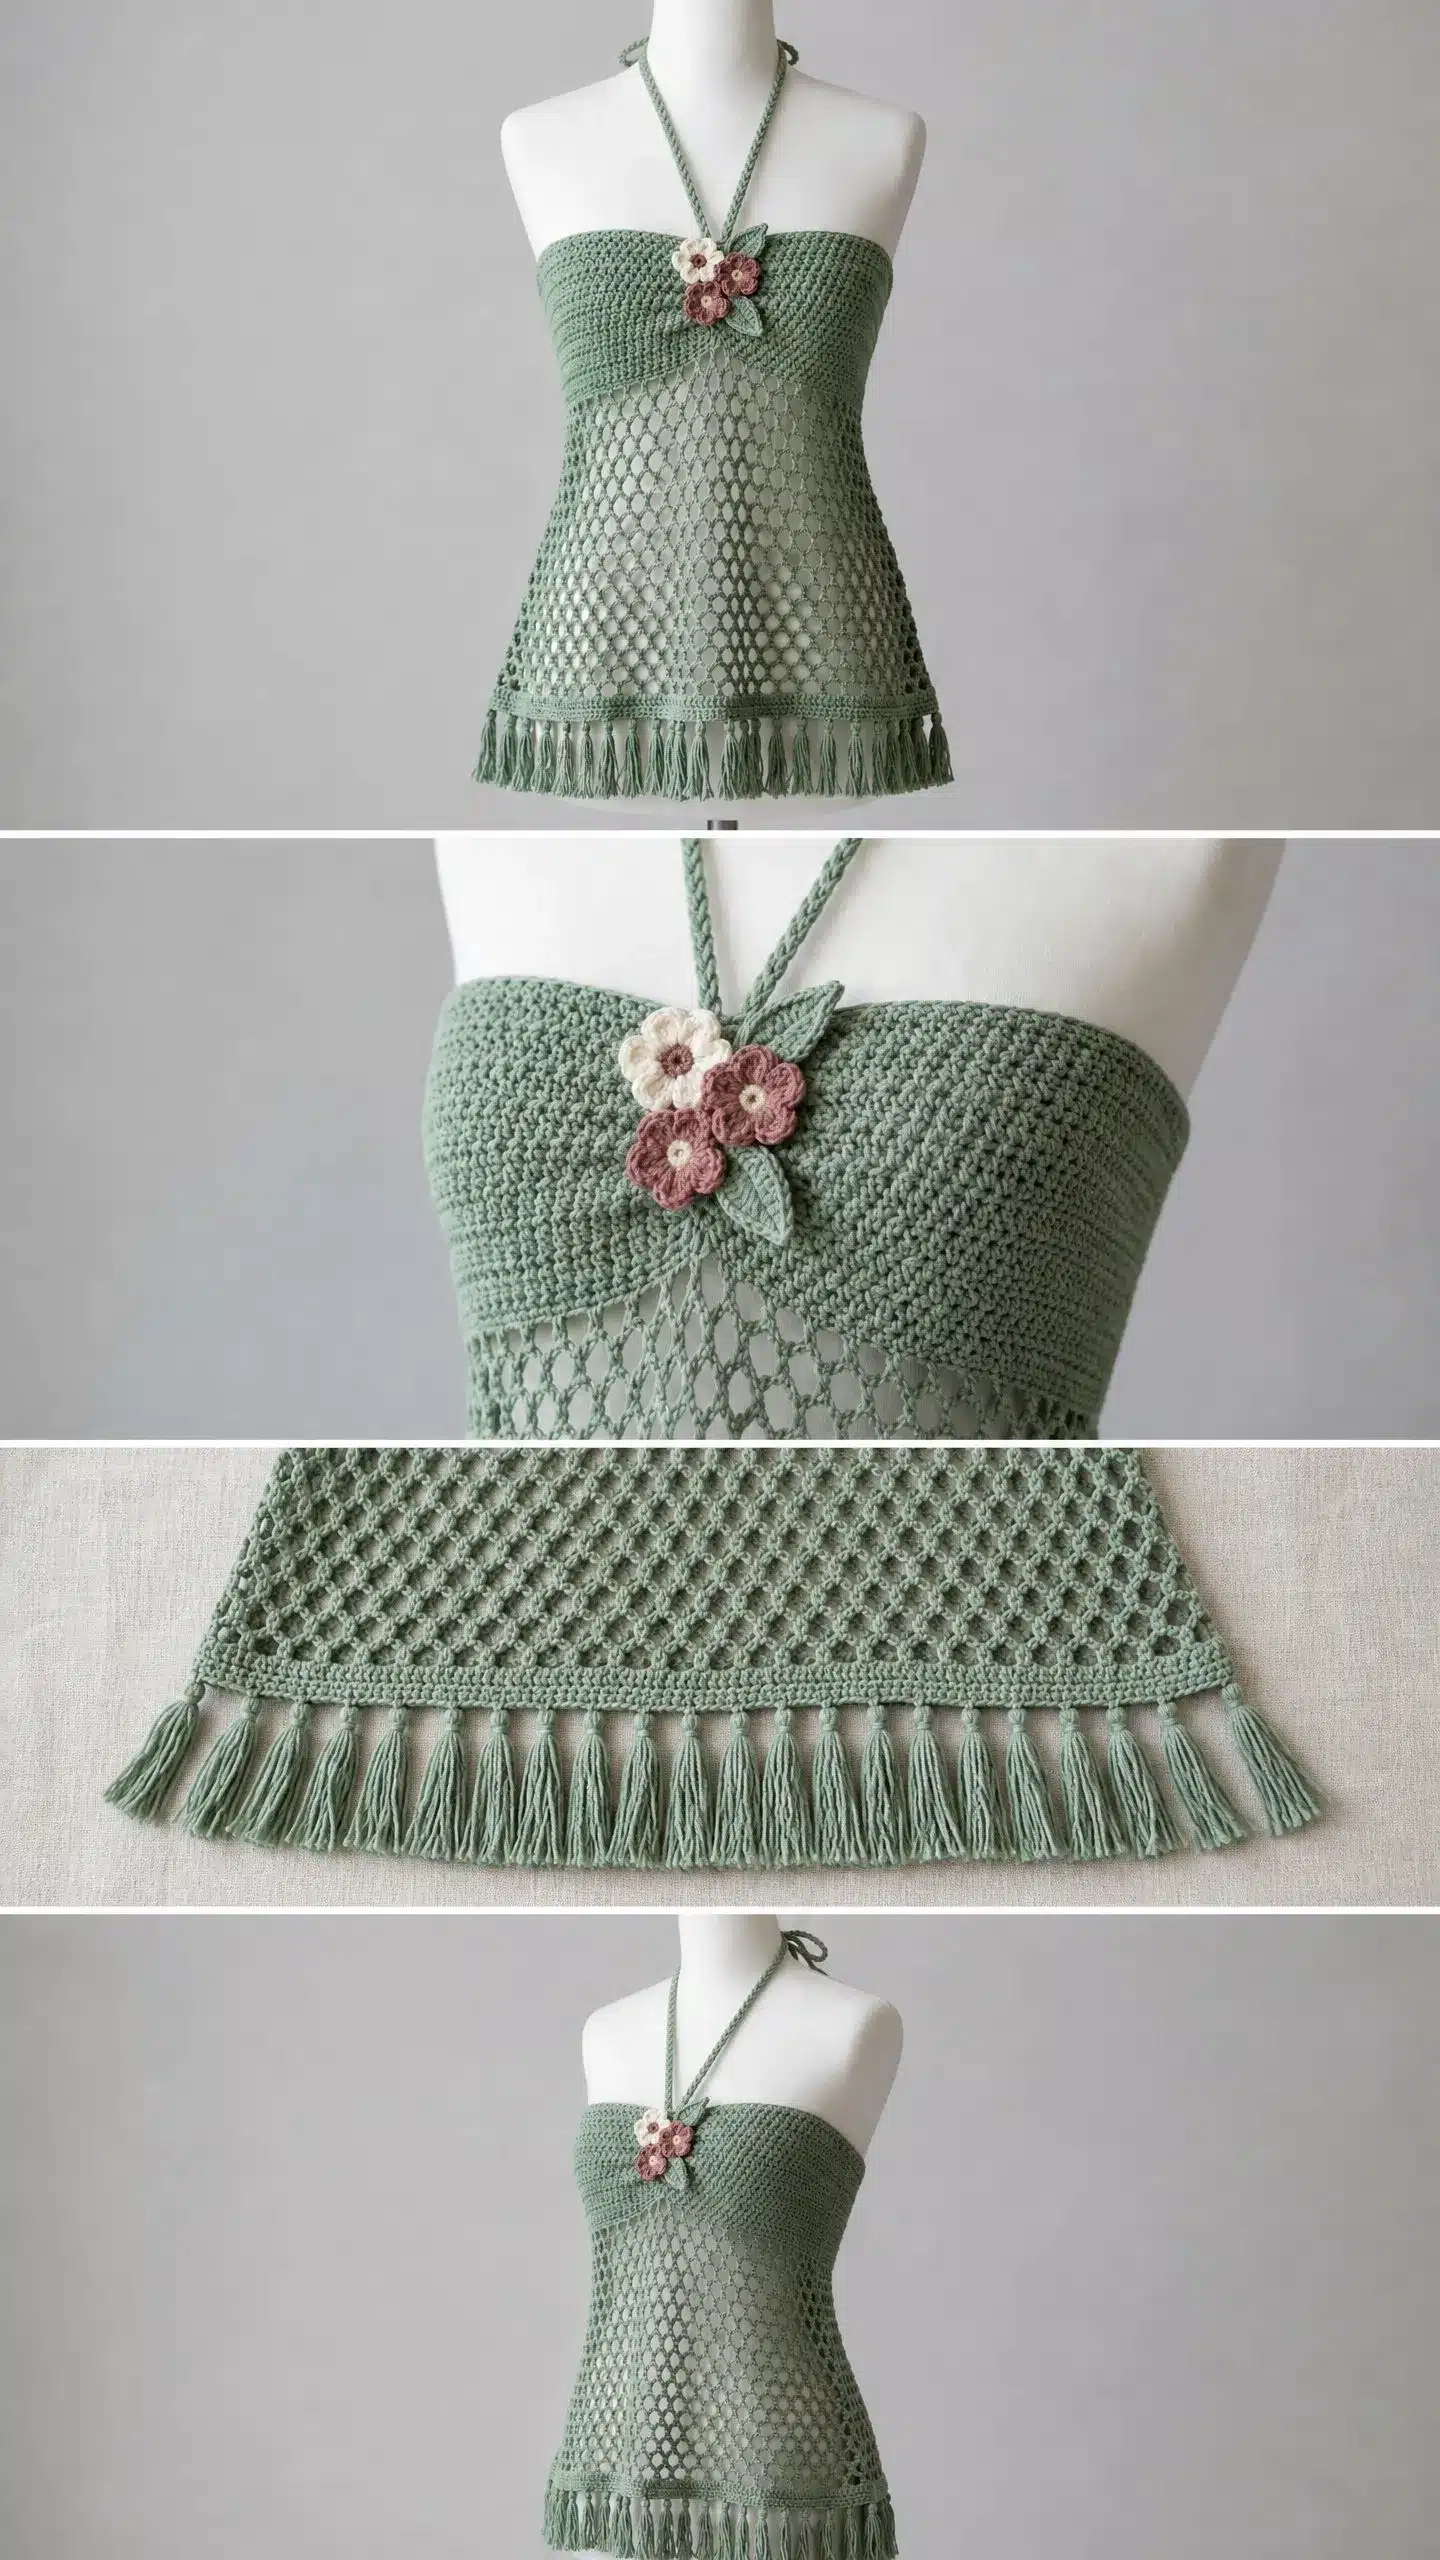
This pattern is a perfect balance of texture and structure. The honeycomb mesh body gives you that breezy, open look without being flimsy, while the solid bodice band keeps everything secure and flattering. It’s worked from the top down in the round, so there’s no side seaming to worry about—just continuous, satisfying progress. The crochet flower and leaf appliqués add a handcrafted touch that makes the top feel truly special, and the tassel hem gives it that free-spirited boho energy. Whether you’re layering it over a swimsuit or pairing it with high-waisted jeans, this top is designed to be your warm-weather staple.
Project Overview
Skill Level
This pattern is rated intermediate. You should be comfortable working in the round, following a stitch pattern repeat, and creating small applique pieces like flowers and leaves. If you’re a confident beginner who has completed several projects and wants to level up, this is a great stretch piece. Take your time with the mesh section and you’ll do just fine.
Finished Measurements
Size Small/Medium as written:
- Bust circumference: 32 to 34 inches (81 to 86 cm)
- Hip circumference at hem: 36 to 38 inches (91 to 96 cm)
- Total length from top of bodice to hem fringe (excluding tassel length): approximately 14 inches (35.5 cm)
- Bodice band height: approximately 4 inches (10 cm)
- Mesh body height: approximately 8 inches (20 cm)
- Tassel hem border height: approximately 2 inches (5 cm)
- Tassel drop length: approximately 3 to 3.5 inches (7.5 to 9 cm)
Size adjustment guidance is included later in the pattern.
Materials
- Yarn: Worsted weight, 100% cotton or cotton-blend. Approximately 600 to 700 yards (550 to 640 m) in sage green main color (MC). Approximately 15 yards (14 m) each in dusty rose (CC1) and cream (CC2) for flowers and leaf accents.
- Hooks: US size H/8 (5.0 mm) for main body and bodice. US size G/6 (4.0 mm) for flowers and leaves.
- Notions: Yarn needle for weaving ends, scissors, stitch markers (4), measuring tape, blocking mat and pins or blocking wires.
Yarn Suggestions
- Option 1: Lion Brand 24/7 Cotton in Sage, Dusty Pink, and Ecru. This yarn is mercerized and machine washable, holds its shape well for structured mesh, and has excellent stitch definition.
- Option 2: Paintbox Yarns Simply DK Cotton in Grass Green, Blush Pink, and Champagne White. Slightly lighter than worsted but produces excellent drape suitable for a beach cover-up. Gauge swatch required.
- Option 3: We Are Knitters The Cotton in Moss, Pink, and Natural. A single-ply cotton that gives soft drape and a relaxed boho feel. Swatch carefully as this yarn is slightly thicker and may require dropping to a US size G/6 for the mesh sections.
- Substitution Note: Select a smooth, plied cotton or cotton-blend yarn with minimal stretch. Avoid acrylic-dominant blends, as they will not block and may cause the mesh to collapse. A cotton-linen blend is also an excellent choice for added drape and breathability. Always crochet a gauge swatch before beginning.
Gauge and Finished Size
Gauge
- Main gauge (US H/8 hook, worsted cotton): 16 single crochet (sc) = 4 inches (10 cm) in single crochet. 8 rows sc = 4 inches (10 cm).
- Mesh gauge (US H/8 hook): 2 mesh repeats (each repeat = 1 ch-2 space + 1 sc) = approximately 1.25 inches (3.2 cm). 4 mesh rows = approximately 2 inches (5 cm).
Gauge is critical for a fitted garment. Adjust hook size as needed to match gauge before beginning.
Abbreviations
- beg = beginning
- ch = chain
- ch-sp = chain space
- dc = double crochet
- hdc = half double crochet
- MC = main color (sage green)
- CC1 = contrast color 1 (dusty rose)
- CC2 = contrast color 2 (cream)
- rem = remaining
- rep = repeat
- rnd = round
- RS = right side
- sc = single crochet
- sk = skip
- sl st = slip stitch
- sp = space
- st = stitch
- sts = stitches
- t-ch = turning chain
- WS = wrong side
- yo = yarn over
Pattern Notes
- The top is worked in joined rounds throughout. After completing the bodice band, the mesh body is worked in continuous rounds without joining, using a stitch marker to track the beginning of each round.
- The bodice band begins with a foundation chain long enough to match the bust measurement and is joined to work in the round. It is worked in solid single crochet, flat and dense, to create a structured strapless band.
- After the bodice band, the work transitions to honeycomb mesh for the body, with subtle shaping increases to widen the silhouette from bust to hip.
- The halter ties are attached at the center front top edge of the bodice and tied at the back of the neck.
- All turning chains in the bodice band do not count as the first stitch.
- The wrong side of the bodice band faces outward during construction but is then folded down and sewn to create a neat finished top edge. This creates the clean, double-layered top band visible in the finished piece.
Pattern Instructions
Section 1: Bodice Band
Note: The bodice band is worked in joined rounds. The wrong side faces outward during construction and will be folded down later.
With MC and larger hook, ch 126 (or desired bust circumference in multiples of 3). Sl st to first ch to form a ring, being careful not to twist.
Round 1: Ch 1, sc in each ch around. Sl st to first sc. (126 sc)
Rounds 2-16: Ch 1, sc in each st around. Sl st to first sc. (126 sc each round)
Fasten off. The bodice band should measure approximately 4 inches (10 cm) in height.
Section 2: Halter Tie Attachment
Cut 6 strands of MC yarn each measuring 3 times the desired finished cord length plus 10 inches for knotting. Divide into 3 groups of 2 strands. Anchor one end and braid to desired length. Knot both ends securely and trim to neaten.
Attach the braided cord to the center front top edge of the bodice band. Sew securely using a yarn needle and MC yarn.
Section 3: Mesh Body
Note: From this point, work in a continuous spiral without joining. Use a stitch marker to track the beginning of each round.
With RS facing and MC, join yarn with sl st to any stitch in Round 16 (the last round of the bodice band).
Adjustment Round: Ch 1, sc in first st, (sc in next 2 sts, 2 sc in next st) twice, sc in each remaining st around. Sl st to first sc. (132 sc)
Note: 132 divided by 3 = 44 repeats. This is now evenly divisible for the mesh stitch.
Round 1 of Mesh (Setup Round): Ch 1, sc in first sc, (ch 2, sk 2 sts, sc in next st) 43 times, ch 2, sk 2 sts, sl st to first sc. (44 sc, 44 ch-2 spaces)
Place stitch marker in the first sc of this round. Move marker up each round.
Round 2 of Mesh: Sc in first ch-2 sp, ch 2, (sc in next ch-2 sp, ch 2) around until 1 ch-2 sp remains, sc in last ch-2 sp, ch 2. (44 sc, 44 ch-2 spaces)
Round 3 of Mesh: Sc in first sc (of previous round), ch 2, (sc in next sc, ch 2) around. (44 sc, 44 ch-2 spaces)
Rounds 4 through 8 of Mesh: Continue alternating: even rounds work sc into ch-2 spaces, odd rounds work sc into sc stitches. (44 sc, 44 ch-2 spaces)
Mesh Increase Round 9: Sc in first sc, ch 2, (sc in next sc, ch 2) 10 times, [sc in next sc, ch 2, sc in same sc, ch 2] (increase 1 repeat), (sc in next sc, ch 2) 10 times, [sc in next sc, ch 2, sc in same sc, ch 2] (increase 1 repeat), (sc in next sc, ch 2) 10 times, [sc in next sc, ch 2, sc in same sc, ch 2] (increase 1 repeat), (sc in next sc, ch 2) to end of round. (47 sc, 47 ch-2 spaces)
Rounds 10 through 12 of Mesh: Continue alternating pattern. (47 sc, 47 ch-2 spaces)
Mesh Increase Round 13: Sc in first sc, ch 2, (sc in next sc, ch 2) 11 times, [sc in next sc, ch 2, sc in same sc, ch 2], (sc in next sc, ch 2) 11 times, [sc in next sc, ch 2, sc in same sc, ch 2], (sc in next sc, ch 2) 11 times, [sc in next sc, ch 2, sc in same sc, ch 2], (sc in next sc, ch 2) to end. (50 sc, 50 ch-2 spaces)
Rounds 14 through 16 of Mesh: Continue alternating pattern. (50 sc, 50 ch-2 spaces)
Sl st to next sc to close round. Fasten off and weave in end.
Checkpoint: After completing all 16 rounds of mesh, the mesh body section should measure approximately 8 inches (20 cm) in length. The hem circumference should measure approximately 37 to 38 inches (94 to 96 cm).
Section 4: Hem Border
With RS facing, join MC with sl st to any sc at the bottom edge of the mesh body.
Round 1: Ch 1, sc in each sc and in each ch-2 sp around. Sl st to first sc. (100 sc)
Rounds 2-3: Ch 1, sc in each st around. Sl st to first sc. (100 sc each round)
Fasten off and weave in ends.
Section 5: Flowers and Leaves Assembly
Crochet Flower (make 1 in CC1 dusty rose, 1 in CC2 cream):
With smaller hook (G/6), make a magic ring. Ch 1, work 6 sc into ring. Pull ring closed. (6 sc) (Ch 3, sl st into next sc) 6 times. (6 petals formed) Fasten off, leaving a 10-inch tail for sewing.
Crochet Leaf (make 2 in MC):
With smaller hook (G/6), ch 9. Starting in 2nd ch from hook, sc, hdc, dc, dc, hdc, sc, sl st. (7 sts worked, 1 sl st at tip) Do not turn. Working along the opposite side of the foundation chain, sl st, sc, hdc, dc, dc, hdc, sc. (7 sts on return side) Sl st into the first sc from Step 2 to close. Fasten off, leaving a 10-inch tail for sewing.
Assembly:
Arrange the flowers and leaves at the center front of the bodice band, positioning them just below the top folded edge and slightly left of center. The two leaves fan outward behind and below the flowers. Use yarn tails and a yarn needle to sew each piece securely to the bodice band. Weave in all ends on the wrong side.
Finishing and Blocking
Weave in all remaining yarn ends on the wrong side using a yarn needle. Trim ends close.
Wet block the finished top by soaking in cool water with a small amount of wool wash or gentle soap for 20 minutes. Gently press out excess water without wringing. Lay flat on blocking mats, shaping the bodice band to the target circumference and pinning the mesh open to maximize the honeycomb pattern. Smooth the hem border flat. Allow to dry completely before moving, approximately 24 hours.
Do not hang the top while wet, as the weight of wet cotton will stretch the mesh unevenly.
Once dry, attach flowers and leaves if not already done.
Care Instructions
Hand wash in cool to lukewarm water with a gentle detergent. Do not wring. Press water out gently between two towels. Lay flat to dry away from direct sunlight to prevent color fading. If machine washing, use a mesh laundry bag on the gentle cycle in cold water. Do not tumble dry. Do not iron mesh sections. Store folded flat rather than on a hanger to maintain shape.
Tips
- To adjust for a larger or smaller size, change the starting chain of the bodice in multiples of 3 (to maintain mesh divisibility after the adjustment round).
- To lengthen the bodice band, add more rounds of sc in Section 1 (and adjust the fold accordingly).
- To lengthen the mesh body, add additional even rounds of mesh between increase rounds.
- To add more hip flare, add one additional increase round with 3 additional repeats.
FAQs
Can I use a different yarn weight for this pattern?
This pattern is designed for worsted weight cotton. If you substitute a different weight, you will need to adjust hook size and work a gauge swatch to ensure the fit and drape are correct.
How do I make the top larger or smaller?
Adjust the starting chain of the bodice band in multiples of 3. This ensures the mesh stitch pattern will divide evenly after the adjustment round. You can also add or remove rounds in the mesh body to change the length.
Can I skip the tassels?
Yes, you can omit the tassels for a cleaner hemline. Simply finish the hem border as written and weave in all ends.
How do I attach the halter ties securely?
Sew the braided cord to the center front top edge of the bodice band using a yarn needle and MC yarn. Make several passes through the cord and the fabric to ensure it is firmly attached.
What if my mesh gauge is off?
Gauge is critical for a fitted garment. If your mesh gauge is off, adjust your hook size. A tighter gauge will result in a smaller, more structured top, while a looser gauge will give more drape and a larger fit.
Can I machine wash this top?
If using a machine-washable cotton like Lion Brand 24/7 Cotton, you can machine wash on a gentle cycle in cold water using a mesh laundry bag. Always lay flat to dry and do not tumble dry.
Pin This Crochet Pattern!