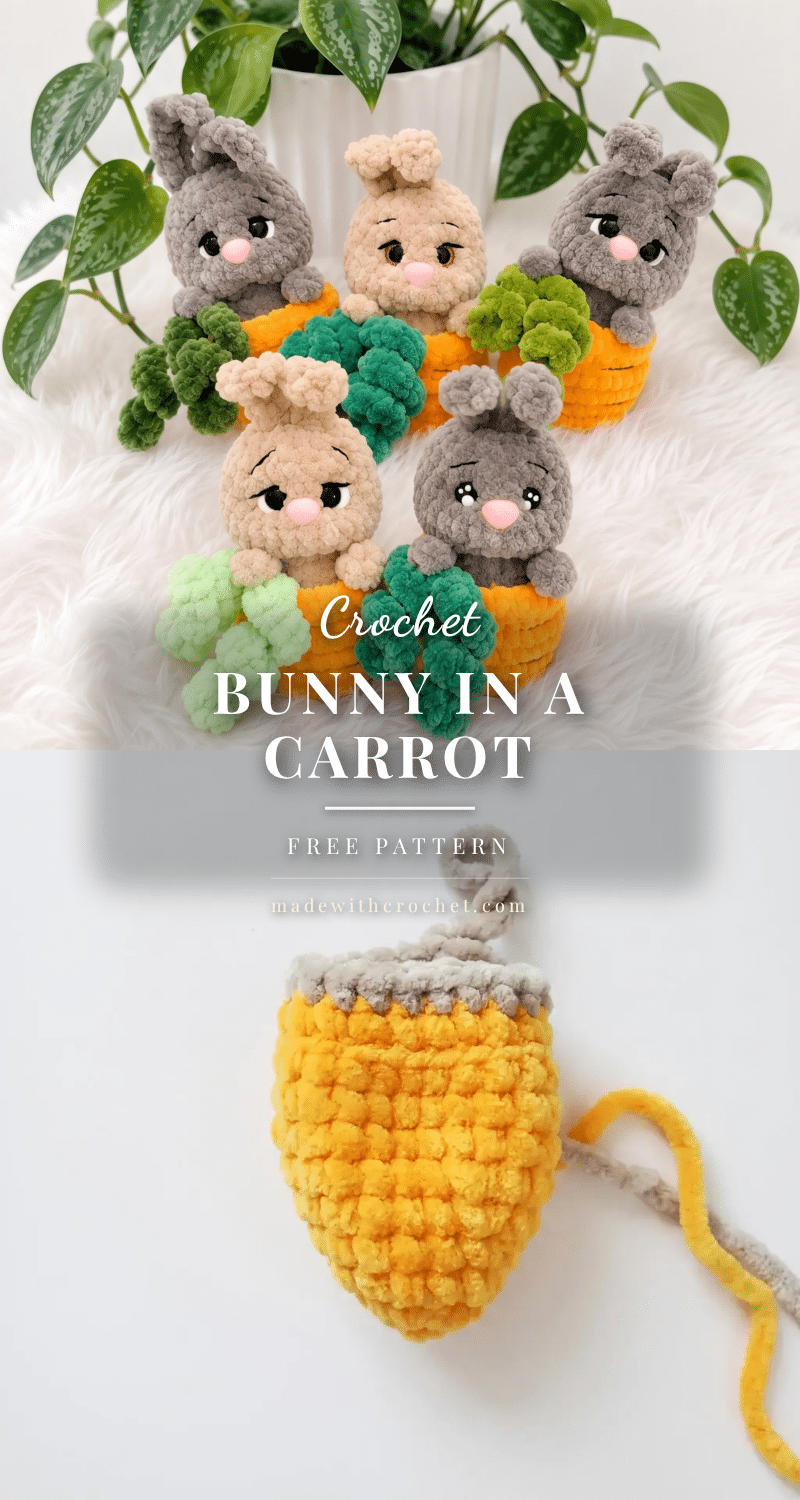
I remember the day I decided on the yarn for this bunny-in-a-carrot. I had a skein of the softest grey plush yarn, the kind that feels like a cloud, sitting next to a bright, cheerful orange. The grey was for the bunny, the orange for the carrot. It was a simple choice, but it felt intentional—the cool, calm grey against the warm, vibrant orange. That contrast is what makes this little amigurumi so special. It’s not just a toy; it’s a tiny story of a bunny finding its perfect home.
Yarn and Color Notes
The magic of this pattern lies in the yarn. The bulky plush or velvet yarn is what gives the bunny its soft, squishy texture and hides any small gaps between stitches. For the bunny, a soft grey or tan creates a gentle, natural look. The carrot, in a bright orange, provides a beautiful pop of color. The small amount of green yarn for the carrot top curls adds the perfect finishing touch. If you want a more whimsical feel, you could use a pastel orange or even a variegated yarn for the carrot. The choice is yours, but the plush texture is key to achieving the adorable, huggable result.
Project Overview
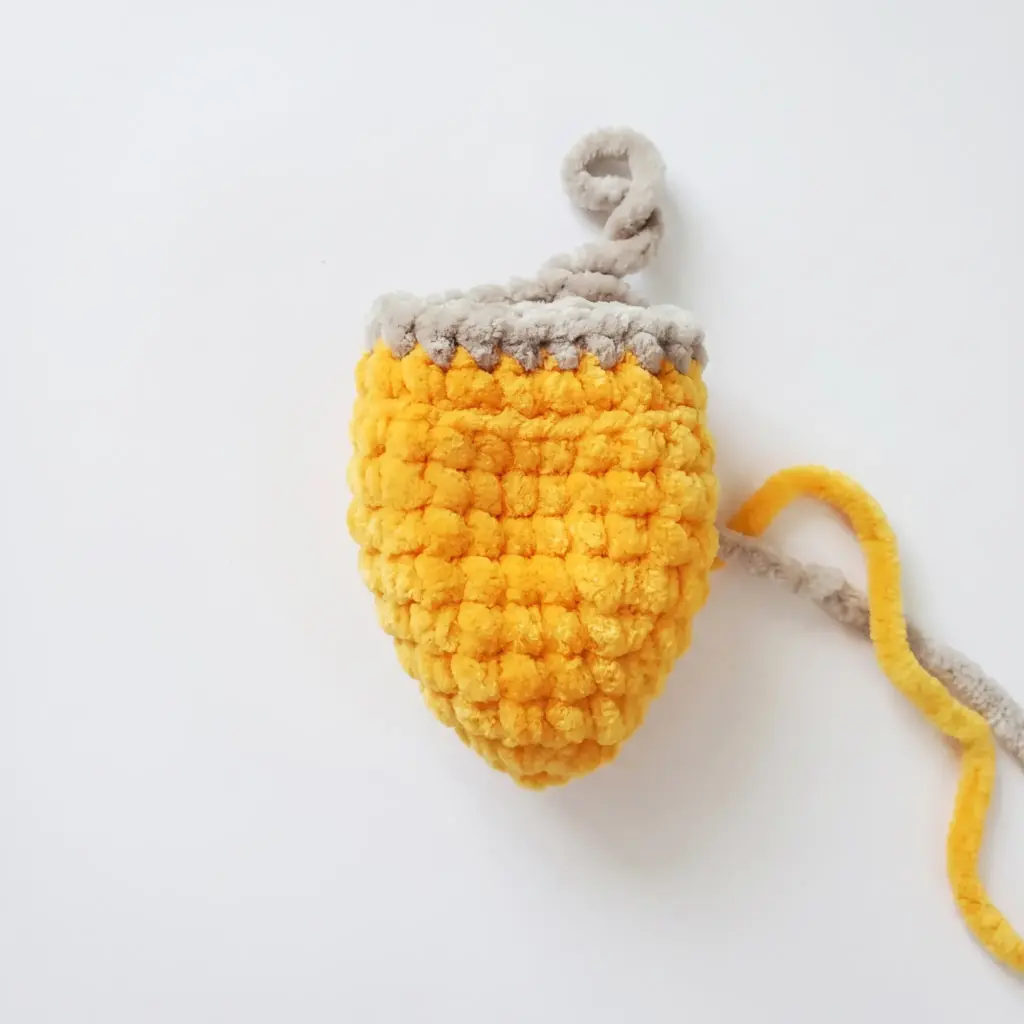
This pattern creates a sweet bunny nestled inside a carrot, standing about 5.5 inches tall. It’s a perfect project for confident beginners who have mastered the magic ring and for intermediate crocheters looking for a quick, satisfying weekend make. The piece works up in soft plush yarn and comes together in just a few sittings.
Materials
- Yarn: Bulky weight plush/velvet yarn — Main Color (bunny grey or tan) and Contrast Color (carrot orange), approximately 30g of each, plus small amounts of green yarn for the carrot top curls
- Hook: US G/6 (4mm)
- Safety eyes: 10mm, 1 pair
- Safety nose: 12x10mm or 10x11mm, 1 piece
- Stuffing: Polyester fiberfill
- Stitch marker
- Yarn needle (large eye) for sewing and embroidery
- Scissors
- Black yarn (fine cotton-blend, such as a sock or fingering weight) for embroidered facial details and carrot veins
- White plush yarn scrap for eye highlights
Abbreviations
- BLO — Back Loop Only
- ch — Chain
- dc — Double Crochet
- dec — Decrease (invisible decrease recommended)
- FLO — Front Loop Only
- hdc — Half Double Crochet
- inc — Increase (2 sc in same stitch)
- MR — Magic Ring
- Rnd — Round
- sc — Single Crochet
- sl st — Slip Stitch
- st(s) — Stitch(es)
Pattern Notes
This pattern is written in US crochet terminology. Work in continuous spiral rounds throughout — do not join or chain up between rounds. Place a stitch marker in the first stitch of each round and move it up as you go. Gauge is not critical for this project; finished size depends on your yarn and tension, but using bulky plush yarn with a 4mm hook yields a bunny approximately 5.5 inches tall. Stitch count is given at the end of each round in parentheses, like this: (24). Stuff the piece firmly and evenly as you work — this pattern requires stuffing while crocheting, not just at the end, since the opening closes up as you decrease. The safety nose is inserted between Rounds 18 and 19 of the head, and the safety eyes are inserted between Rounds 19 and 20, spaced 5 single crochets apart. The two front legs are worked directly into Round 12 of the body — no separate leg pieces are needed.
Pattern Instructions
Carrot Body & Bunny Torso
Start with the Contrast Color (carrot orange).
- Rnd 1: 6 sc in MR. (6)
- Rnd 2: inc in each st around. (12)
- Rnd 3: 3 sc, inc repeat around. (15)
- Rnd 4: 4 sc, inc repeat around. (18)
- Rnd 5: 5 sc, inc repeat around. (21)
- Rnd 6: 6 sc, inc repeat around. (24)
- Rnds 7–9: sc in each st around. (24)
- Rnd 10: working in BLO for the entire round, 4 sc, dec repeat around. (20)
Switch to the Main Color (bunny body color).
- Rnd 11: sc in each st around. (20)
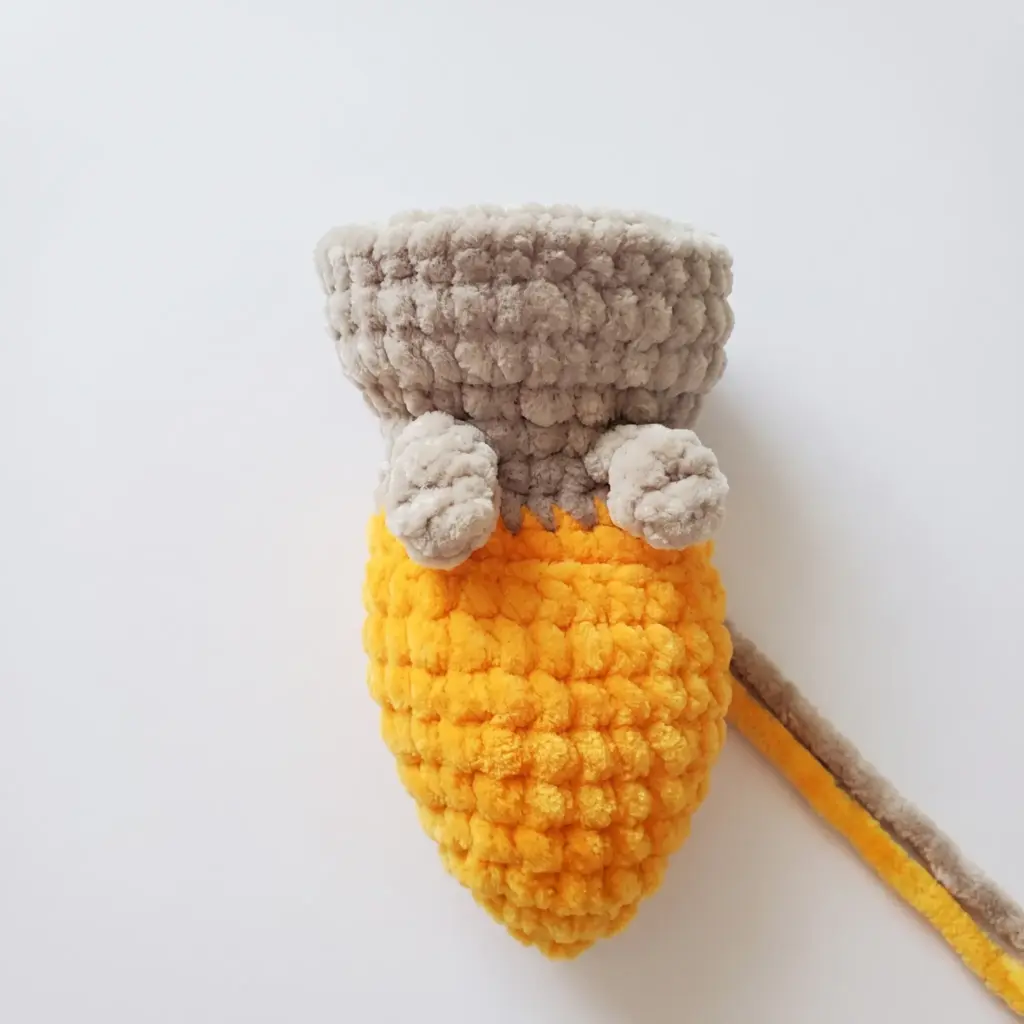
- Rnd 12: 9 sc, then work the first leg: sl st into the FLO of the next stitch, ch 4, working into the 2nd ch from hook make 1 dc, 1 hdc, 1 sc, then sl st into the front loop of the base stitch to close the leg. Continue with 4 sc, then work the second leg the same way, then 5 sc. (20 body sts total; the two legs are worked as appendages and are not included in the round count.)
- Rnd 13: 2 sc, dec repeat around. (15)
Head
- Rnd 14: inc in each st around. (30)
- Rnds 15–17: sc in each st around. (30)
- Rnd 18: 3 sc, dec repeat around. (24)
- Rnds 19–20: sc in each st around. (24)
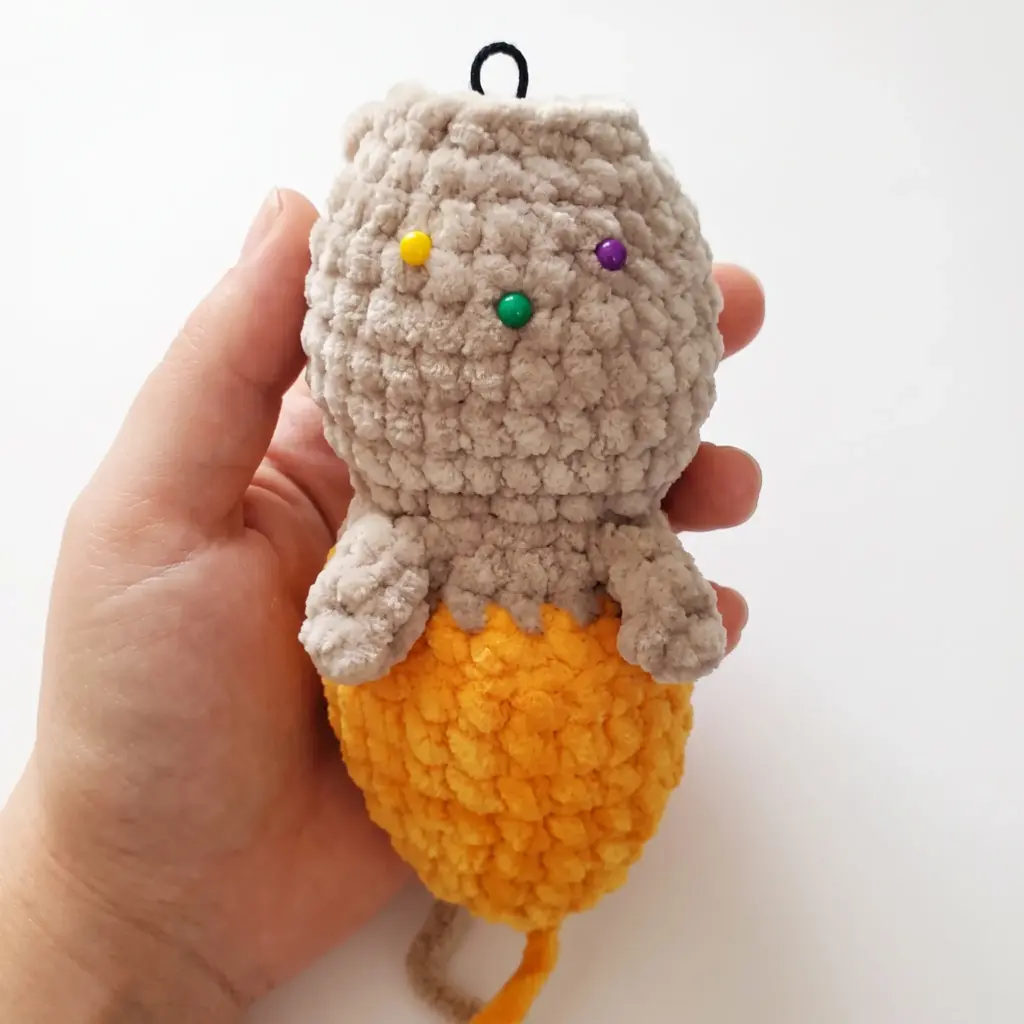
Insert the safety nose between Rounds 18 and 19, centered on the face. Insert the safety eyes between Rounds 19 and 20, spacing them 5 sc apart across the front of the face.
- Rnd 21: 2 sc, dec repeat around. (18)
- Rnd 22: 1 sc, dec repeat around. (12)
- Rnd 23: dec around. (6)
Finish stuffing the head firmly before closing. Fasten off, leaving a tail. Weave the tail through the remaining 6 stitches, pull tight to close the opening, and secure.
Ears (make 2)
- Row 1: Ch 6. Starting in the 2nd ch from hook, work 3 dc in the same stitch, then sc in the remaining 4 chains.
Leave long yarn tails on each ear for sewing onto the head.
Small Carrot Curl
- Row 1: Ch 10. Starting in the 2nd ch from hook, 3 sc in same st repeat across 8 times, then 1 sc in the last chain. Fasten off, leaving a tail for sewing.
Large Carrot Curl
- Row 1: Ch 15. Starting in the 2nd ch from hook, 2 sc in same st repeat across 13 times, then 1 sc in the last chain. Fasten off, leaving a tail for sewing.
Assembly
- Cinch the eyes. Thread your yarn needle and insert it between Rounds 14 and 15 at the base of the face, offsetting 1 sc from the center, and bring it out at the lower outer corner of one eye. Insert into the lower inner corner of the same eye and return to the original entry point. Repeat this same path once more through the starting tail’s entry point for extra hold, then pull both tails evenly so the eyes sink slightly into the head. Secure the tails and hide them inside the head.
- Embroider the face. Using white yarn, embroider small eye highlights over each safety eye. Using black yarn, embroider the upper lash lines above each eye — pin or baste the thread first to test placement before stitching permanently. Embroider two small eyebrow lines above the eyes.
- Attach the ears. Position both ears on top of the head, angled slightly to one side for a relaxed look, and whipstitch them in place using their yarn tails.
- Finish the carrot base. Turn the carrot body upside down and, working into Round 10 (the BLO round), single crochet 24 stitches evenly around the remaining front-loop circle to create a clean rim. Fasten off, weave in the end, and tuck it out of sight.
- Add the carrot veins. Using black yarn, embroider a few short vertical lines down the front of the carrot to mimic natural carrot texture.
- Sew on the greenery. Position the small and large curls together at the top of the carrot, between Rounds 10 and 11 of the body, and whipstitch them securely in place using their yarn tails.
- Weave in all remaining ends throughout the piece, checking that no loose tails are visible.
Tips & Tricks
- Keep your tension tight and even throughout, especially on the carrot and head. Amigurumi worked with plush yarn hides gaps well, but a snug gauge keeps stuffing from peeking through between stitches.
- When you reach the invisible decreases in Round 10, work them slowly and check that you’re only catching the back loops. This creates the clean ridge line that separates the carrot body from the bunny torso above it.
- Stuff as you go rather than waiting until the end. Pack the carrot firmly before you finish Round 10, then continue stuffing the torso and head in stages as each section closes in, using a chopstick or stuffing tool to push fill evenly into the legs and rounded curves.
- If you swap the recommended bulky plush yarn for a thinner weight, size down your hook slightly to avoid visible gaps, and expect a smaller finished bunny. Plush yarns are forgiving, but lighter yarns will show stitch definition more clearly.
- When sewing the ears and carrot curls, work your whipstitch through the outer loops only on the attachment piece, keeping stitches small and close together so the seam disappears into the plush texture rather than sitting on top of it.
Frequently Asked Questions
What size hook and yarn should I use for this bunny-in-a-carrot pattern?
Use a US G/6 (4mm) hook with bulky weight plush yarn for the best results. This combination produces a finished bunny approximately 5.5 inches tall with the plush texture shown in the original design.
Do I need to stuff the piece as I go, or can I wait until the end?
Stuff the piece as you go rather than waiting until the end. The pattern requires stuffing while crocheting because the opening closes up as you decrease. Pack the carrot firmly before finishing Round 10, then continue stuffing the torso and head in stages.
How do I attach the safety eyes and nose?
The safety nose is inserted between Rounds 18 and 19 of the head, centered on the face. The safety eyes are inserted between Rounds 19 and 20, spaced 5 single crochets apart across the front of the face. After insertion, you will cinch the eyes to sink them slightly into the head for a more realistic look.
Can I use a different yarn weight?
Yes, but if you swap the recommended bulky plush yarn for a thinner weight, size down your hook slightly to avoid visible gaps. Expect a smaller finished bunny. Plush yarns are forgiving, but lighter yarns will show stitch definition more clearly.
How do I make the legs?
The two front legs are worked directly into Round 12 of the body. You do not need to make separate leg pieces. The instructions guide you through creating the legs as appendages while continuing to crochet the body.
What if I don’t have a safety nose?
If you don’t have a safety nose, you can embroider a small nose using black yarn. Simply stitch a small triangle or oval shape in the center of the face between Rounds 18 and 19.
Pin This Crochet Pattern!