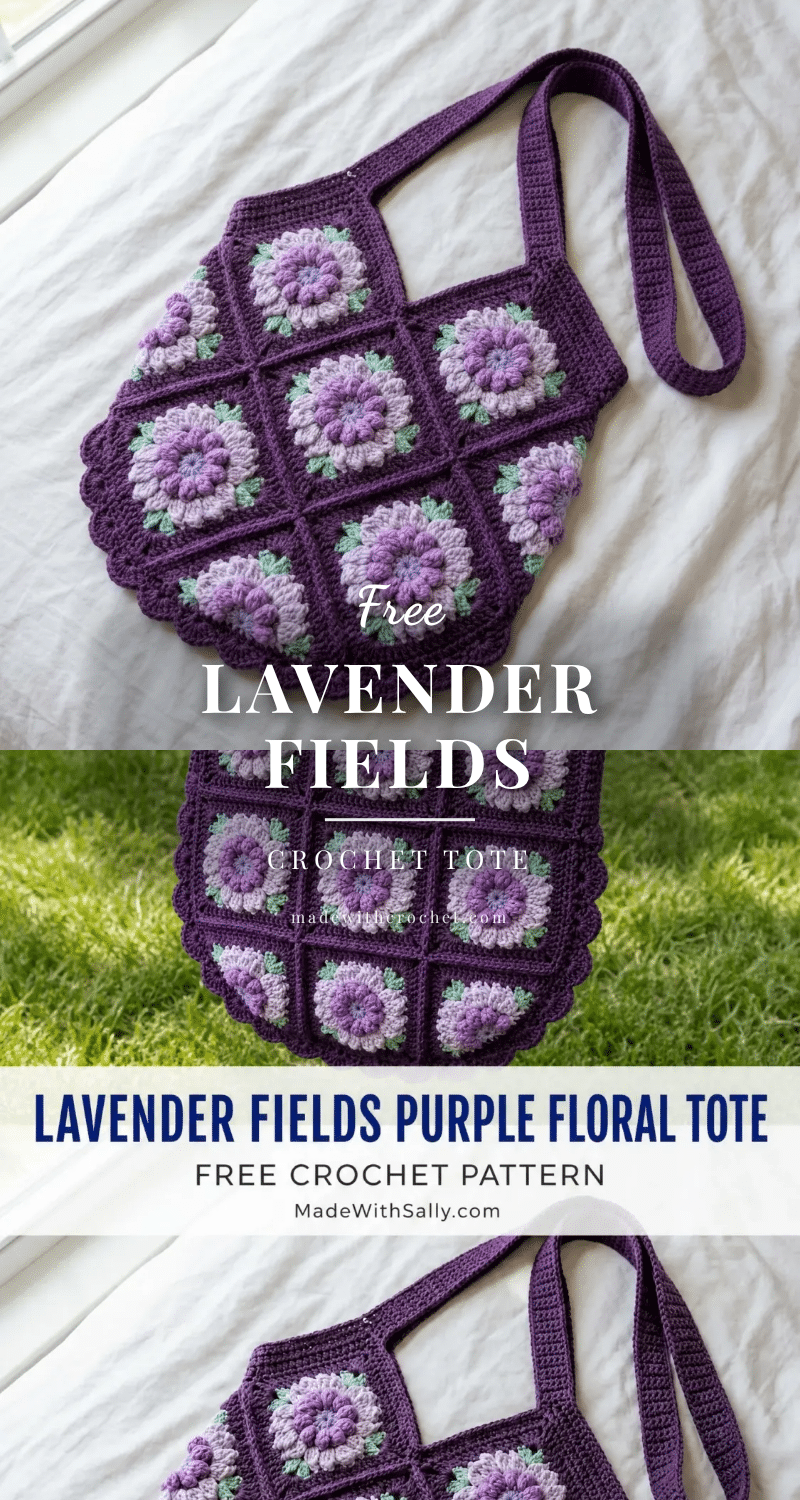
There’s something deeply satisfying about settling in for a quiet evening with a small batch of yarn, counting stitches as a relaxing repeat takes over. The Lavender Fields Purple Floral Tote is the perfect companion for those cozy moments—a project that feels like a gentle ritual from the very first granny square to the final seam. With its raised puff stitch flowers, delicate mint green leaves, and deep purple frame, this bag looks far more intricate than it actually is, making it a joy to create and an even greater joy to carry.
Small Details That Make It Better
What sets this tote apart is the thoughtful interplay of texture and color. The three-dimensional puff stitch flower centers add a tactile “wow” factor that flat embroidery simply can’t match, while the mint green leaf clusters provide a fresh contrast against the rich purple tones. The deep purple outer frame on each square creates a striking grid when joined, giving the bag a structured, polished look. Whether you choose a soft cotton blend for everyday durability or a wool blend for a more luxurious feel, the yarn choices will subtly shift the bag’s personality—from casual and carefree to elegant and refined. This is a project that rewards patience with a truly stunning result.
Project Overview
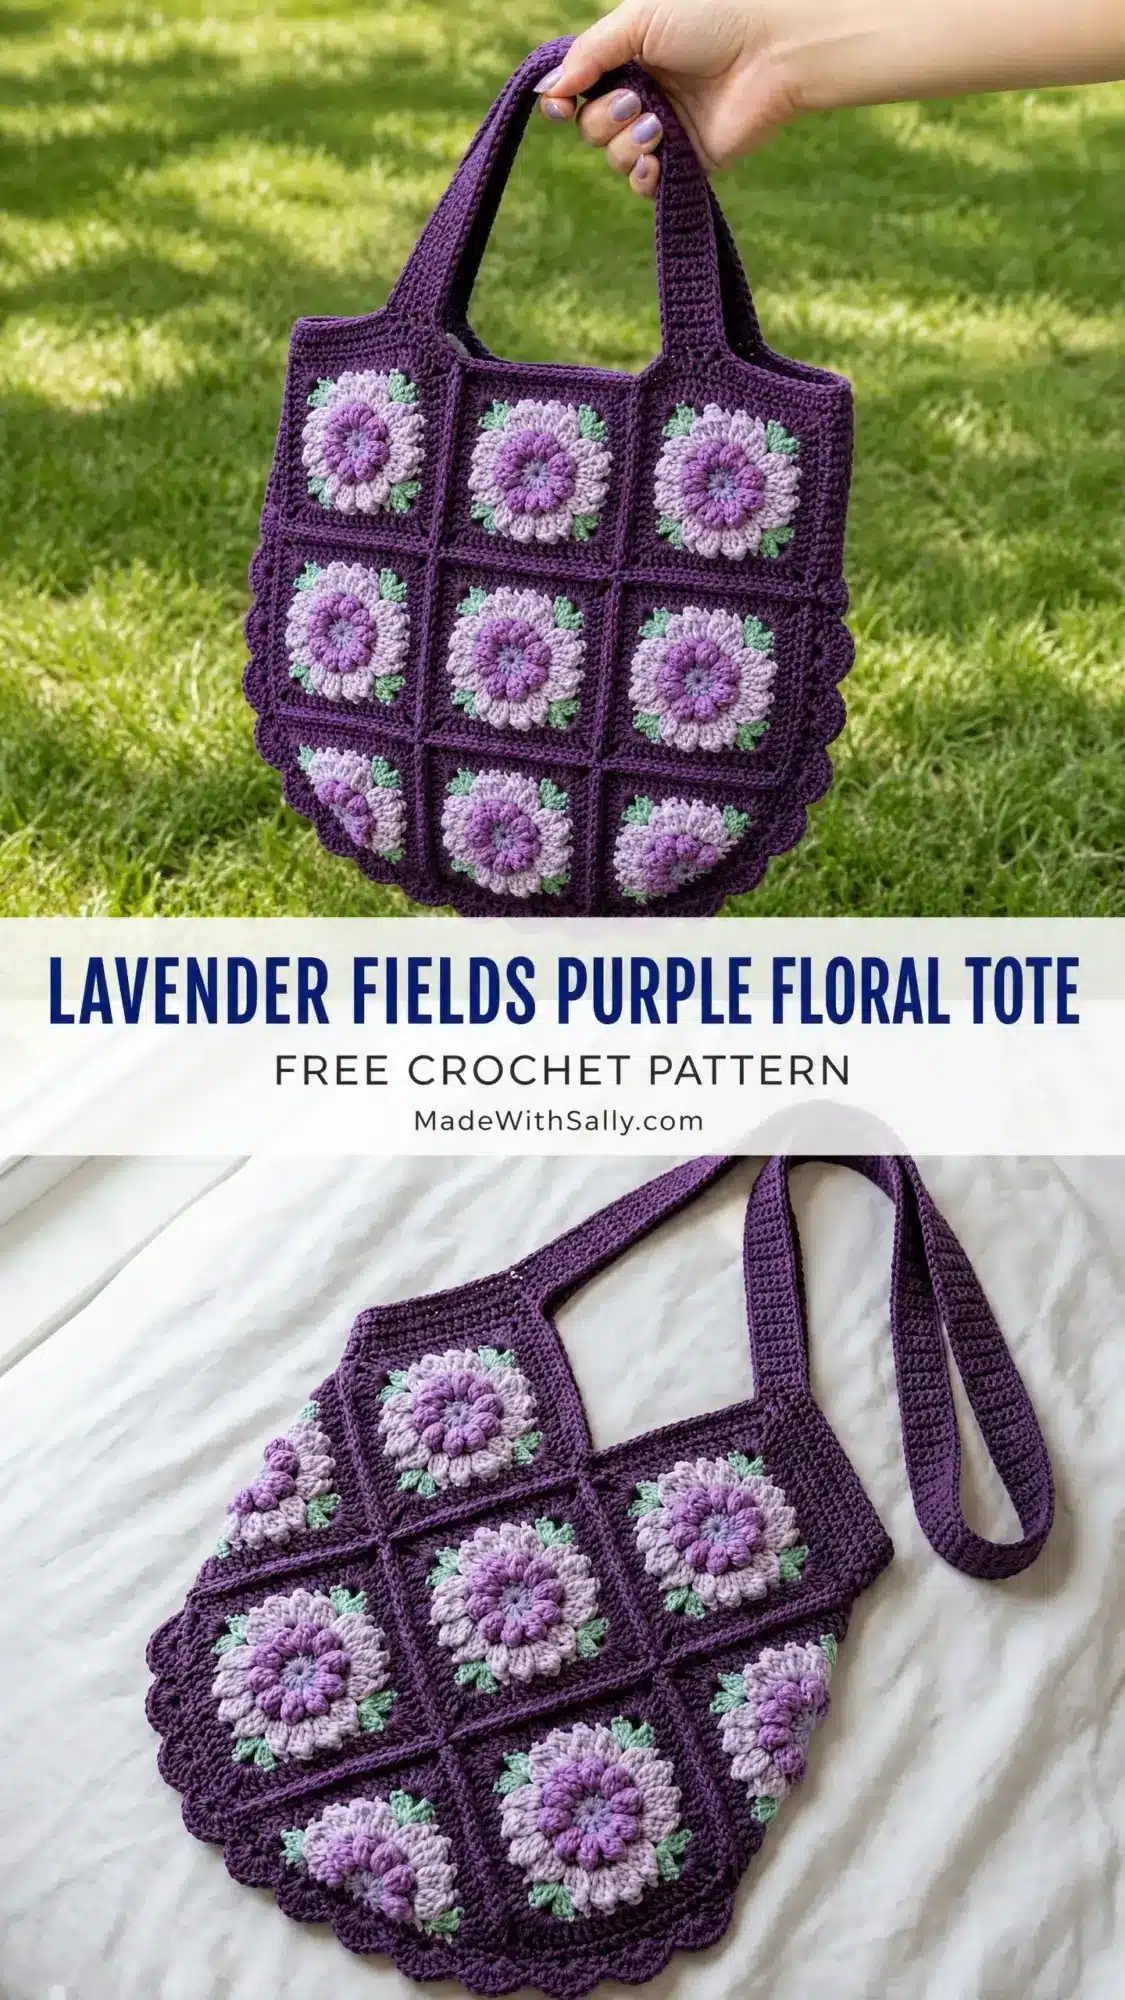
This structured tote features eighteen identical floral granny squares arranged in a 3×3 grid on each side. The squares are joined and framed with a deep purple border, creating a beautiful grid effect. The bag includes a flat rectangular bottom, gusseted sides for real depth, a scalloped decorative edge, and a long crocheted shoulder strap. Each square showcases a three-dimensional puff stitch flower center in lavender and light purple tones, surrounded by mint green leaf clusters and finished with a solid deep purple outer frame.
Skill Level
This pattern is intermediate level. You should be comfortable with granny squares, puff stitches, joining methods, working in rounds, and crocheting a long narrow strap. No advanced shaping is involved, but the three-dimensional puff flower and precise joining of 18 squares requires patience and careful counting. Don’t let “intermediate” scare you off if you’re an adventurous beginner—if you’ve made a few granny squares and you’re willing to learn the puff stitch, you can absolutely tackle this project.
Time Estimate
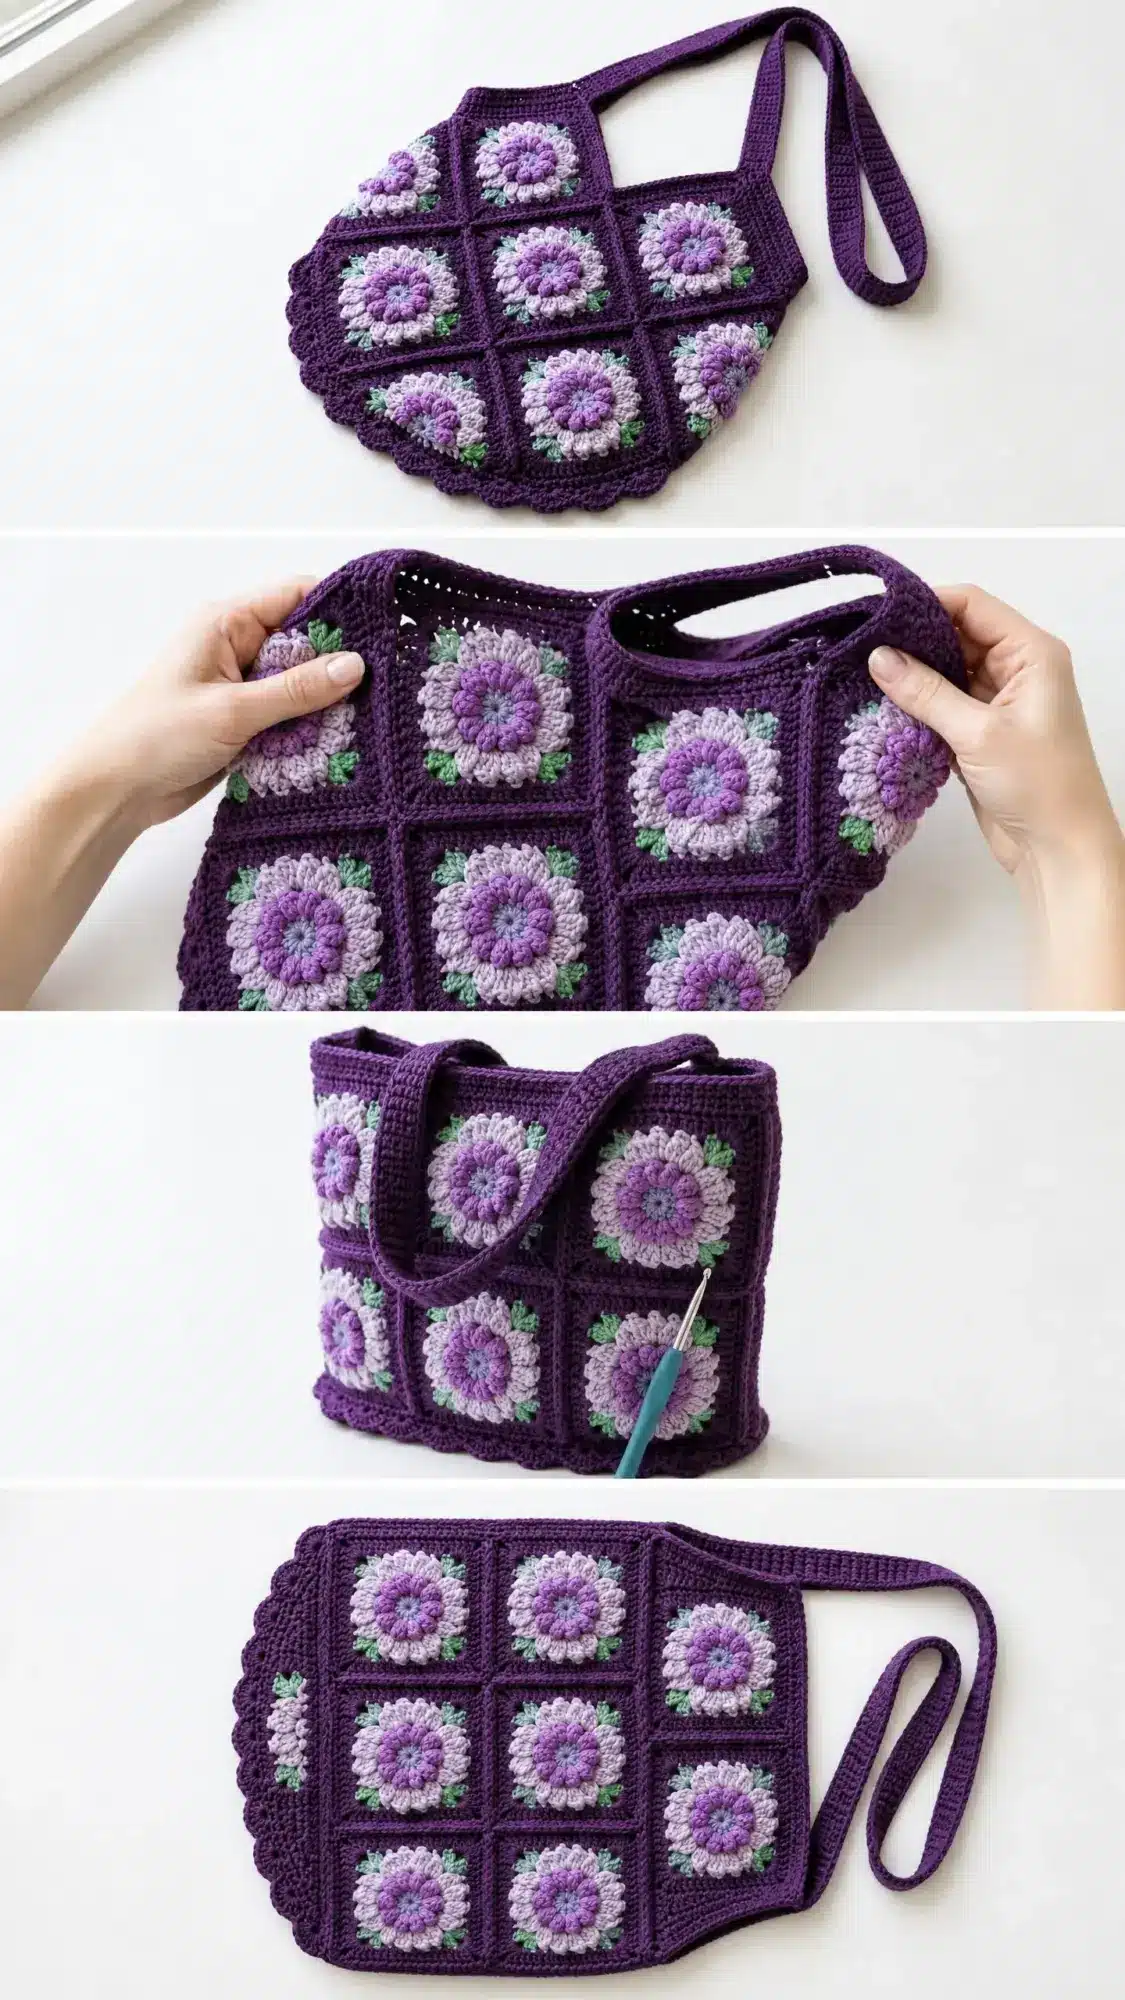
Plan for 20 to 30 hours depending on your speed. Each square takes approximately 30 to 45 minutes. Joining, the border, and strap add another 6 to 8 hours. This is a wonderful project to work on over a few weeks, making a square or two each evening.
Finished Measurements
The completed bag measures approximately 14 inches wide by 13 inches tall (not including the strap), with a gusset depth of approximately 3 inches. In metric: approximately 35.5 cm wide by 33 cm tall, with a 7.5 cm gusset depth. Each granny square measures approximately 4.5 inches (11.5 cm) square after joining and light blocking.
Materials
- Yarn: Worsted weight (Category 4) in five colors:
Color A (deep purple): approximately 800 yards (730 m)
Color B (light lavender): approximately 400 yards (365 m)
Color C (medium purple): approximately 150 yards (137 m)
Color D (dusty lilac or pale lavender-pink): approximately 100 yards (91 m)
Color E (soft mint green): approximately 100 yards (91 m) - Hook: US size J-10 (6.0 mm) crochet hook
- Notions: Yarn needle for weaving ends, scissors, stitch markers (at least 6), rust-proof pins for blocking. Optional: 14 by 14 inch piece of sturdy woven fabric for interior lining, sewing needle and thread if adding lining.
Yarn Suggestions
- Option 1: Lion Brand Vanna’s Choice in Dusty Purple (Color A), Dusty Lavender (Color B), Purple (Color C), Pale Lavender (Color D), and Mint (Color E). This yarn is widely available, affordable, and has excellent stitch definition for puff stitches.
- Option 2: Paintbox Yarns Simply DK held double as a worsted substitute, in Violet Purple, Lilac, Wisteria Purple, Baby Pink, and Spearmint Green. Holding two strands together gives wonderful drape and structure for a tote.
- Option 3: WeCrochet Wool of the Andes Worsted in Eggplant (Color A), Haze (Color B), Amethyst Heather (Color C), Blossom Heather (Color D), and Spearmint (Color E). The wool content adds structure and blocks beautifully.
Substitution Note: Any smooth worsted weight yarn that achieves the stated gauge will work. Avoid very fuzzy or textured yarn as it obscures the puff stitch detail. Cotton or cotton-blend yarns are excellent for a tote as they add structure and are machine washable.
Gauge
One completed granny square = 4.5 inches (11.5 cm) square, blocked. In single crochet (sc): 14 sc and 16 rows = 4 inches (10 cm) with a J-10 hook. Gauge matters here for the final bag dimensions and for ensuring squares join neatly. Swatch and adjust your hook size if needed.
Abbreviations (US Terms)
- beg = beginning
- ch = chain
- ch-sp = chain space
- dc = double crochet
- hdc = half double crochet
- ps = puff stitch
- rep = repeat
- rnd = round
- RS = right side
- sc = single crochet
- sk = skip
- sl st = slip stitch
- sp = space
- st(s) = stitch(es)
- WS = wrong side
- yo = yarn over
Pattern Notes
- All rounds are worked on the RS unless otherwise stated.
- Chain 3 at the start of a double crochet round counts as the first dc throughout.
- Chain 2 at the start of a half double crochet round counts as the first hdc throughout.
- When changing colors, draw the new color through the final two loops of the last stitch in the old color. Fasten off and weave in ends after each color change unless instructed to carry the yarn.
- The puff stitches are worked into chain spaces, not into the top of stitches, to allow the three-dimensional flower to sit above the fabric surface.
- Block all squares before joining for best results.
Special Stitches
Puff Stitch (ps)
This creates the beautiful raised bobble effect at the flower center. Here’s how to work it step by step:
- Yarn over, insert hook into indicated stitch or space.
- Yarn over, pull up a loop to the height of a double crochet (3 loops on hook).
- Yarn over, insert hook into the same stitch or space again.
- Yarn over, pull up a loop to the same height (5 loops on hook).
- Yarn over, insert hook into the same stitch or space a third time.
- Yarn over, pull up a loop to the same height (7 loops on hook).
- Yarn over, draw through all 7 loops on hook.
The key is pulling up each loop to the same height. This keeps your puffs even and plump.
3-dc Cluster
- Yarn over, insert hook into indicated stitch or space, yarn over, pull up a loop, yarn over, draw through 2 loops (2 loops remain on hook).
- Yarn over, insert hook into same stitch or space, yarn over, pull up a loop, yarn over, draw through 2 loops (3 loops remain on hook).
- Yarn over, insert hook into same stitch or space, yarn over, pull up a loop, yarn over, draw through 2 loops (4 loops remain on hook).
- Yarn over, draw through all 4 loops.
Scallop Stitch
- Skip 2 stitches.
- Work 5 dc into the next stitch.
- Skip 2 stitches.
- Sl st into the next stitch.
This creates one complete scallop shell over 6 stitches.
Flat Join
With RS facing, hold two squares together with edges aligned. Insert hook through both corresponding corner or edge stitches, draw up a loop of Color A, ch 1, then sc through both layers across the edge. This creates a visible ridge on the RS that frames each square with Color A.
Pattern Instructions
Granny Square (Make 18)
The flower is worked in rounds using Colors B, C, D, and E, with Color A for the outer frame.
With Color B, make a magic ring (or ch 4 and join with sl st to form a ring).
Round 1 (Color B): Ch 1 (does not count as st), work 8 sc into the ring. Join with sl st to first sc. Fasten off Color B.
Joining Squares Into Panels
Each panel is 3 squares wide and 3 squares tall, giving a panel that measures approximately 13.5 inches (34 cm) wide by 13.5 inches (34 cm) tall before the gusset and border are added.
Arrange 9 squares in a 3×3 grid on a flat surface with all RS facing up. Arrange squares so that the leaf points of adjacent squares create a consistent directional pattern if desired, or orient randomly for a more relaxed look.
Step 1 – Vertical joins: Hold the top-right square and top-middle square with RS together. Using Color A and the flat join method, sc through both layers along the shared edge. Work 1 sc into each dc stitch along the edge. At the corner ch-2 sp, work 3 sc into the corner space. Continue along the edge (approximately 20 sc per seam including corners). Fasten off. Repeat to join the top-middle to the top-left square. Repeat for the middle row and bottom row (6 vertical seams per panel).
Step 2 – Horizontal joins: Hold the top row and middle row with RS together. Using Color A and the flat join method, sc through both layers along the full shared edge, working across all 3 squares in the row. Work through the seam intersections firmly. Fasten off. Repeat to join the middle row to the bottom row (2 horizontal seams per panel).
Make 2 panels in this way (front and back).
Checkpoint: Each completed panel should measure approximately 13.5 inches (34 cm) square. The join seams create a dark purple grid over the RS.
Gusset Strip
With Color A, ch 11 (or desired width for gusset depth). Work in rows of sc until the strip measures approximately 42 inches (107 cm) long, or long enough to go around three sides of one panel (right side, bottom, left side) with a little ease. Fasten off.
Assembling the Bag Body
Step 1: With Color A and RS facing out, pin the gusset strip around three sides of the front panel: starting at the top right corner, running along the right side, across the bottom, and up the left side to the top left corner. The strip should be flat against the panel edge with WS of strip facing the WS of the panel.
Step 2: Using Color A, sc the gusset strip to the front panel edge. Work 1 sc through both the gusset edge and the panel edge for every row or stitch along the edge. At the bottom corners, ease the strip around by working 3 sc into the corner of the gusset. Fasten off.
Step 3: Attach the back panel in the same way. Pin the opposite long edge of the gusset strip to the back panel, RS out. Sc the back panel to the gusset strip along all three sides (right side, bottom, left side). Fasten off.
The top of the bag is left open.
Checkpoint: The bag body is now three-dimensional. When held open, it should measure approximately 14 inches (35.5 cm) wide, 13 inches (33 cm) tall, and 3 inches (7.5 cm) deep.
Top Edge Finishing
With Color A, join with sl st to the top right corner of the bag opening.
Round 1: Ch 1. Work 1 sc into each available stitch around the entire top opening of the bag, including through the strap attachment points. Join with sl st (approximately 92 sc around the top opening).
Round 2: Ch 1. Work 1 hdc into each sc around. Join with sl st. Fasten off.
This creates a neat, sturdy top rim around the bag opening.
Assembly
Before joining, wet block each granny square by submerging in cool water, gently squeezing out excess water in a towel, and pinning to a blocking mat to 4.5 inches (11.5 cm) square. Allow to dry completely (12 to 24 hours).
After the bag is fully assembled, lightly mist the exterior with water and reshape by hand. Stuff the bag with plastic bags or a towel to hold the rectangular shape while drying.
Weave in all ends securely, leaving at least a 4-inch (10 cm) tail on each end and weaving in two or more directions. Trim all ends close after weaving.
Tips
- To make a larger bag: Use a 4-square by 4-square grid (16 squares per panel, 32 total) and adjust the gusset length and strap accordingly. The bag will be approximately 18 by 18 inches (46 by 46 cm).
- To make a smaller clutch version: Use a 2-square by 2-square grid (4 squares per panel, 8 total) with a short strap or handles, approximately 9 by 9 inches (23 by 23 cm).
- To change the gusset width: Simply change the starting chain of the gusset strip. Each additional stitch adds approximately 0.3 inches (7 mm) to the bag depth.
- To adjust the square size: Change hook size or yarn weight. Using DK weight on a US size G-6 (4 mm) hook produces squares of approximately 3.5 inches (9 cm) each.
Care Instructions
- If worked in acrylic yarn: Machine wash on a gentle cycle in cold water, lay flat to dry. Do not tumble dry with heat as it may distort the puff stitches.
- If worked in wool or wool-blend yarn: Hand wash in cool water with gentle wool wash, roll in a towel to remove excess water, reshape and lay flat to dry.
- Do not iron directly over the puff stitch areas as this will flatten the three-dimensional texture.
- Store folded or hanging. If hanging on a hook, use a wide hanger to avoid distorting the strap.
Frequently Asked Questions
Can I use a different yarn weight for this pattern?
Yes, but you will need to adjust your hook size and check your gauge. Using DK weight yarn with a smaller hook will produce smaller squares, while bulky yarn will make larger squares. Be sure to block and measure your swatch before committing to the full project.
How do I keep my puff stitches even?
The key is pulling up each loop to the same height—aim for the height of a double crochet. Practice on a small swatch first to get a feel for the tension. Using a smooth, non-fuzzy yarn also helps the stitches stand out clearly.
Can I add a lining to the bag?
Absolutely! A lining adds structure and helps the bag hold its shape. Use a 14 by 14 inch piece of sturdy woven fabric and sew it to the inside of the bag after assembly. This is optional but recommended for everyday use.
What if my squares don’t measure exactly 4.5 inches after blocking?
If your squares are slightly off, you can adjust by blocking them to the correct size. If they are significantly different, check your gauge and consider changing your hook size. Consistent square size is important for neat joining.
How do I attach the strap securely?
When attaching the strap, sew through both the strap ends and the top edge of the bag, reinforcing with extra stitches for durability. You can also add a small fabric patch on the inside for added strength if you plan to carry heavy items.
Can I make this bag with fewer colors?
Yes, you can simplify the color palette. For a monochromatic look, use different shades of the same color for the flowers and frame. Alternatively, use just two or three colors for a more modern, minimalist design.
Pin This Crochet Pattern!