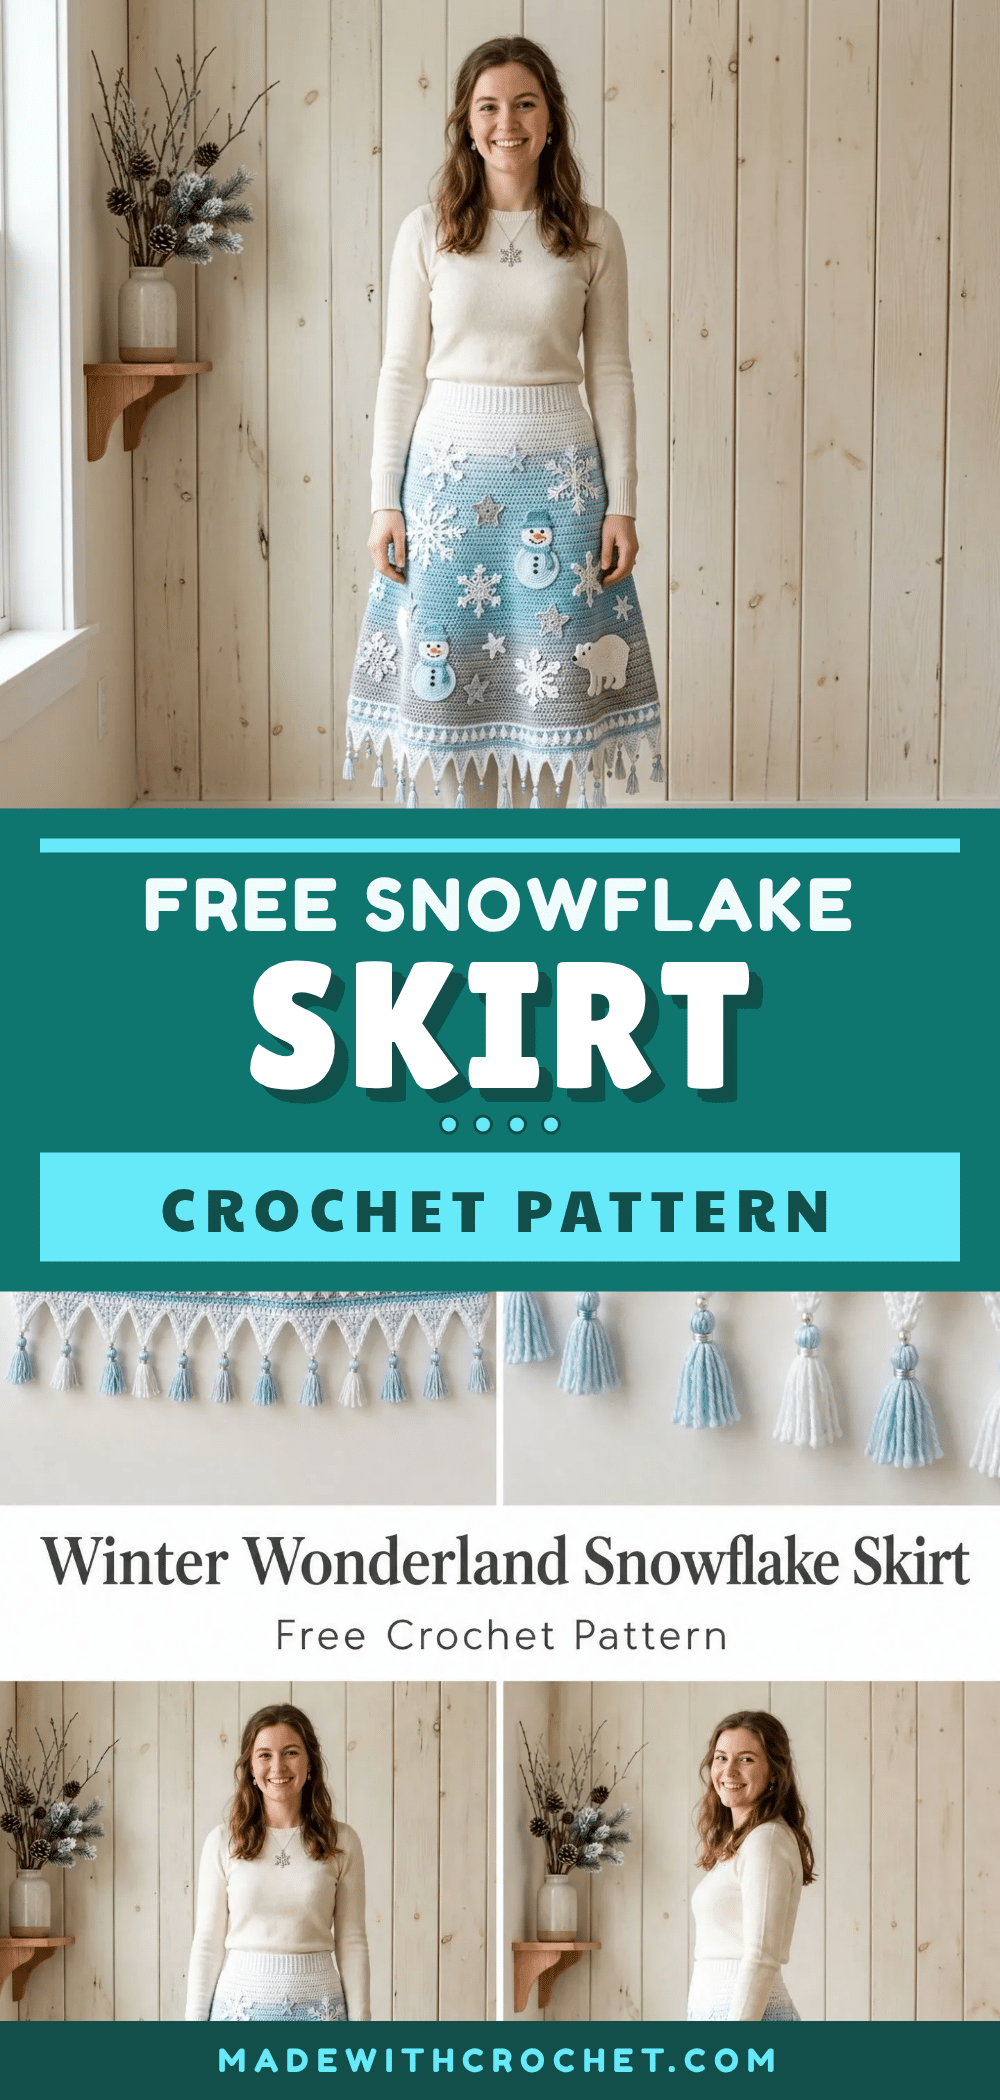
When I finished this Winter Wonderland Snowflake Skirt, I just stood there holding it up, grinning. It’s one of those rare projects that looks complicated enough to impress other crocheters but is actually built on simple single crochet rounds. The ombre color transition, the dimensional snowflakes, the cheerful snowmen with their tiny scarves, and that sweet polar bear peeking out from the hem—it all comes together into a wearable piece of winter art. Whether you’re making it for holiday parties, winter photos, or just because you want something cozy and beautiful, this skirt delivers.
Why the Finished Piece Stands Out
What makes this skirt special is the way the appliques sit on the fabric. Because the body is worked in dense single crochet, the snowflakes, stars, snowmen, and polar bear don’t get lost in the texture. They pop. The ombre effect from white through sky blue to medium gray gives the skirt depth without being busy, and the picot-tassel hem adds movement that catches the light. It’s a project that looks like a lot of work—and it is—but every piece you finish feels like a small victory. The finished skirt is warm, whimsical, and absolutely giftable for anyone who loves winter.
Project Overview
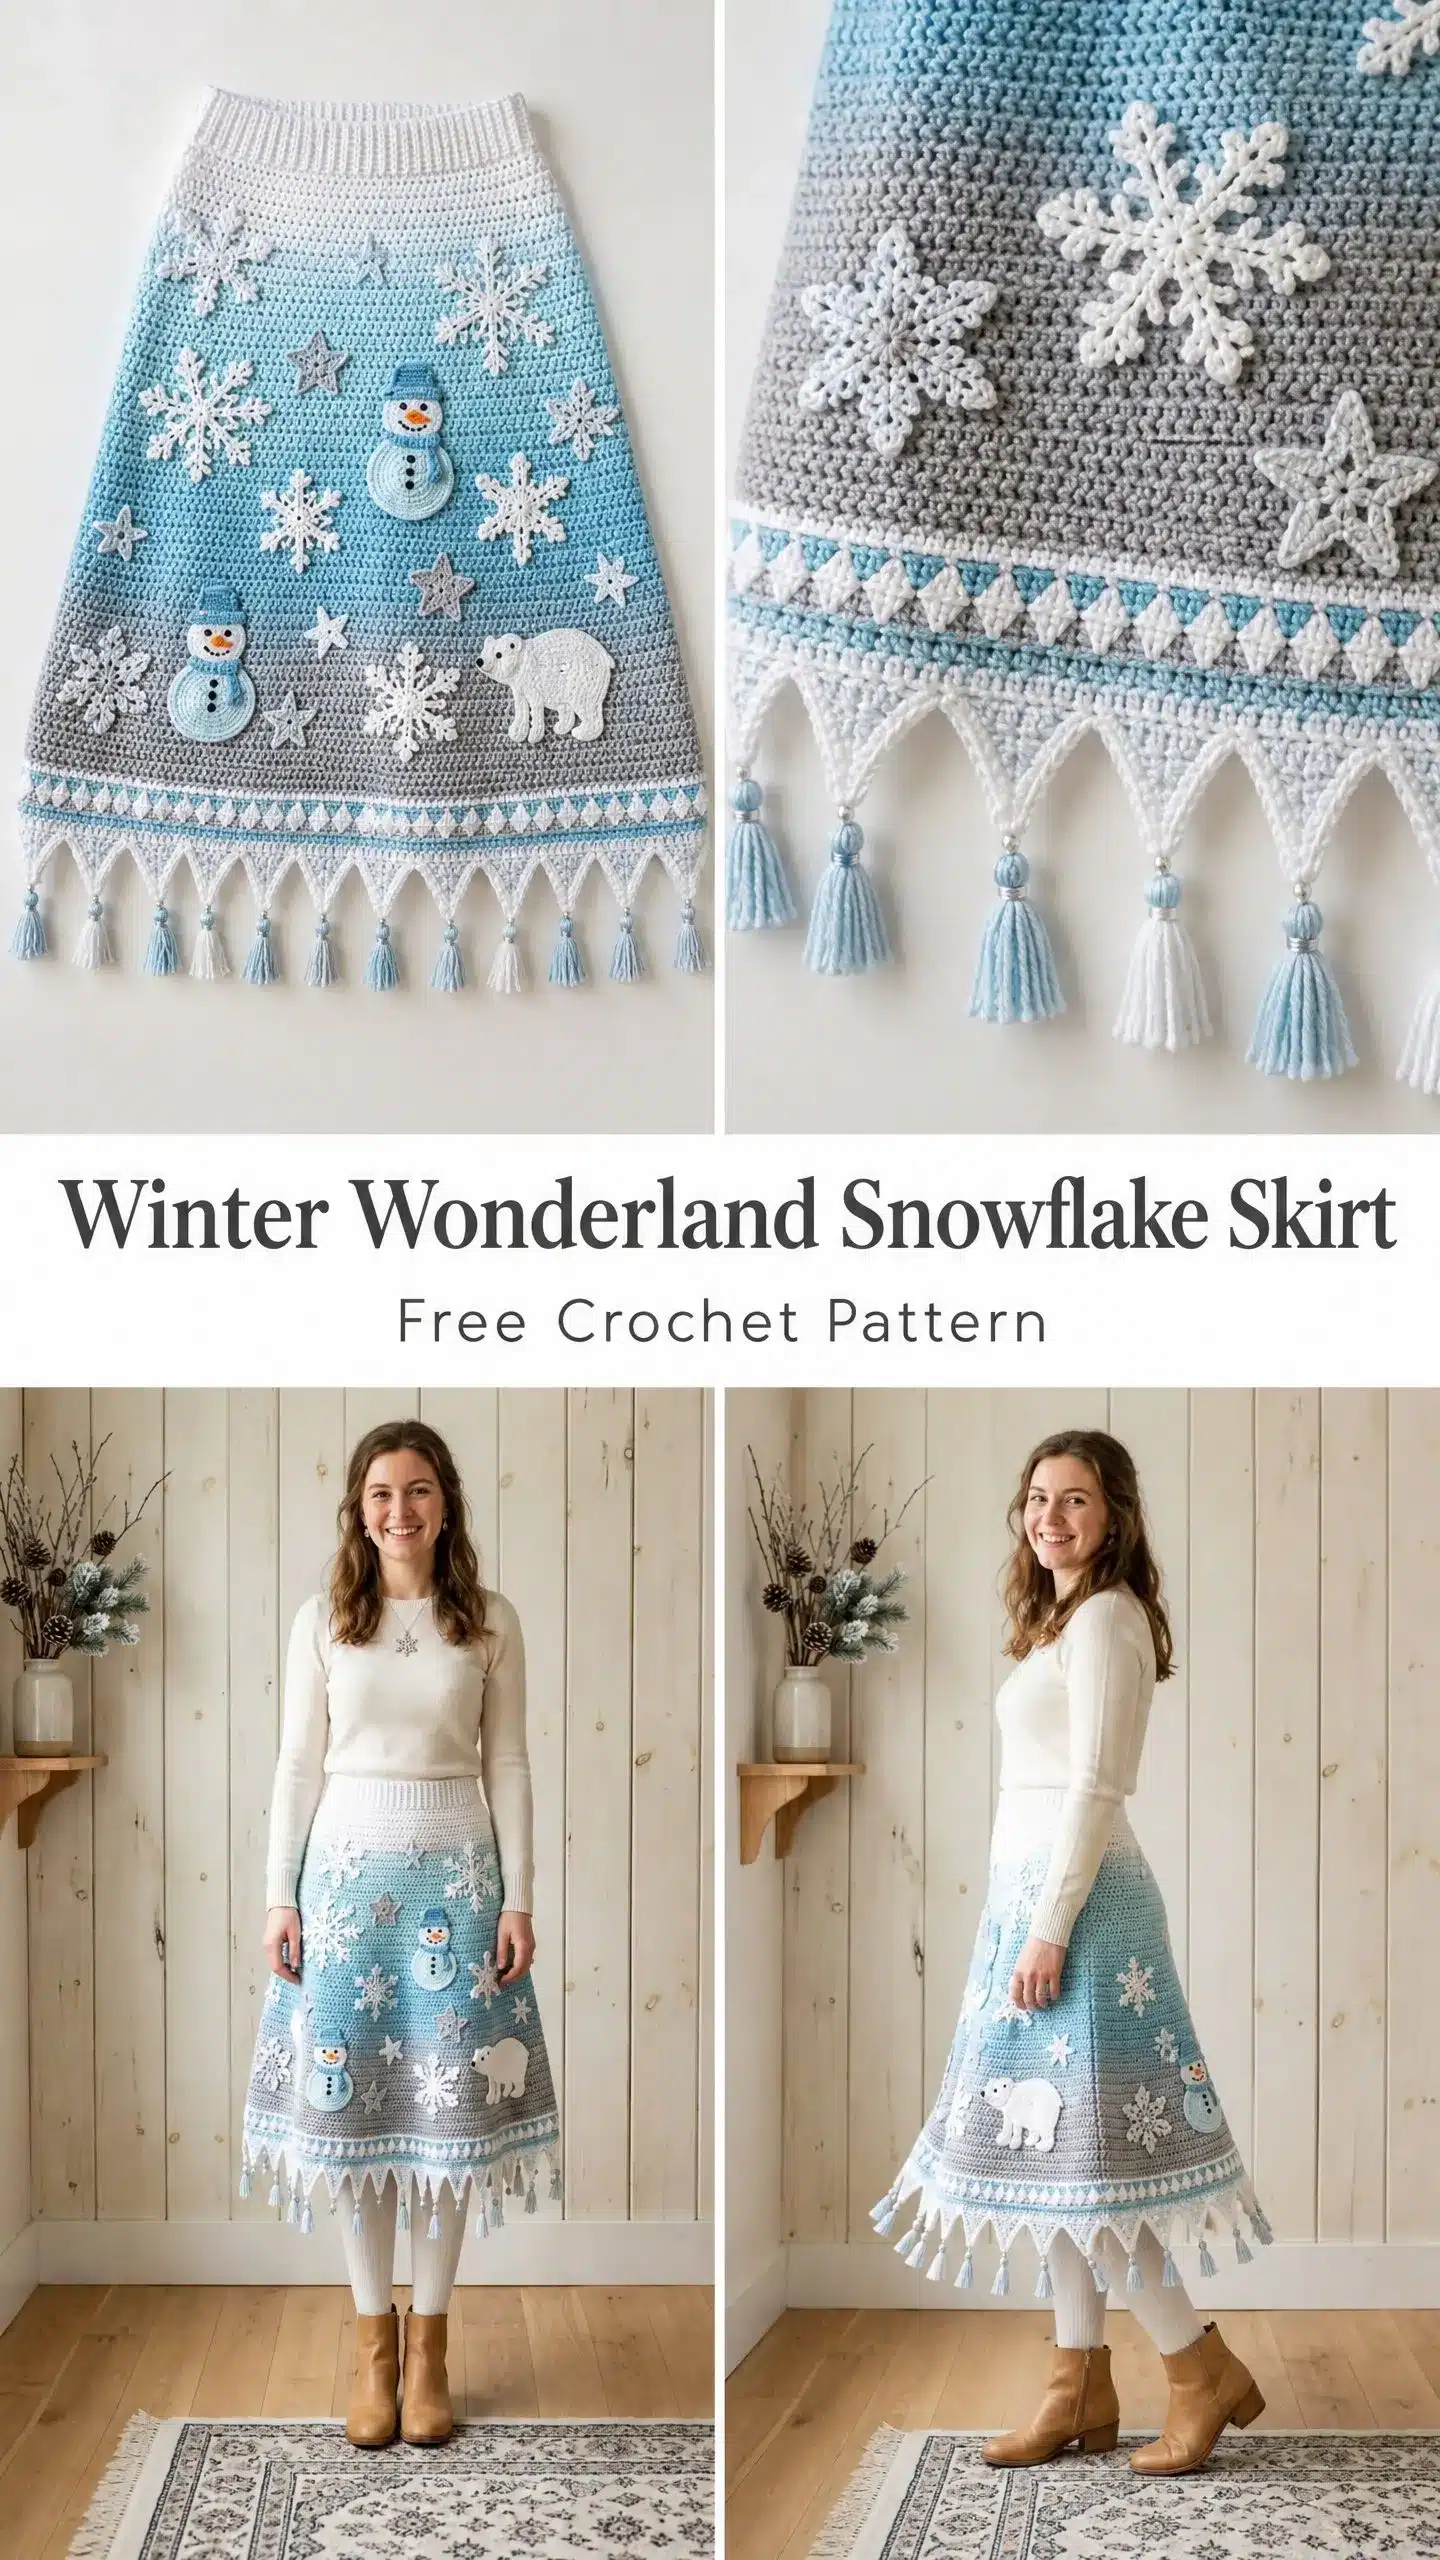
This midi-length A-line skirt features an ombre colorway that transitions from crisp white at the waist through soft sky blue in the middle and down to medium gray at the hem. The body is worked in continuous spiral rounds of single crochet, creating a dense, structured fabric perfect for showcasing the applique embellishments. The decorative elements include large and small snowflakes, two cheerful snowmen with hats and scarves, scattered six-pointed stars, and one sweet polar bear. A picot-and-tassel hem adds movement and visual interest. Everything is worked separately and attached after the body is complete, so you can adjust placement to your preference.
Skill Level
This pattern is rated intermediate to advanced. The body construction itself is straightforward single crochet in the round with simple increases. However, the project requires comfort with several techniques: working in continuous spiral rounds without joining, managing yarn floats during color changes, executing a ribbed waistband with post stitches, completing multiple separate motif patterns, and attaching dimensional appliques neatly. If you’ve completed garments before and feel comfortable with basic motifs, you’ll succeed with this project. The individual components aren’t difficult. There are just several of them.
Finished Measurements
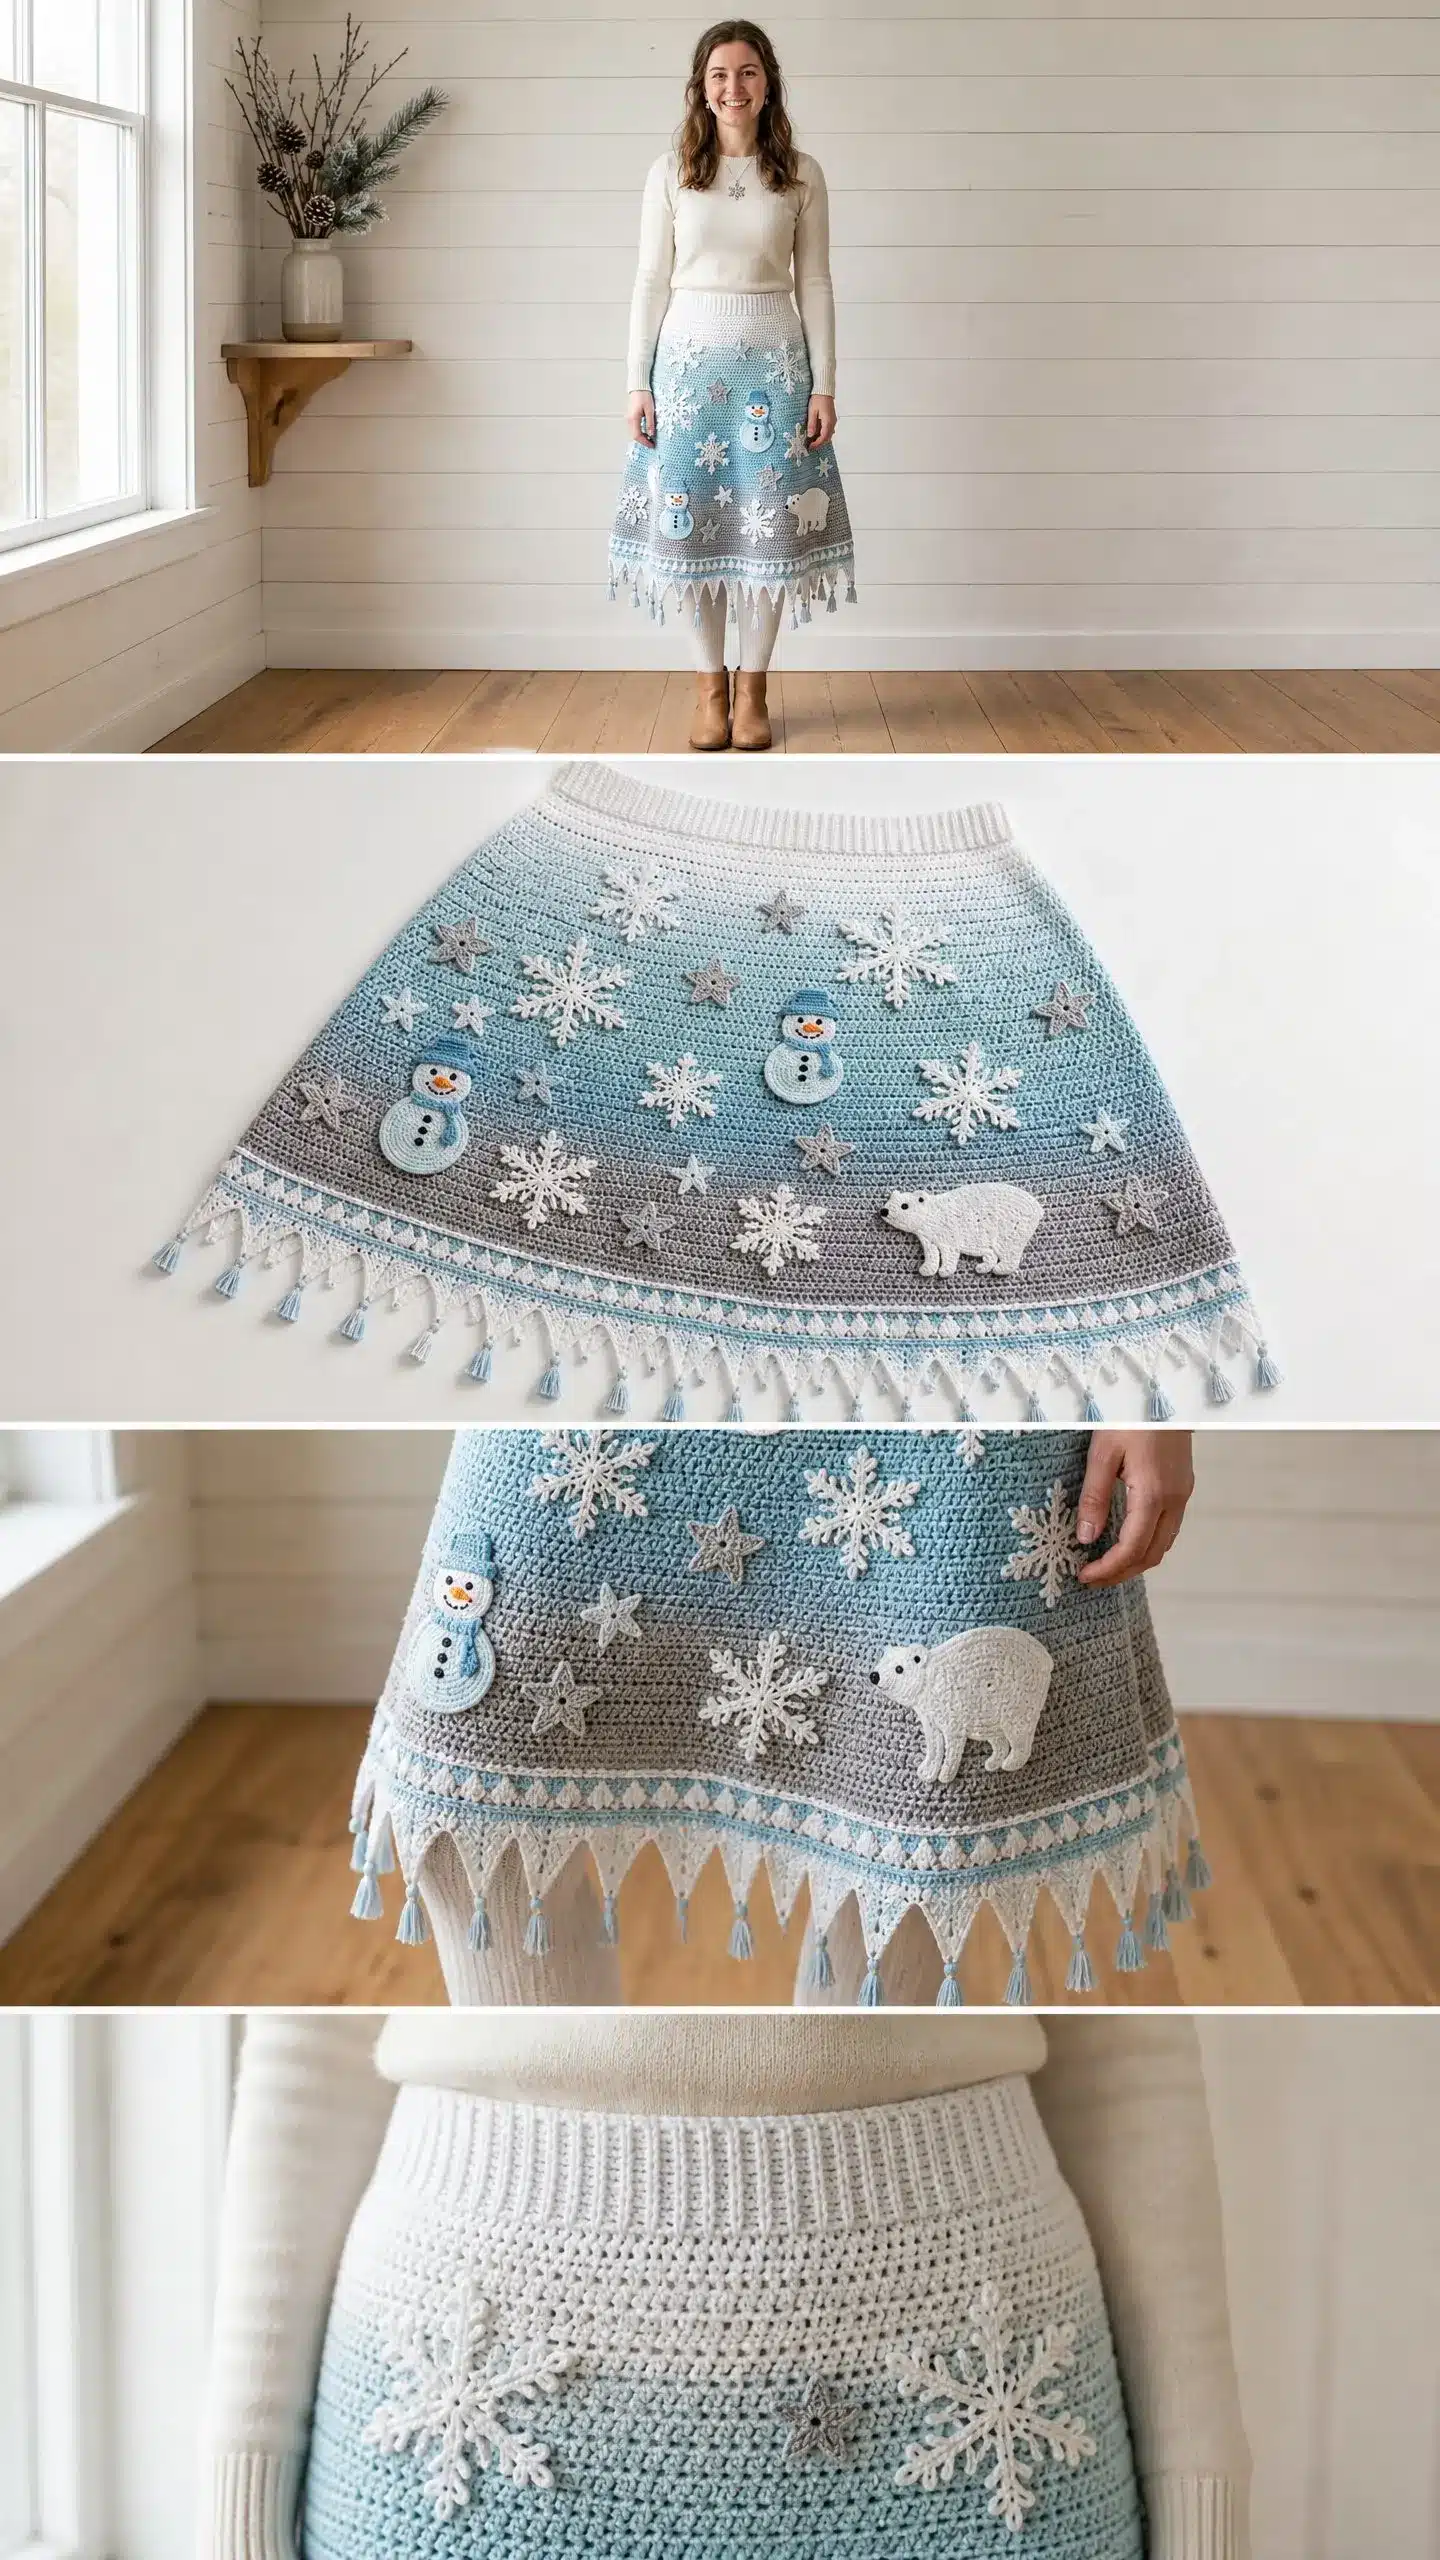
The pattern as written fits a finished waist measurement of 30 inches (76 cm) and stretches to fit hips up to 42 inches (107 cm) with the A-line flare. Skirt length from waistband top to hem tip including tassel fringe is approximately 28 inches (71 cm). The skirt body excluding the waistband measures approximately 25 inches (63.5 cm) from the pick-up row to the base of the picot hem. The waistband depth is approximately 2 inches (5 cm). Tassels add approximately 2.5 to 3 inches (6.5 to 7.5 cm) at the hem points.
Materials
Yarn
You’ll need worsted weight yarn in nine colors:
- Color A (White): approximately 500 yards (457 meters) for waistband and upper body
- Color B (Sky Blue): approximately 700 yards (640 meters) for middle body section
- Color C (Medium Gray): approximately 400 yards (366 meters) for lower body section
- Color D (Pale Blue): approximately 100 yards (91 meters) for tassels and snowman accents
- Color E (White): approximately 300 yards (274 meters) for snowflake and snowman motifs (can be same as Color A)
- Color F (Silver Gray): approximately 150 yards (137 meters) for star motifs and picot border accents
- Color G (Black): approximately 20 yards (18 meters) for snowman eyes, buttons, and mouth details
- Color H (Orange): approximately 5 yards (4.6 meters) for snowman carrot nose
- Color I (Light Blue): approximately 30 yards (27 meters) for snowman hat and scarf accents
Hooks
- Size J (6.0 mm) crochet hook for body and waistband
- Size H (5.0 mm) crochet hook for motifs and appliques
Additional Supplies
- Elastic, 1.5 inches (3.8 cm) wide, cut to your actual waist measurement plus 1 inch for overlap
- Yarn needle for weaving ends and sewing appliques
- At least 6 stitch markers
- Sewing pins for motif placement
- Scissors
- Optional: Small amounts of polyester fiberfill for three-dimensional snowman body shaping
- Optional: Silver or iridescent thread to hold alongside Color F for star motifs to enhance shimmer
Gauge and Finished Size
Getting gauge right is critical for this garment. A difference of even half a stitch per inch will alter the waist circumference by several inches over the full round count. Body gauge using Size J (6.0 mm) hook, worked in rounds of single crochet: 14 stitches and 16 rounds equals 4 inches (10 cm), blocked. Individual motif gauge is not critical for exact size but should feel firm, not floppy, when complete. Swatch, block your swatch, and re-swatch if needed before starting the body.
Abbreviations
- sc: single crochet
- ch: chain
- sl st: slip stitch
- dc: double crochet
- hdc: half double crochet
- tr: treble crochet
- inc: increase (work 2 sc in the same stitch)
- sc2tog: single crochet 2 together
- MC: magic circle
- FPsc: front post single crochet
- BPsc: back post single crochet
- BLO: back loop only
- pm: place marker
- rnd: round
Pattern Notes
- The skirt body is worked in continuous spiral rounds. This means you won’t join at the end of each round or make a turning chain. Place a stitch marker in the first stitch of each round and move it up as you work. This keeps your color-change seam clean.
- Color changes for the ombre effect are worked gradually. Each transition zone spans 6 rounds: 2 rounds of the outgoing color, 2 rounds alternating every other stitch (carrying the non-working yarn loosely inside), and 2 rounds of the incoming color. This creates a soft blended edge rather than a hard stripe.
- All motifs should be blocked before sewing them on. Pin everything in place before sewing anything so you can confirm the layout and spacing looks right.
Special Stitches
- Picot-3: Chain 3, slip stitch into the first chain of the chain-3 just made. This creates a small raised decorative loop.
- Picot-5: Chain 5, slip stitch into the first chain of the chain-5. Creates a larger loop used in large snowflake petal tips.
- Standing sc: Begin with a slip knot on your hook. Insert hook into the designated stitch, yarn over, pull up a loop, yarn over, pull through both loops. This starts a new color without a joining slip stitch.
- Joined color change: Work the last stitch of your current color until 2 loops remain on the hook. Drop the current color (don’t cut unless told to), pick up the new color, yarn over and pull through both loops.
- Tassel: Cut 10 strands of yarn each 9 inches (23 cm) long. Fold the bundle in half. Using your crochet hook, pull the folded loop through the designated picot point at the hem. Draw the cut ends through the folded loop and pull tight. Trim to 2.5 inches (6.5 cm) below the knot.
Pattern Instructions
Waistband
The waistband is worked flat in rows using Color A and the J (6.0 mm) hook, then seamed to form a tube.
Foundation chain: Chain 10.
Row 1 (RS): Sc in 2nd ch from hook and in each ch across. Turn. (9 sc)
Row 2 (WS): Ch 1, FPsc around post of first st, BPsc around post of next st. Repeat FPsc, BPsc across to last st, FPsc in last st. Turn. (9 sts)
Row 3 (RS): Ch 1, BPsc around post of first st, FPsc around post of next st. Repeat BPsc, FPsc across to last st, BPsc in last st. Turn. (9 sts)
Repeat Rows 2 and 3 until the waistband strip measures 31 inches (78.5 cm) from the starting edge, ending after a WS row. This should be approximately 100 to 108 total rows depending on your tension. Do not cut yarn.
Hold the two short ends together with RS facing outward. Slip stitch through both layers across the 9 stitches to seam. Fasten off and weave in the end.
Checkpoint: Your waistband tube should measure 30.5 to 31 inches (77.5 to 78.5 cm) in circumference when slightly stretched. The tube height should be approximately 2 inches (5 cm).
Skirt Body
With RS of waistband facing outward, join Color A with a standing sc into the bottom long edge of the waistband, picking up through both loops of the edge row-end stitches. Place marker in this first stitch.
Pick-up Round: Work sc evenly around the bottom edge of the waistband, distributing increases as needed to reach exactly 112 sc. You’ll work approximately 1 sc into every other row-end along the bottom edge. Place marker. (112 sc)
Checkpoint: At gauge of 14 stitches per 4 inches, 112 stitches produce a circumference of approximately 32 inches (81 cm). This is slightly eased for comfort over the 30-inch waistband.
Round 1: Sc in each st around. (112 sc)
Round 2: Sc in each st around. (112 sc)
Round 3 (increase): Work sc to 14 sts before marker, inc, sc 13, inc, sc 13, inc, sc 13, inc, sc 13, inc, sc 13, inc, sc 13, inc, sc 13, inc, sc to end. (120 sc)
Rounds 4-6: Sc in each st around. (120 sc)
Round 7 (increase): Work 8 inc evenly spaced, with each inc placed 15 sts after the previous. (128 sc)
Round 8: Sc in each st around. Begin ombre transition to Color B on final stitch. (128 sc)
Rounds 9-10: Work in Color B and Color A alternating every stitch for ombre blend. (128 sc)
Round 11 (increase): Work in Color B. Work 8 inc evenly spaced, approximately 16 sts apart. (136 sc)
Round 12: Work in Color B. Sc in each st around. (136 sc)
Rounds 13-14: Sc in each st around in Color B. (136 sc)
Round 15 (increase): Work 8 inc evenly spaced, approximately 17 sts apart. (144 sc)
Rounds 16-18: Sc in each st around. (144 sc)
Round 19 (increase): Work 8 inc evenly spaced, approximately 18 sts apart. (152 sc)
Rounds 20-22: Sc in each st around. (152 sc)
Round 23 (increase): Work 8 inc evenly spaced, approximately 19 sts apart. (160 sc)
Rounds 24-26: Sc in each st around. (160 sc)
Round 27 (increase): Work 8 inc evenly spaced, approximately 20 sts apart. (168 sc)
Round 28: Sc in each st around. Begin ombre transition to Color C on final stitch. (168 sc)
Rounds 29-30: Work in Color C and Color B alternating every stitch for ombre blend. (168 sc)
Round 31 (increase): Work in Color C. Work 8 inc evenly spaced, approximately 21 sts apart. (176 sc)
Round 32: Work in Color C. Sc in each st around. (176 sc)
Rounds 33-34: Sc in each st around in Color C. (176 sc)
Round 35 (increase): Work 8 inc evenly spaced, approximately 22 sts apart. (184 sc)
Rounds 36-38: Sc in each st around. (184 sc)
Round 39 (increase): Work 8 inc evenly spaced, approximately 23 sts apart. (192 sc)
Rounds 40-42: Sc in each st around. (192 sc)
Round 43 (increase): Work 8 inc evenly spaced, approximately 24 sts apart. (200 sc)
Rounds 44-46: Sc in each st around. (200 sc)
Checkpoint: After Round 46, your skirt body should measure approximately 22 to 23 inches (56 to 58 cm) from the pick-up row. The hem circumference should be approximately 57 inches (145 cm).
Large Snowflake Motif (Make 6)
Using Color E and Size H hook.
MC, ch 1, work 8 sc into ring, pull closed, sl st to join. (8 sc)
Round 2: 2 sc in each st around. (16 sc)
Round 3: (Sc in next st, 2 sc in next st) around. (24 sc)
Rounds 4-5: Sc in each st around. (24 sc)
Round 6: (Sc in next 2 sts, sc2tog) around. (18 sc)
Stuff lightly with fiberfill if desired.
Round 7: (Sc in next st, sc2tog) around. (12 sc)
Sl st to join, fasten off, leave long tail.
Small Snowflake Motif (Make 8)
Using Color E and Size H hook.
MC, ch 1, work 6 sc into ring, pull closed, sl st to join. (6 sc)
Round 2: 2 sc in each st around. (12 sc)
Round 3: (Sc in next st, 2 sc in next st) around. (18 sc)
Round 4: Sc in each st around. (18 sc)
Round 5: (Sc in next st, sc2tog) around. (12 sc)
Stuff lightly. Sl st to join, fasten off, leave long tail.
Six-Pointed Star Motif (Make 8)
Using Color E and Size H hook.
MC, ch 1, work 6 sc into ring. (6 sc)
Round 2: 2 sc in each st around. (12 sc)
Round 3: (Sc, 2 sc in next) around. (18 sc)
Round 4: (Sc in 2 sts, 2 sc in next) around. (24 sc)
Rounds 5-7: Sc in each st around. (24 sc)
Do not stuff. Flatten the piece. Sl st through both layers across 6 sts to close body into a half-circle disc. Do not fasten off.
From the bottom edge of the closed body, join Color E, ch 4, sc in 2nd ch from hook and next 2 ch (3 sc), sl st to body edge 2 sts from join. Repeat 3 more times spaced evenly along bottom edge for 4 stubby legs. Fasten off.
Snowman Motif (Make 2)
MC, ch 1, work 6 sc into ring. (6 sc)
Round 2: 2 sc in each st around. (12 sc)
Round 3: (Sc, 2 sc in next) around. (18 sc)
Round 4: Sc in each st around. (18 sc)
Continue shaping and attach to body. Embroider small black eyes and nose with Color G.
Assembly
Using yarn needle and Color G, embroider 2 small eyes and a curved mouth onto the head. With Color H, embroider a small triangular carrot nose. With Color G, embroider 3 button dots down the front of the body. Stack head on top of body, sewing securely. Attach hat to top of head. Wrap scarf around neck and tack ends.
Tips
- Block all motifs before sewing them onto the skirt. This ensures they lie flat and the finished piece looks polished.
- Pin all motifs in place before sewing any of them. This lets you adjust spacing and layout to your liking.
- Use stitch markers to keep track of your increase points in the skirt body. This prevents mistakes and keeps the A-line shape even.
- If you’re using a different yarn weight, make a gauge swatch and adjust hook size accordingly to match the finished measurements.
FAQs
Can I adjust the skirt length?
Yes. The skirt body is worked in rounds with increases at set intervals. To make it shorter, stop after fewer increase rounds. To make it longer, continue working additional rounds without increases after the last increase round, keeping the hem circumference the same.
Can I use a different yarn weight?
You can, but you will need to adjust hook size and re-calculate gauge. The finished size and fit depend on matching the gauge of 14 stitches and 16 rounds per 4 inches with a J (6.0 mm) hook. If you change yarn weight, make a swatch first and adjust accordingly.
How do I wash this skirt?
This skirt is machine washable if you’ve used acrylic yarn. Wash on gentle cycle in cold water, then lay flat to dry to maintain the shape. The tassels may need gentle finger-combing after washing to keep them neat.
Can I skip the motifs and just make the skirt body?
Absolutely. The skirt body is a complete garment on its own. The motifs are decorative and can be omitted, reduced in number, or replaced with your own designs.
How do I attach the elastic?
The elastic is threaded through the waistband tube after the waistband is seamed. Use a safety pin to guide the elastic through, then overlap the ends and sew them securely. Distribute the gathers evenly around the waist.
What if my gauge is off?
If your gauge is off, the waist circumference and overall fit will change. Make a swatch, block it, and measure before starting the body. If needed, change hook size to match the gauge. A difference of even half a stitch per inch will alter the waist circumference by several inches over the full round count.
Pin This Crochet Pattern!