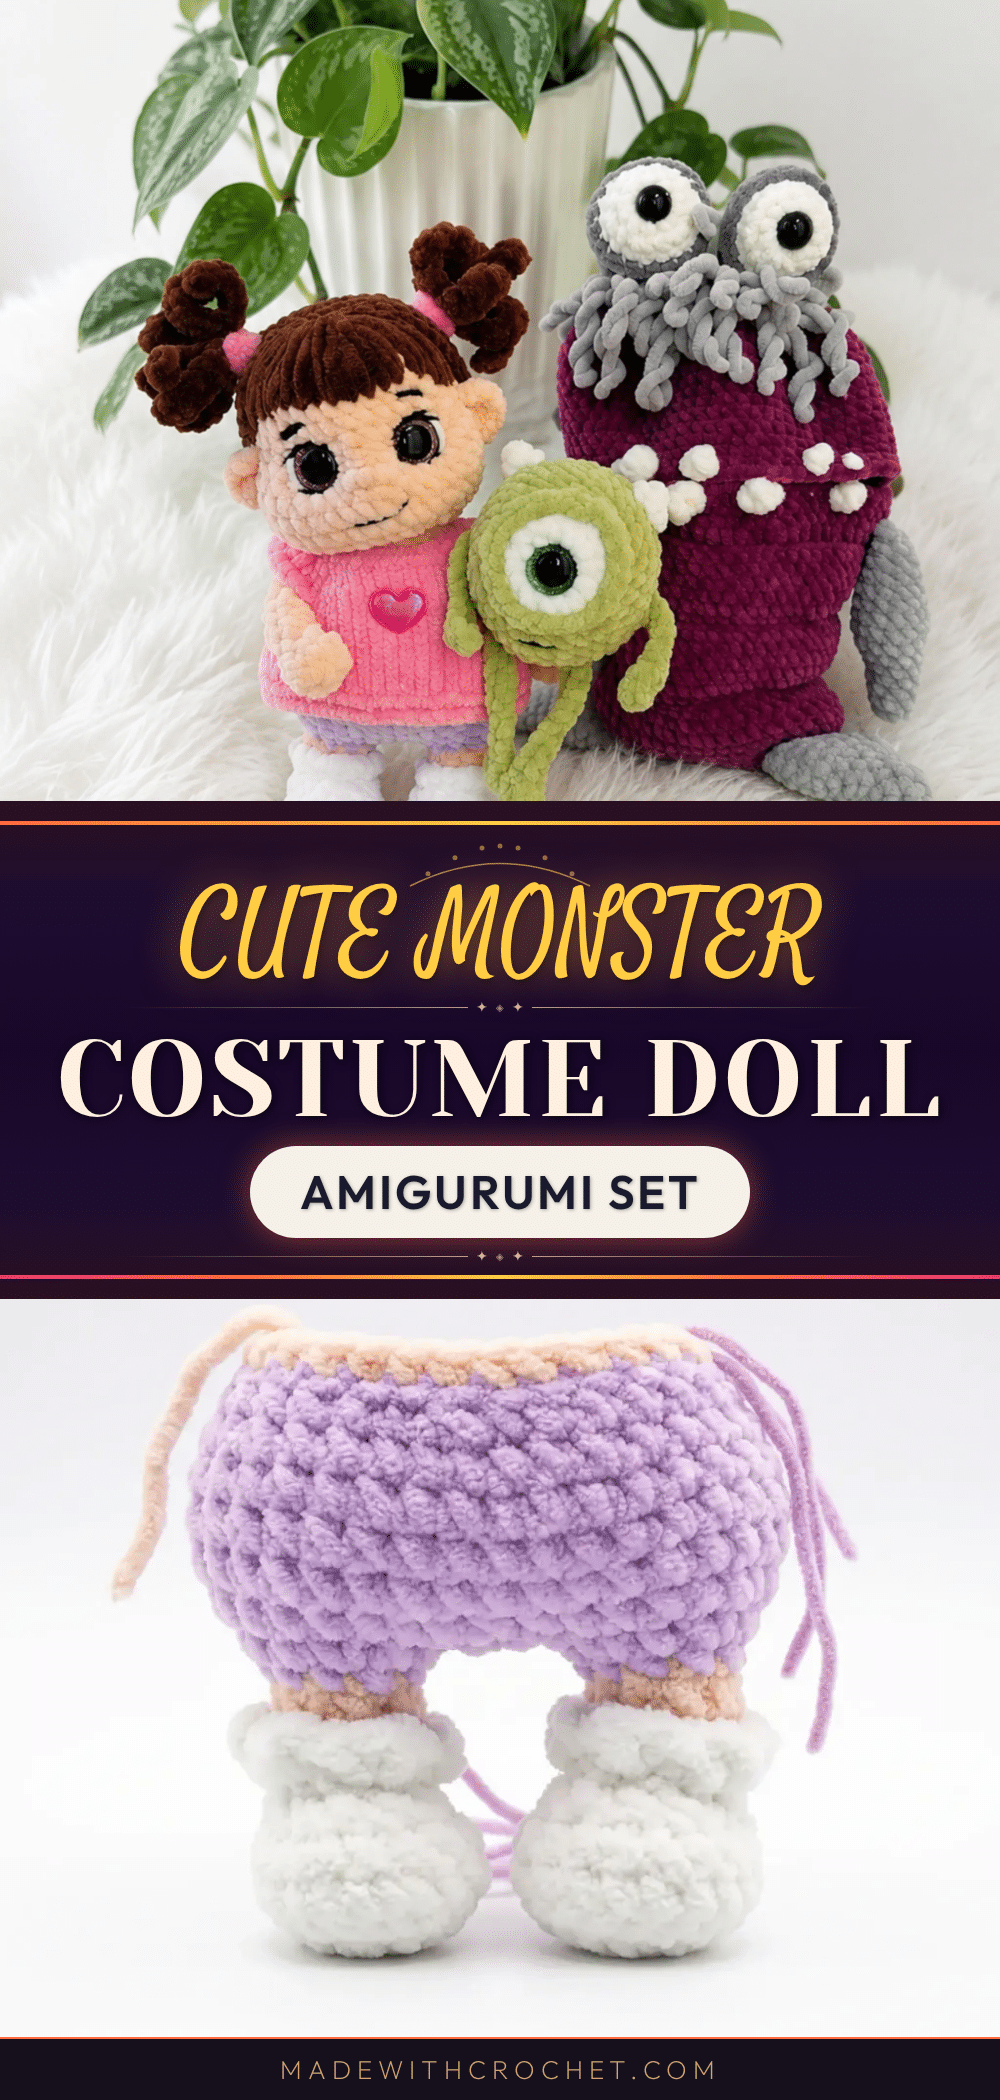
Looking for a handmade gift that brings a smile to any fan of animated classics? This Cute Monster Costume Doll Amigurumi Set is the perfect project for crocheters who want to create a charming, interactive toy. Whether you are making a set for a child’s birthday, a unique addition to a craft market table, or a fun weekend project for yourself, this pattern delivers a high-quality result. You will build a detailed doll and dress her in a knit or crocheted outfit, then stitch a full monster costume that fits right over her. It is a versatile set that combines basic amigurumi shaping with wearable costume elements and a standalone character.
Gift and Use Ideas
This amigurumi set is more than just a static decoration; it is a playset that encourages storytelling. The doll can be dressed in her everyday outfit and then transformed into her monster alter-ego, making it a fantastic gift for imaginative play. The plush texture of the yarn makes it ideal for cuddling, while the detailed construction of the monster costume—with its spiky teeth and furry texture—adds a collectible quality. It serves as a delightful centerpiece for a themed party or a sweet keepsake that captures the spirit of friendship and fun.
Project Overview
This pattern guides you through creating a complete amigurumi set featuring a doll and two monster characters. You will start by crocheting the doll from the ground up, constructing the legs, body, arms, and head, and then styling her with a wig and dress. The set includes instructions for a full monster costume that fits over the doll, complete with fins and eyes. Additionally, you will create a standalone one-eyed monster friend. The project is designed for confident beginners and intermediate crocheters, offering opportunities to practice color changes, wearable garment construction, and detailed assembly.
Materials
- Yarn: Plush yarn, Worsted weight (100g/120m). Colors required: body/skin tone, pants color, white, hair color, dress color, Sulley-costume main color, fin/fur color, dark gray, and Wazowski main + contrast color.
- Hooks: 4mm (US G/6) for amigurumi pieces; 2.25mm (US B-1) or knitting needles, size 2mm (for the knit version of the dress).
- Safety Eyes: One pair 18mm (Boo), one 16mm (Sulley costume), one 18mm green (Wazowski).
- Joint: A 35mm joint (or two matching discs plus a cotter pin) for Boo’s head, if using a jointed neck.
- Stuffing: Fiberfill stuffing.
- Tools: Stitch markers, yarn needle / tapestry needle, sharp sewing needle, black and white embroidery thread for the face, small buttons for the dress closure, sturdy thread for cinching and gathering, straight pins, and scissors.
Gauge and Finished Size
Gauge is not critical for this project, but a tighter tension than usual is recommended to keep stuffing from peeking through. Aim to match the finished doll size of about 21cm (8¼in) to ensure the costume pieces fit together correctly.
Abbreviations
- BLO — Back Loop Only
- ch — Chain
- dc — Double Crochet
- dec — Decrease (invisible decrease)
- dtr — Double Treble Crochet
- FLO — Front Loop Only
- hdc — Half Double Crochet
- inc — Increase (2 sc in same stitch)
- MR — Magic Ring
- Rnd — Round
- Row — Row
- sc — Single Crochet
- sl st — Slip Stitch
- sts — Stitches
- tr — Treble Crochet
Pattern Notes
This pattern is written in US crochet terminology. The amigurumi pieces are worked in continuous spiral rounds unless a piece specifically says to join or turn. The dress and some costume rows are worked flat, back and forth. Stitch count is given at the end of each round or row in parentheses, like this: (12). Safety eyes are placed with careful attention to the marked “center of the face” increase — always dry-fit eyes before pushing the backs on. Several pieces use back loop only (BLO) rows to create a visible ridge for color-blocking — don’t skip these; they’re what gives the finished pieces their clean, structured look. The Sulley costume and Mike Wazowski pieces both build arms and legs directly out of the main body as you go, rather than crocheting them separately and sewing them on.
Pattern Instructions
Arms (make 2)
Rnd 1: 6 sc in MR. (6)
Rnd 2: hdc inc, sc 5. (7)
Rnd 3: hdc2tog, sc 5. (6)
Rnds 4–11: sc in each st around. (6) Do not stuff the arms. Fold the arm flat so the decrease from Rnd 3 sits at the side seam. If needed, work 2–3 extra rounds before folding, then sc through both layers across 3 sts to close. Fasten off and weave in the end.
Ears (make 2)
Row 1: 4 sc in MR, do not join, ch 1, turn. (5)
Row 2: sl st in each of next 4 sts. (5) Fasten off, leaving a tail for sewing on.
Nose
Ch 3. Fasten off, leaving tails on both ends for attaching later.
Legs & Body
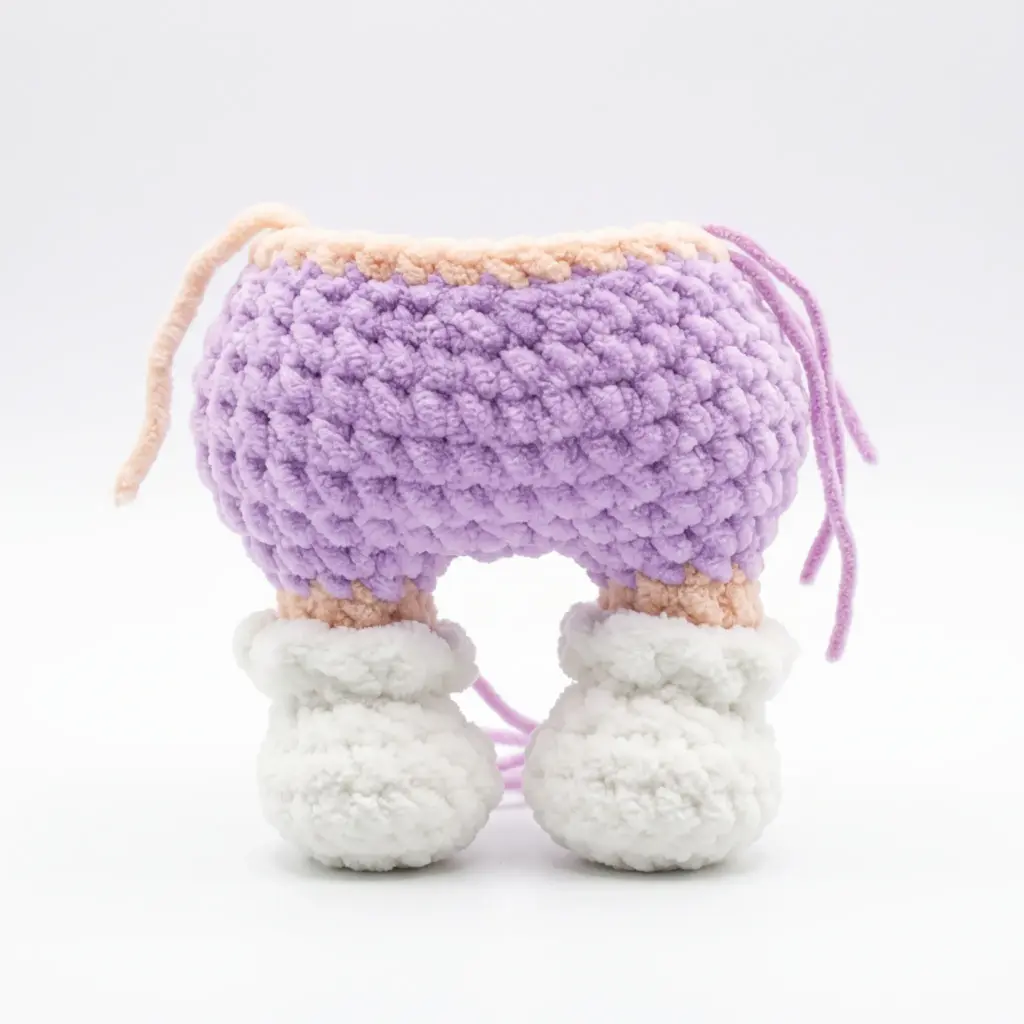
Begin with white yarn. Do not stuff the legs until they’ve been joined together in Round 11.
Rnd 1: Ch 5. Starting in 2nd ch from hook: sc 3, 5 sc in last ch, then working into the back bumps of the foundation chain: sc 2, inc. (12)
Rnd 2: inc, sc 2, inc 5 times, sc 2, inc, sc 1. (19)
Rnd 3: BLO throughout: sc in each st around. (19)
Rnd 4: sc in each st around. (19)
Rnd 5: sc 4, dec 5 times, sc 5. (14)
Rnd 6: sc 4, dec 3 times, sc 4. (11) At the end of the round, switch to body color. Don’t cut the white yarn — carry it up the inside of the work.
Rnd 7: BLO throughout: sc 4, dec, sc 5. (10)
Rnd 8: sc in each st around. (10) At the end of the round, switch to purple (pants color). Fasten off body-color yarn and weave in.
Rnd 9: BLO throughout: sc in each st around. (10)
Rnd 10: (sc 1, inc) 5 times. (15) On the left leg only, fasten off here. Using the remaining front loops from Rnd 7 and white yarn, work the sock trim: ch 2, sl st in same st, then sl st, ((hdc, sl st) in same st, sl st) 5 times. Fasten off and weave in.
Rnd 11: sc 7, ch 1, turn; sc 4, ch 1, turn; sc 4, ch 1, turn. Take the left leg, count back 6 sts from the marker, hold it against the right-leg piece, and sc 4 through both the leg and the connecting chain to join. Place a marker to track round starts — its exact position doesn’t matter.
Rnd 12: sc 1 into the join, (sc 1, inc) twice, sc 2, inc, sc 4, sc 1 into the join, sc 3, sc 1 into the join, sc 4, inc, sc 2, (inc, sc 1) twice, sc 1 into the join, sc 1, inc across the connecting chain. (38)
Rnds 13–15: sc in each st around. (38) Begin stuffing the legs now.
Rnd 16: (sc 2, dec) twice, sc 20, (dec, sc 2) twice, sc 2. (34)
Rnd 17: (sc 6, dec, sc 7, dec) twice. (30) At end of round, switch to body color and fasten off purple.
Rnd 18: BLO throughout: sc in each st around. (30)
Rnd 19: (sc 4, dec) 5 times. (25)
Rnd 20: sc in each st around. (25)
Rnd 21: (sc 3, dec) 5 times. (20)
Rnd 22: sc in each st around. (20) Stuff the body firmly.
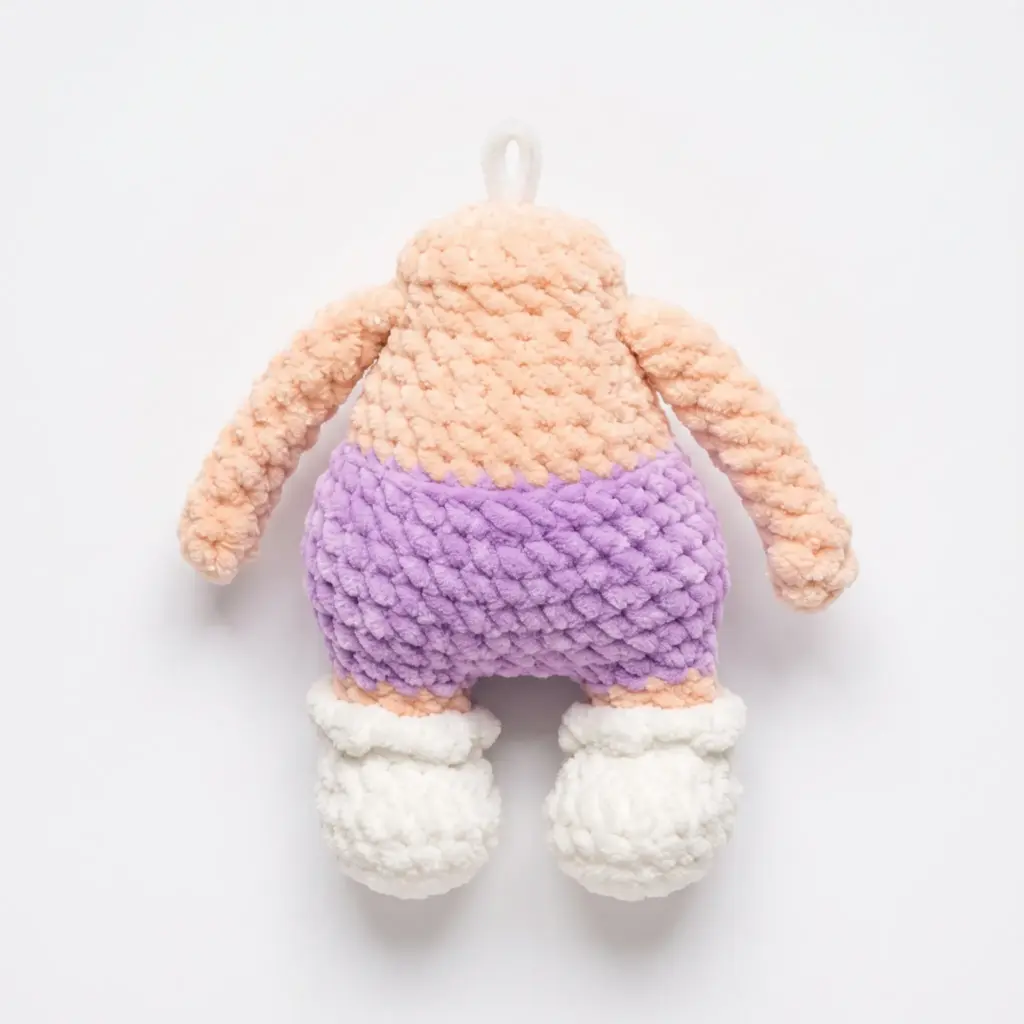
Rnd 23: Attach the arms here: sc 4, sc 3 attaching one arm, dec, sc 4, dec, sc 3 attaching the second arm, sc 2. (18) Position the arms with fingers pointing forward, and nudge stitch placement slightly if needed to keep them symmetrical.
Rnds 24–25: sc in each st around. (18)
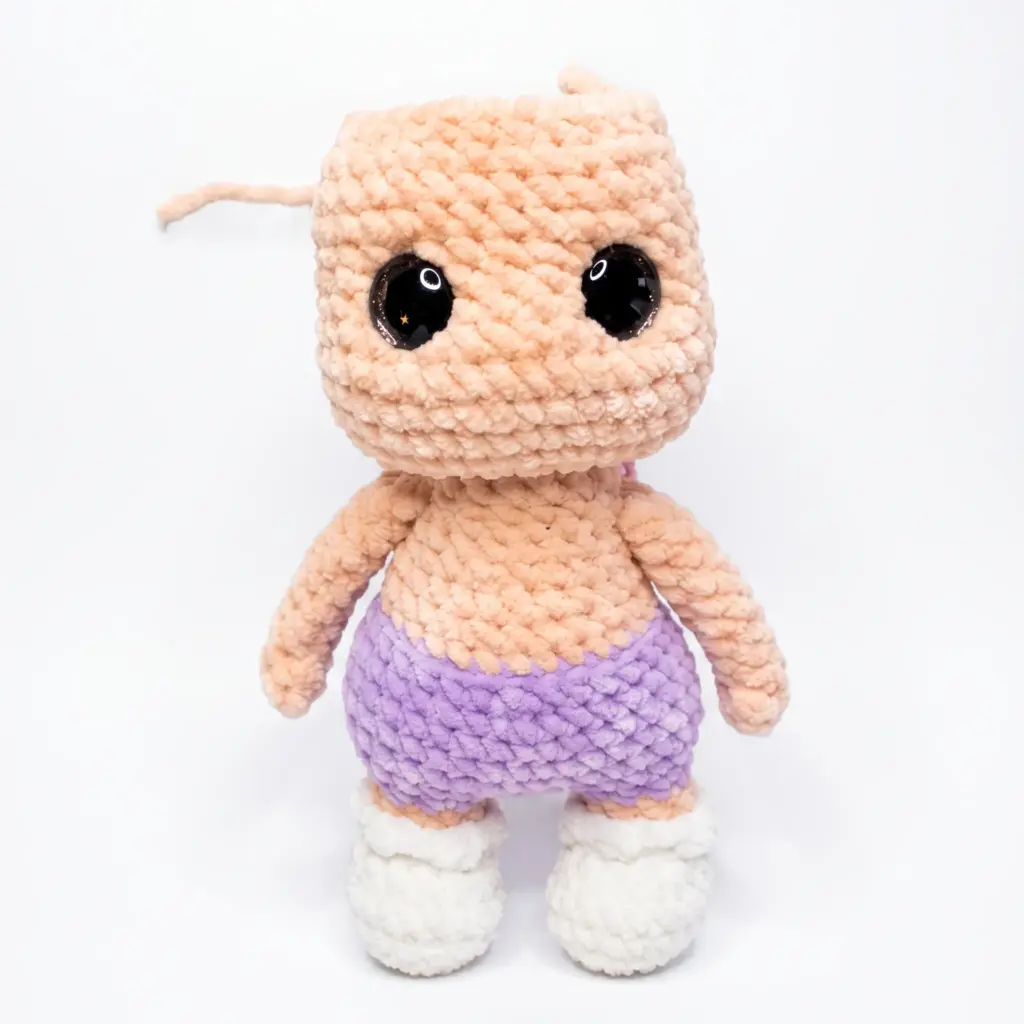
Rnd 26: sc 16. If using a jointed neck: finish stuffing the body, insert the joint disc and cotter pin, then work 11 more decreases before fastening off, using the tail to cinch tightly around the joint post. If sewing the head on instead, fasten off here.
Head
Work in body-color yarn.
Rnd 1: Ch 8. Starting in 2nd ch from hook: inc, sc 5, 3 sc in same st, sc 6. (16)
Rnd 2: inc twice, sc 5, inc 3 times, sc 5, inc. (22)
Rnd 3: (sc 1, inc) 3 times, inc (mark this stitch — it’s your face-center reference) , (inc, sc 1) 7 times, inc. (34)
Rnd 4: (sc 8, inc, sc 7, inc) twice. (38)
Rnds 5–8: sc in each st around. (38)
Rnd 9: sc 6, dec twice, sc 4, dec twice, sc 20. (34) Double-check that the 4 sts between the decreases sit centered on the face.
Rnds 10–12: sc in each st around. (34) Insert the safety eyes between Rnds 9 and 10, spaced evenly around the decrease points. If using a joint, insert it through Rnd 1, centered at the back of the head.
Rnd 13: (dec, sc 15) twice. (32)
Rnd 14: sc in each st around. (32)
Rnd 15: (sc 6, dec) 4 times. (28) Begin stuffing the head.
Rnd 16: (sc 5, dec) 4 times. (24)
Rnd 17: dec 12 times. (12)
Rnd 18: dec 6 times. Fasten off and weave in the end.
Wig
Work in brown yarn.
Rnd 1: 6 sc in MR. (6)
Rnd 2: inc 6 times. (12)
Rnd 3: inc 12 times. (24)
Rnd 4: (sc 2, inc) 8 times. (32)
Rnd 5: (sc 3, inc) 8 times. (40)
Rnds 6–12: sc in each st around. (40) Work 3–4 more sc, then fasten off. Try the wig on the doll’s head before finishing — gauge varies, so you may need extra or fewer rounds. Sew it on, embroider bangs, and finish the face.
Pigtails (make 2)
Begin with pink yarn and leave a 12in (30cm) starting tail.
Row 1: Ch 10. Starting in 2nd ch from hook: sl st in each of next 9 sts, ch 1, turn. (9)
Row 2: sc in each st around. (9) At the end of the row, switch to brown and fasten off pink. Then work: (ch 7, starting in 2nd ch from hook, sc 6 down the chain, sl st in FLO) 8 times. Fasten off and twist the finished pigtail.
Dress (Crochet Version)
Begin with white yarn. Do not stuff the legs until they’ve been joined together in Round 11.
Rnd 1: Ch 5. Starting in 2nd ch from hook: sc 3, 5 sc in last ch, then working into the back bumps of the foundation chain: sc 2, inc. (12)
Rnd 2: inc, sc 2, inc 5 times, sc 2, inc, sc 1. (19)
Rnd 3: BLO throughout: sc in each st around. (19)
Rnd 4: sc in each st around. (19)
Rnd 5: sc 4, dec 5 times, sc 5. (14)
Rnd 6: sc 4, dec 3 times, sc 4. (11) At the end of the round, switch to body color. Don’t cut the white yarn — carry it up the inside of the work.
Rnd 7: BLO throughout: sc 4, dec, sc 5. (10)
Rnd 8: sc in each st around. (10) At the end of the round, switch to purple (pants color). Fasten off body-color yarn and weave in.
Rnd 9: BLO throughout: sc in each st around. (10)
Rnd 10: (sc 1, inc) 5 times. (15) On the left leg only, fasten off here. Using the remaining front loops from Rnd 7 and white yarn, work the sock trim: ch 2, sl st in same st, then sl st, ((hdc, sl st) in same st, sl st) 5 times. Fasten off and weave in.
Rnd 11: sc 7, ch 1, turn; sc 4, ch 1, turn; sc 4, ch 1, turn. Take the left leg, count back 6 sts from the marker, hold it against the right-leg piece, and sc 4 through both the leg and the connecting chain to join. Place a marker to track round starts — its exact position doesn’t matter.
Rnd 12: sc 1 into the join, (sc 1, inc) twice, sc 2, inc, sc 4, sc 1 into the join, sc 3, sc 1 into the join, sc 4, inc, sc 2, (inc, sc 1) twice, sc 1 into the join, sc 1, inc across the connecting chain. (38)
Rnds 13–15: sc in each st around. (38) Begin stuffing the legs now.
Rnd 16: (sc 2, dec) twice, sc 20, (dec, sc 2) twice, sc 2. (34)
Rnd 17: (sc 6, dec, sc 7, dec) twice. (30) At end of round, switch to body color and fasten off purple.
Rnd 18: BLO throughout: sc in each st around. (30)
Rnd 19: (sc 4, dec) 5 times. (25)
Rnd 20: sc in each st around. (25)
Rnd 21: (sc 3, dec) 5 times. (20)
Rnd 22: sc in each st around. (20) Stuff the body firmly.
Rnd 23: Attach the arms here: sc 4, sc 3 attaching one arm, dec, sc 4, dec, sc 3 attaching the second arm, sc 2. (18) Position the arms with fingers pointing forward, and nudge stitch placement slightly if needed to keep them symmetrical.
Rnds 24–25: sc in each st around. (18)
Rnd 26: sc 16. If using a jointed neck: finish stuffing the body, insert the joint disc and cotter pin, then work 11 more decreases before fastening off, using the tail to cinch tightly around the joint post. If sewing the head on instead, fasten off here.
Sulley Costume — Lower Fins (make 2)
Row 1: 4 sc in MR, do not join, ch 1, turn. (5)
Row 2: sl st in each of next 4 sts. (5) Fasten off, leaving a tail for sewing on.
Sulley Costume — Upper Fins (make 2)
Row 1: 4 sc in MR, do not join, ch 1, turn. (5)
Row 2: sl st in each of next 4 sts. (5) Fasten off, leaving a tail for sewing on.
Sulley Costume — Main Piece, Lower Section
Begin with white yarn. Do not stuff the legs until they’ve been joined together in Round 11.
Rnd 1: Ch 5. Starting in 2nd ch from hook: sc 3, 5 sc in last ch, then working into the back bumps of the foundation chain: sc 2, inc. (12)
Rnd 2: inc, sc 2, inc 5 times, sc 2, inc, sc 1. (19)
Rnd 3: BLO throughout: sc in each st around. (19)
Rnd 4: sc in each st around. (19)
Rnd 5: sc 4, dec 5 times, sc 5. (14)
Rnd 6: sc 4, dec 3 times, sc 4. (11) At the end of the round, switch to body color. Don’t cut the white yarn — carry it up the inside of the work.
Rnd 7: BLO throughout: sc 4, dec, sc 5. (10)
Rnd 8: sc in each st around. (10) At the end of the round, switch to purple (pants color). Fasten off body-color yarn and weave in.
Rnd 9: BLO throughout: sc in each st around. (10)
Rnd 10: (sc 1, inc) 5 times. (15) On the left leg only, fasten off here. Using the remaining front loops from Rnd 7 and white yarn, work the sock trim: ch 2, sl st in same st, then sl st, ((hdc, sl st) in same st, sl st) 5 times. Fasten off and weave in.
Rnd 11: sc 7, ch 1, turn; sc 4, ch 1, turn; sc 4, ch 1, turn. Take the left leg, count back 6 sts from the marker, hold it against the right-leg piece, and sc 4 through both the leg and the connecting chain to join. Place a marker to track round starts — its exact position doesn’t matter.
Rnd 12: sc 1 into the join, (sc 1, inc) twice, sc 2, inc, sc 4, sc 1 into the join, sc 3, sc 1 into the join, sc 4, inc, sc 2, (inc, sc 1) twice, sc 1 into the join, sc 1, inc across the connecting chain. (38)
Rnds 13–15: sc in each st around. (38) Begin stuffing the legs now.
Rnd 16: (sc 2, dec) twice, sc 20, (dec, sc 2) twice, sc 2. (34)
Rnd 17: (sc 6, dec, sc 7, dec) twice. (30) At end of round, switch to body color and fasten off purple.
Rnd 18: BLO throughout: sc in each st around. (30)
Rnd 19: (sc 4, dec) 5 times. (25)
Rnd 20: sc in each st around. (25)
Rnd 21: (sc 3, dec) 5 times. (20)
Rnd 22: sc in each st around. (20) Stuff the body firmly.
Rnd 23: Attach the arms here: sc 4, sc 3 attaching one arm, dec, sc 4, dec, sc 3 attaching the second arm, sc 2. (18) Position the arms with fingers pointing forward, and nudge stitch placement slightly if needed to keep them symmetrical.
Rnds 24–25: sc in each st around. (18)
Rnd 26: sc 16. If using a jointed neck: finish stuffing the body, insert the joint disc and cotter pin, then work 11 more decreases before fastening off, using the tail to cinch tightly around the joint post. If sewing the head on instead, fasten off here.
Sulley Costume — Main Piece, Upper Section
Work in body-color yarn.
Rnd 1: Ch 8. Starting in 2nd ch from hook: inc, sc 5, 3 sc in same st, sc 6. (16)
Rnd 2: inc twice, sc 5, inc 3 times, sc 5, inc. (22)
Rnd 3: (sc 1, inc) 3 times, inc (mark this stitch — it’s your face-center reference) , (inc, sc 1) 7 times, inc. (34)
Rnd 4: (sc 8, inc, sc 7, inc) twice. (38)
Rnds 5–8: sc in each st around. (38)
Rnd 9: sc 6, dec twice, sc 4, dec twice, sc 20. (34) Double-check that the 4 sts between the decreases sit centered on the face.
Rnds 10–12: sc in each st around. (34) Insert the safety eyes between Rnds 9 and 10, spaced evenly around the decrease points. If using a joint, insert it through Rnd 1, centered at the back of the head.
Rnd 13: (dec, sc 15) twice. (32)
Rnd 14: sc in each st around. (32)
Rnd 15: (sc 6, dec) 4 times. (28) Begin stuffing the head.
Rnd 16: (sc 5, dec) 4 times. (24)
Rnd 17: dec 12 times. (12)
Rnd 18: dec 6 times. Fasten off and weave in the end.
Sulley Costume — Eyes (make 2)
Begin with pink yarn and leave a 12in (30cm) starting tail.
Row 1: Ch 10. Starting in 2nd ch from hook: sl st in each of next 9 sts, ch 1, turn. (9)
Row 2: sc in each st around. (9) At the end of the row, switch to brown and fasten off pink. Then work: (ch 7, starting in 2nd ch from hook, sc 6 down the chain, sl st in FLO) 8 times. Fasten off and twist the finished pigtail.
Mike Wazowski
Work in body-color yarn.
Rnd 1: Ch 8. Starting in 2nd ch from hook: inc, sc 5, 3 sc in same st, sc 6. (16)
Rnd 2: inc twice, sc 5, inc 3 times, sc 5, inc. (22)
Rnd 3: (sc 1, inc) 3 times, inc (mark this stitch — it’s your face-center reference) , (inc, sc 1) 7 times, inc. (34)
Rnd 4: (sc 8, inc, sc 7, inc) twice. (38)
Rnds 5–8: sc in each st around. (38)
Rnd 9: sc 6, dec twice, sc 4, dec twice, sc 20. (34) Double-check that the 4 sts between the decreases sit centered on the face.
Rnds 10–12: sc in each st around. (34) Insert the safety eyes between Rnds 9 and 10, spaced evenly around the decrease points. If using a joint, insert it through Rnd 1, centered at the back of the head.
Rnd 13: (dec, sc 15) twice. (32)
Rnd 14: sc in each st around. (32)
Rnd 15: (sc 6, dec) 4 times. (28) Begin stuffing the head.
Rnd 16: (sc 5, dec) 4 times. (24)
Rnd 17: dec 12 times. (12)
Rnd 18: dec 6 times. Fasten off and weave in the end.
Assembly
Stuff the Head firmly, then attach it to the Legs & Body piece using the joint (if jointed) or by whip-stitching around the neck opening (if sewn on). Pin the Ears in place on either side of the head, just above the eyes, and sew them on using the tails left from finishing. Sew the Nose onto the center of the face at the marked face-center point, then embroider the eyebrows and mouth with black thread. Sew the Wig onto the top and back of the head, checking placement against the ears before securing every stitch. Attach the Pigtails just behind the ears, tucking the twisted ends under the wig edge before sewing through both layers. Slip the finished Dress onto the doll and close the button loop at the back. For the Sulley Costume, sew the Lower Fins onto the back seam of the lower body section using their yarn tails, then sew the Eyes into place on the front of the costume using cinching thread. Work loop stitches across the shoulders for a furry texture. Slip the completed costume over the dressed doll. For Mike Wazowski, no separate assembly is needed — the arms and legs are crocheted directly into the body as you work. Weave in every remaining yarn end throughout all pieces, trimming tails close to the fabric.
Tips
- Keep your tension slightly tighter than you would for a garment — amigurumi relies on a dense fabric to hide stuffing, and loose stitches will show gaps no matter how much fiberfill you pack in.
- When you reach an invisible decrease, insert your hook into the front loops of the next two stitches only, then complete the stitch as usual; this keeps the decrease flat instead of leaving a visible bump.
- Stuff firmly enough that the piece holds its shape when you press it, but stop before the fabric feels stretched or the stitches start to gap — you should still be able to pinch the surface slightly.
- If you substitute yarn, stick to another plush or velvet-style yarn in the same weight; a smooth cotton or acrylic will change both the drape of the costume and the softness of the finished doll.
- When sewing pieces together, use the same color yarn as the piece you’re attaching and work a mattress stitch along matching stitch columns wherever possible — it disappears into the surface far better than a running stitch.
- The tooth-and-fin round on the Sulley costume can be fiddly the first time through; work slowly, and don’t be afraid to un-do and redo a single bobble stitch if it looks lopsided before moving to the next one.
Frequently Asked Questions
Can I use a different type of yarn?
It is recommended to stick to plush or velvet-style yarn in the same weight. Using smooth cotton or acrylic will change the drape of the costume and the softness of the finished doll.
How do I ensure the costume fits the doll?
Gauge isn’t critical, but aim to match the finished doll size of about 21cm (8¼in). A tighter tension than usual helps keep stuffing from peeking through and ensures pieces fit together correctly.
What if I don’t have a jointed neck?
You can sew the head on instead. In Round 26 of the body, simply fasten off and whip-stitch the head to the neck opening.
How do I attach the arms?
Arms are attached in Round 23 of the body. Position the arms with fingers pointing forward and nudge stitch placement slightly if needed to keep them symmetrical.
Do I need to join rounds for the amigurumi pieces?
No, the amigurumi pieces are worked in continuous spiral rounds unless a piece specifically says to join or turn.
Pin This Crochet Pattern!