There is something deeply satisfying about the rhythmic pop of a hook and the way a textured fabric begins to take shape under your hands. The Pastel Garden Star Baby Sack is a masterclass in this tactile joy, relying on the classic granny cluster stitch to build a five-pointed star silhouette that is as whimsical as it is functional. The pattern invites you to work from the center outward, carefully managing increases at multiple points to create elongated star arms that cradle a baby’s limbs. The self-striping yarn adds a layer of visual delight, allowing the colors to flow naturally from pink to lavender to mint without the interruption of cutting yarn. It is a project that rewards patience with a stunning, photo-ready result that feels as good as it looks.
Texture and Stitch Notes
The defining feature of this project is the granny cluster stitch, which creates a naturally open fabric with a lovely, bobbled texture. This stitch unit—three double crochets worked into the same space—provides both structure and drape, ensuring the sack is cozy but not heavy. The pattern relies on the Point Increase Shell (PIS) to extend the star points, creating a dramatic, starburst effect. Working with a variegated or self-striping yarn enhances this texture, as the color changes highlight the individual clusters and chain spaces. The construction method, which involves seaming two flat panels together, adds a unique dimension to the finished piece, transforming a flat star into a wearable cocoon.
Project Overview
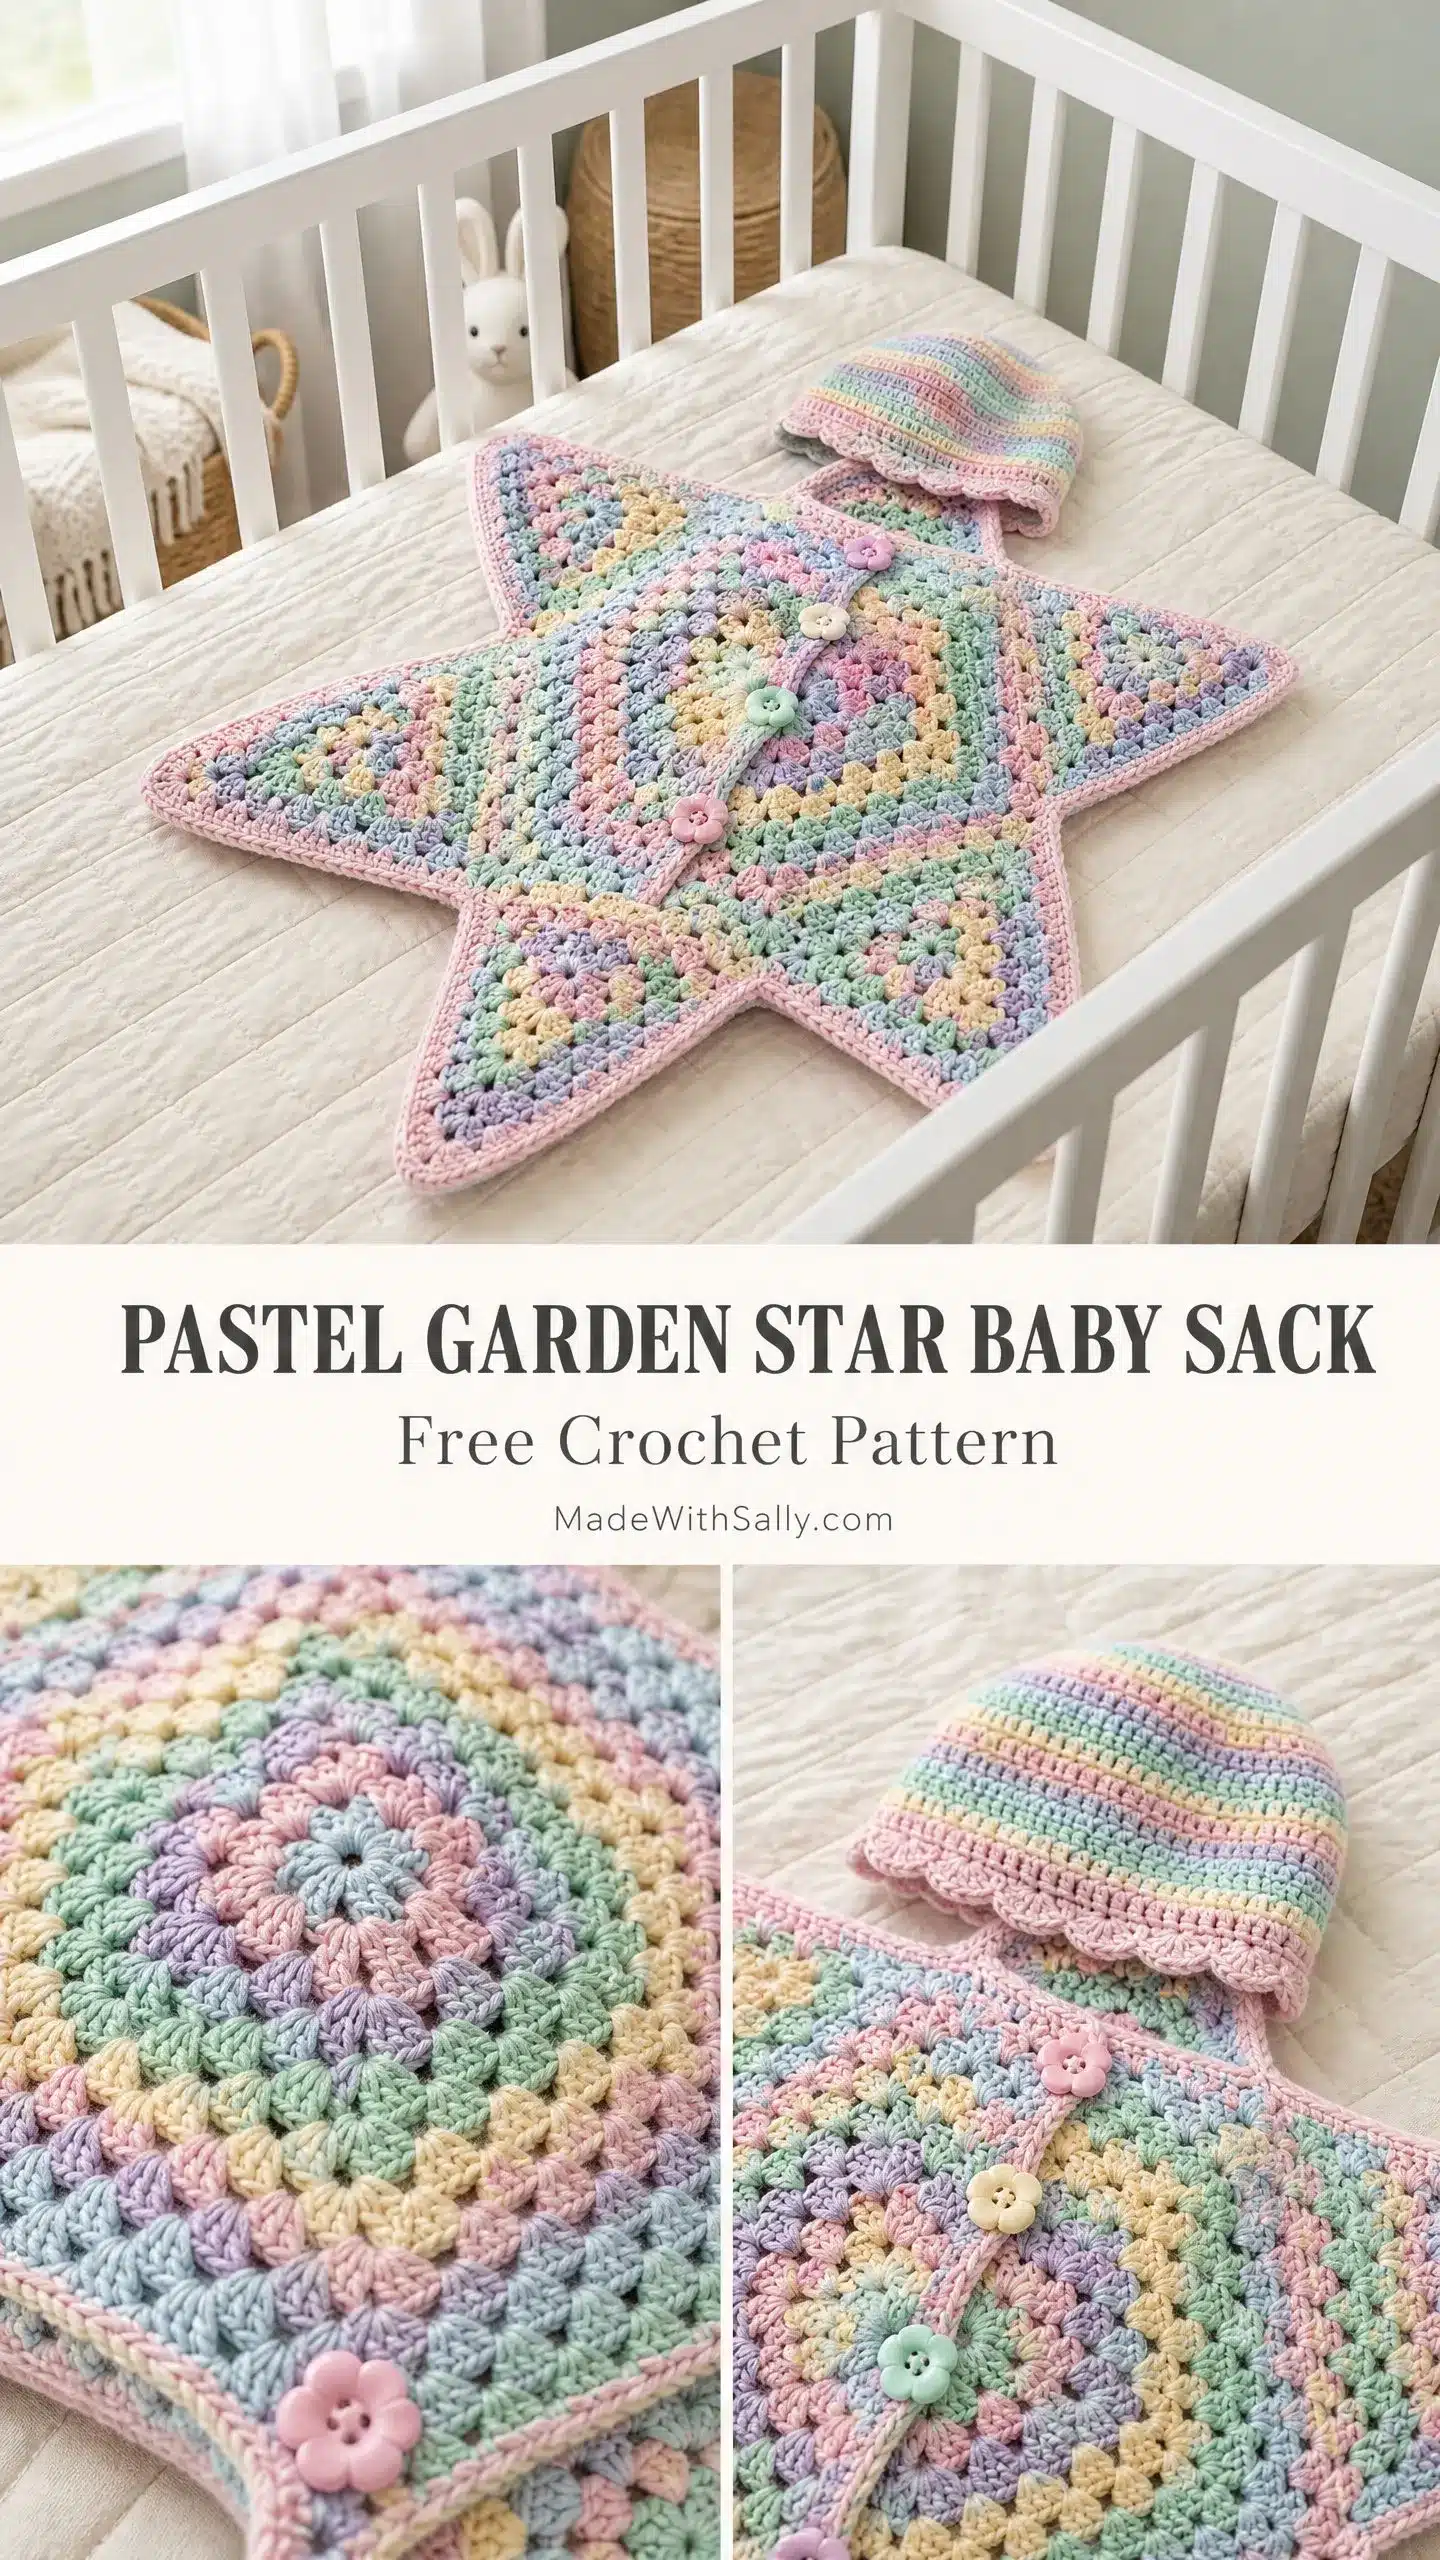
This pattern creates a two-piece set: a star-shaped baby sack and a matching hat with cat ears. The sack is constructed from two separate star-shaped panels worked from the center outward using the granny starburst method. The back panel is worked entirely in joined rounds, while the front panel splits after the initial rounds to create a flat section for the button opening. The panels are then seamed together to form a three-dimensional sack. The matching hat is worked in joined rounds from the crown down, finished with a brim and adorable ear pieces.
Back Panel
Worked in joined rounds from the center outward to form the back of the sack.
Front Panel
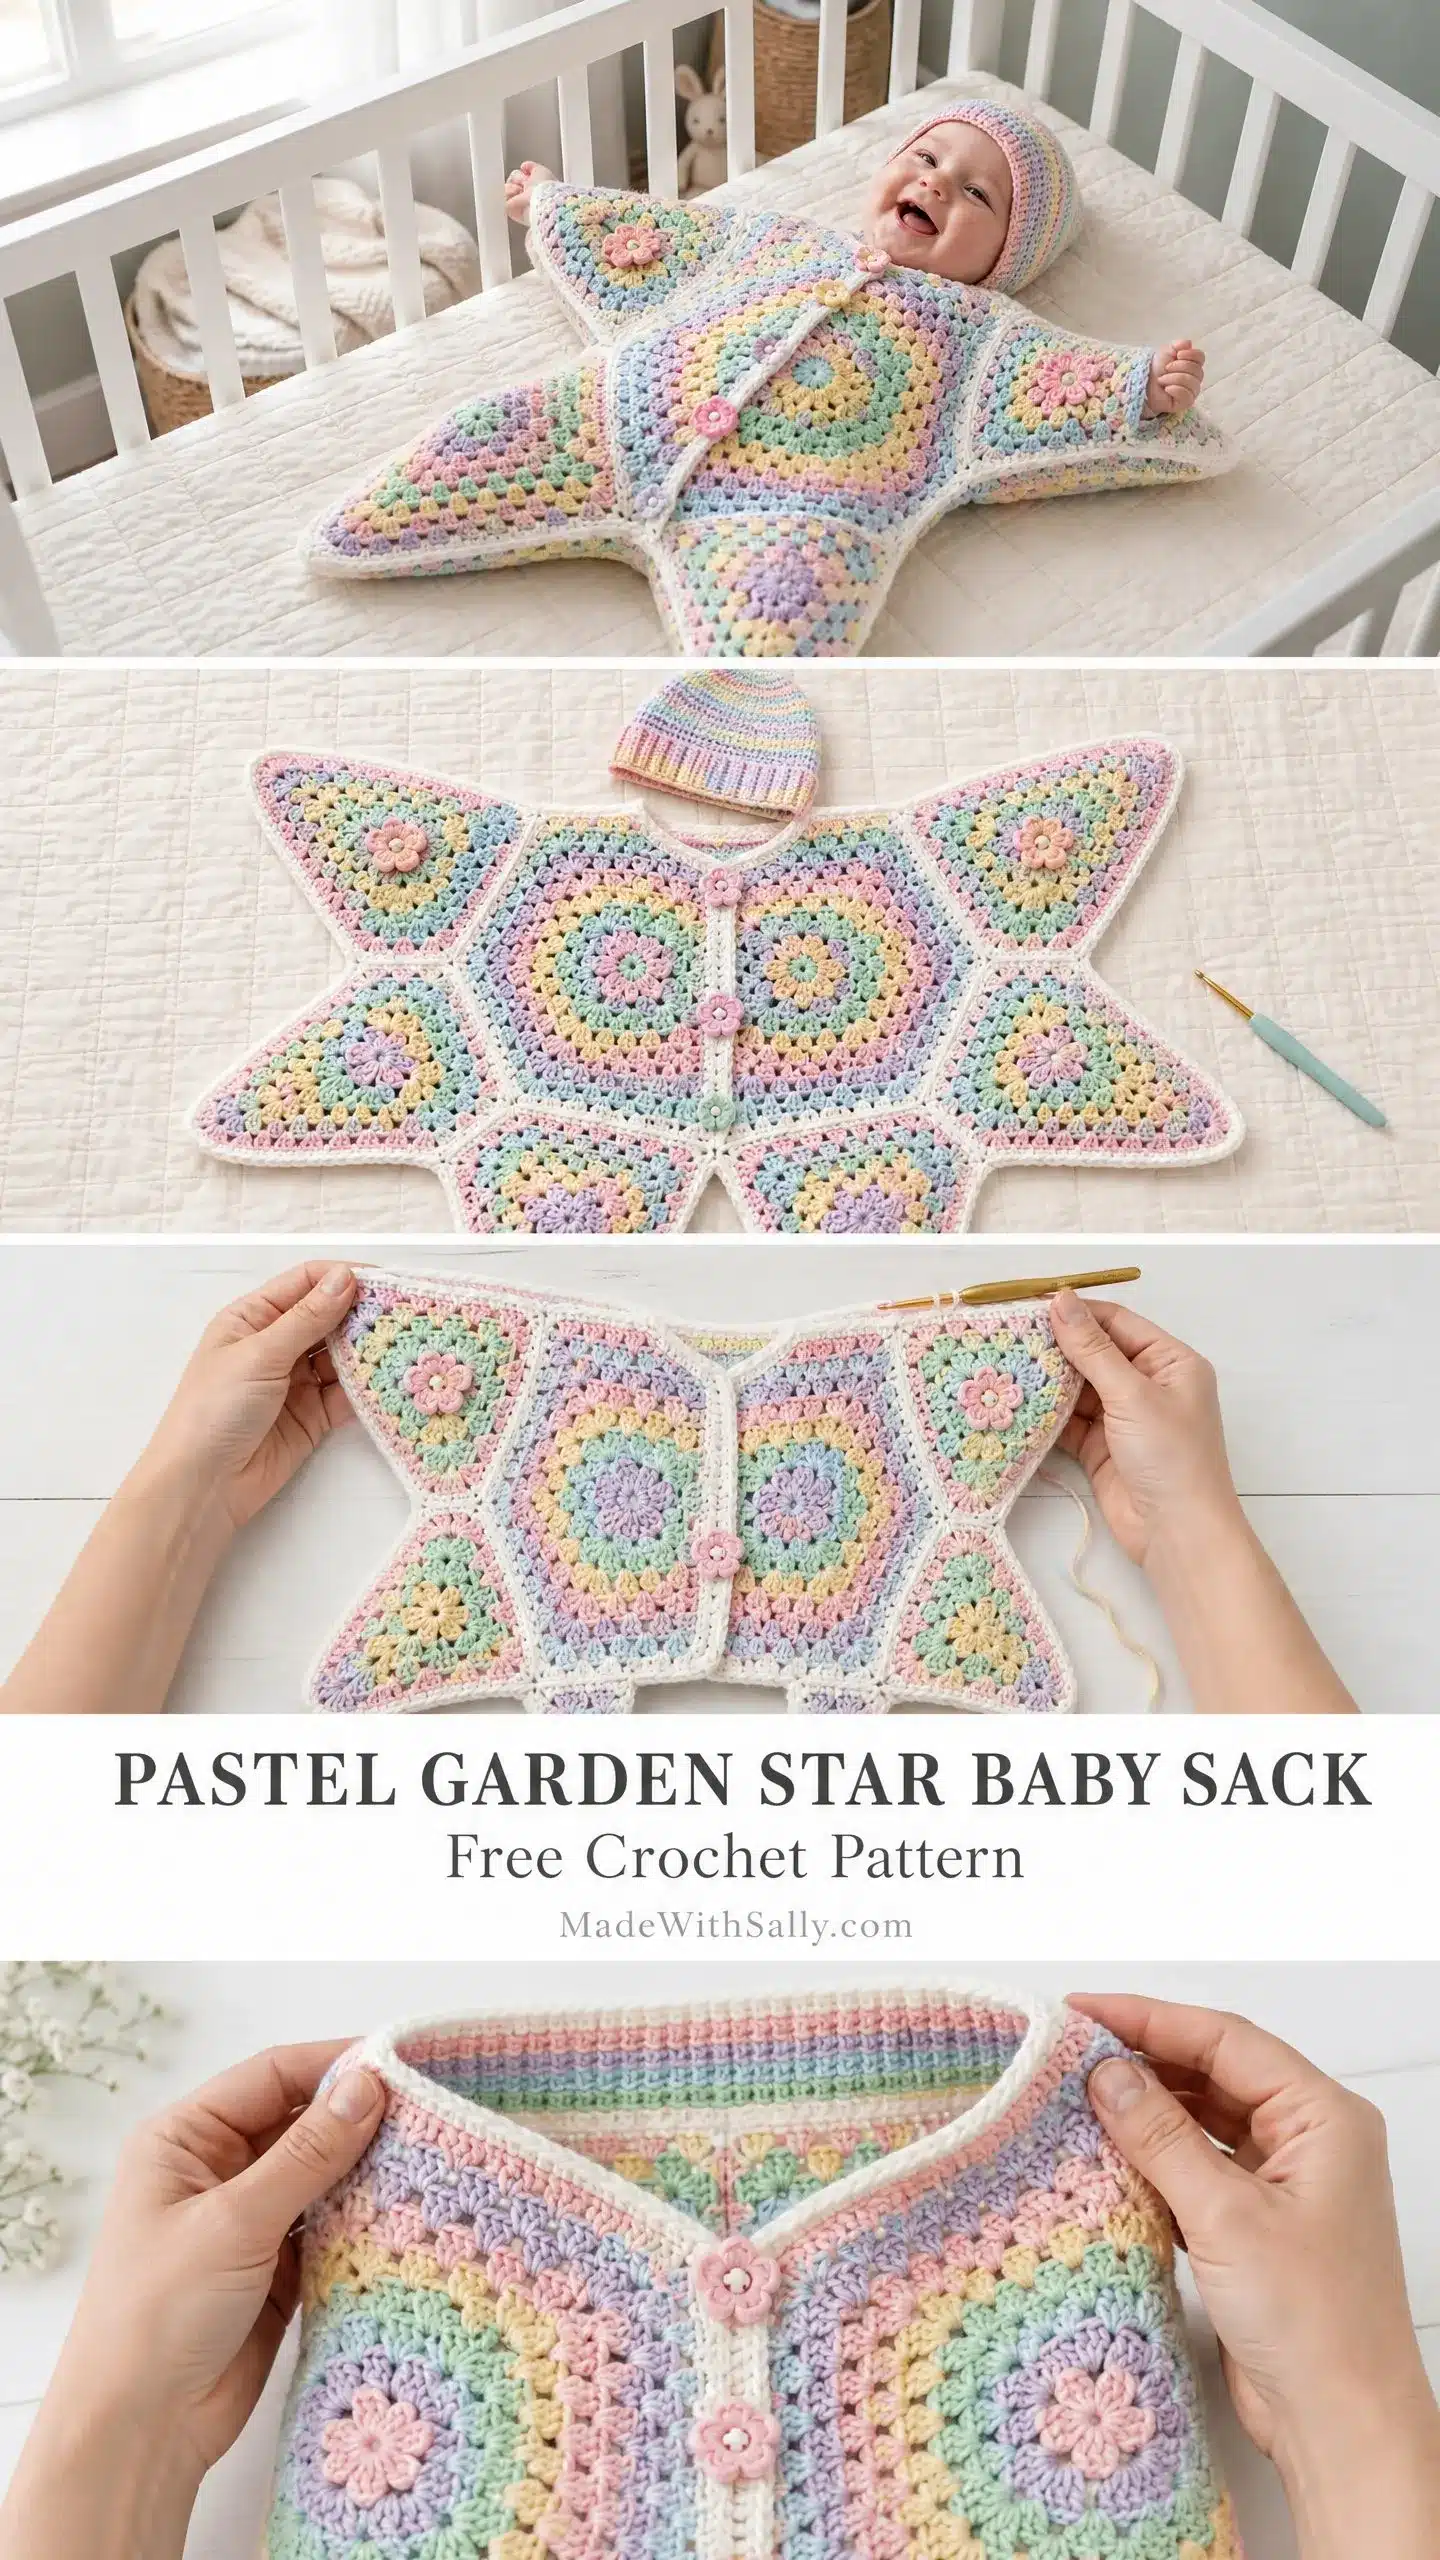
Worked in rounds for the first four rounds, then split to work flat for the button opening.
Hat
Worked in joined rounds from the crown down, including a brim and ear pieces.
Materials
- Yarn: Size 3 light DK weight or light worsted variegated yarn in a pastel rainbow colorway. You need approximately 800 yards (730 meters) total for the sack and hat combined.
- Lion Brand Mandala Baby (2 skeins needed)
- Paintbox Yarns Simply DK Prints (3 skeins needed)
- Caron Simply Soft Ombre (3 skeins needed, adjust hook to US H-8/5.0mm)
- Hook: US size G-6 / 4.0 mm crochet hook
- Notions:
- At least 10 stitch markers
- Yarn needle for weaving ends and seaming
- 5 decorative flower buttons, approximately 3/4 inch (19 mm) diameter
- Sewing needle and matching thread
- Scissors
- Blocking mat and rust-proof pins
Gauge and Finished Size
Getting gauge right matters here because it determines whether the finished sack actually fits a baby properly. With your G-6 (4.0 mm) hook in granny cluster pattern:
- One granny cluster unit (3 dc, ch 1) = approximately 3/4 inch (2 cm) wide
- 4 rounds of granny cluster pattern = approximately 3 inches (7.6 cm) measured flat from center
- 14 dc stitches = 4 inches (10 cm)
- 8 rows/rounds = 4 inches (10 cm)
Work a gauge swatch by crocheting the center circle through Round 4 and measuring across. Adjust your hook size up or down as needed.
Finished Measurements
- Baby Sack: Approximately 22 inches (56 cm) from top point to bottom point. About 24 inches (61 cm) across the widest horizontal spread from arm point to arm point. Fits a baby approximately 0 to 6 months, up to about 26 inches (66 cm) in length.
- Hat: Approximately 14 inches (35.5 cm) circumference, fitting a newborn to 3 month head circumference of 13 to 15 inches (33 to 38 cm).
Abbreviations
Let me walk you through every abbreviation before we start. Understanding these makes the pattern so much easier to follow.
- ch = chain (wrap yarn over hook, pull through loop)
- sl st = slip stitch (insert hook, yarn over, pull through stitch and loop on hook in one motion)
- sc = single crochet (insert hook, yarn over, pull up loop, yarn over, pull through both loops)
- dc = double crochet (yarn over, insert hook, yarn over, pull up loop, yarn over, pull through 2 loops, yarn over, pull through remaining 2 loops)
- sp = space
- ch-sp = chain space (the gap created by a chain in the previous row/round)
- sk = skip
- st(s) = stitch(es)
- RS = right side
- WS = wrong side
- pm = place marker
- rnd(s) = round(s)
- GC = granny cluster (see Special Stitches below)
- PIS = point increase shell (see Special Stitches below)
- MR = magic ring
Pattern Notes
- The sack is two separate star-shaped panels worked from the center outward. The back panel is worked entirely in joined rounds with the right side always facing you. The front panel starts the same way for the first 4 rounds, then splits and is worked flat to create the button opening.
- Place stitch markers at each of the 5 star points and move them up every round. This is genuinely essential for keeping track of where you are. Trust me on this one.
- The granny cluster pattern creates a naturally open fabric with lovely drape. When you seam the two panels together, use a slip stitch seam through both outer edge granny cluster tops for a firm, tidy join.
- Do not cut your yarn between color changes if using self-striping yarn. Just keep crocheting and let the colors flow naturally.
Special Stitches
Granny Cluster (GC)
Work 3 double crochet stitches into the same stitch or space. This is your foundational stitch unit throughout the entire pattern. All granny clusters are worked as a group of 3 dc into a single designated spot, separated from neighboring clusters by a ch-1 or ch-2 space. Think of it as a little bundle of three tall stitches.
Point Increase Shell (PIS)
Into the same point chain space, work (GC, ch 3, GC). That means 3 dc, chain 3, 3 dc all into the same space. This creates the elongated tip of each star point and is how your star arms grow outward.
Magic Ring (MR)
Make a loop with the yarn tail crossing over the working yarn. Insert hook through the loop, yarn over, pull up a loop, chain 1 to secure. Work stitches into the ring, then pull the tail to close the ring tightly. If magic rings intimidate you, you can substitute ch 4 and slip stitch to form a ring instead.
Pattern Instructions
Back Panel Instructions
The back panel is worked entirely in rounds from the center outward.
- Round 1: MR, ch 3 (counts as dc), work 14 dc into ring, sl st to top of beg ch-3. Pull tail to close ring. (15 dc)
- Round 2: Ch 3, 2 dc into same st (first GC made), ch 2, skip 2 sts, (GC, ch 2, skip 2 sts) 4 times, sl st to top of beg ch-3. (5 GC, 5 ch-2 sps)
- Round 3: Sl st into first ch-2 sp, ch 3, (2 dc, ch 3, 3 dc) into same ch-2 sp (PIS made at first point), ch 1, (PIS into next ch-2 sp, ch 1) 4 times, sl st to top of beg ch-3. (5 PIS, 5 ch-1 sps) Place a stitch marker into each of the 5 ch-3 sps at the star points.
- Round 4: Sl st into first ch-3 sp, ch 3, (2 dc, ch 3, 3 dc) into same ch-3 sp, ch 1, GC into ch-1 sp, ch 1, (PIS into next ch-3 sp, ch 1, GC into next ch-1 sp, ch 1) 4 times, sl st to top of beg ch-3. (5 PIS at points, 5 GC at sides, 10 ch-1 sps)
- Round 5: Sl st into first ch-3 sp, ch 3, (2 dc, ch 3, 3 dc) into same ch-3 sp, ch 1, GC into next ch-1 sp, ch 1, GC into next ch-1 sp, ch 1, (PIS into next ch-3 sp, ch 1, GC into next ch-1 sp, ch 1, GC into next ch-1 sp, ch 1) 4 times, sl st to top of beg ch-3. (5 PIS, 10 GC, 15 ch-1 sps)
- Round 6: Sl st into first ch-3 sp, ch 3, (2 dc, ch 3, 3 dc) into same ch-3 sp, ch 1, (GC into next ch-1 sp, ch 1) twice, GC into next ch-1 sp, ch 1, (PIS into next ch-3 sp, ch 1, (GC into next ch-1 sp, ch 1) twice, GC into next ch-1 sp, ch 1) 4 times, sl st to top of beg ch-3. (5 PIS, 15 GC, 20 ch-1 sps)
- Round 7: Sl st into first ch-3 sp, ch 3, (2 dc, ch 3, 3 dc) into same ch-3 sp, ch 1, (GC into next ch-1 sp, ch 1) 3 times, (PIS into next ch-3 sp, ch 1, (GC into next ch-1 sp, ch 1) 3 times) 4 times, sl st to top of beg ch-3. (5 PIS, 20 GC, 25 ch-1 sps)
- Round 8: Sl st into first ch-3 sp, ch 3, (2 dc, ch 3, 3 dc) into same ch-3 sp, ch 1, (GC into next ch-1 sp, ch 1) 4 times, (PIS into next ch-3 sp, ch 1, (GC into next ch-1 sp, ch 1) 4 times) 4 times, sl st to top of beg ch-3. (5 PIS, 25 GC, 30 ch-1 sps)
- Round 9: Sl st into first ch-3 sp, ch 3, (2 dc, ch 3, 3 dc) into same ch-3 sp, ch 1, (GC into next ch-1 sp, ch 1) 5 times, (PIS into next ch-3 sp, ch 1, (GC into next ch-1 sp, ch 1) 5 times) 4 times, sl st to top of beg ch-3. (5 PIS, 30 GC, 35 ch-1 sps)
- Round 10: Sl st into first ch-3 sp, ch 3, (2 dc, ch 3, 3 dc) into same ch-3 sp, ch 1, (GC into next ch-1 sp, ch 1) 6 times, (PIS into next ch-3 sp, ch 1, (GC into next ch-1 sp, ch 1) 6 times) 4 times, sl st to top of beg ch-3. (5 PIS, 35 GC, 40 ch-1 sps)
- Round 11: Sl st into first ch-3 sp, ch 3, (2 dc, ch 3, 3 dc) into same ch-3 sp, ch 1, (GC into next ch-1 sp, ch 1) 7 times, (PIS into next ch-3 sp, ch 1, (GC into next ch-1 sp, ch 1) 7 times) 4 times, sl st to top of beg ch-3. (5 PIS, 40 GC, 45 ch-1 sps)
- Round 12: Sl st into first ch-3 sp, ch 3, (2 dc, ch 3, 3 dc) into same ch-3 sp, ch 1, (GC into next ch-1 sp, ch 1) 8 times, (PIS into next ch-3 sp, ch 1, (GC into next ch-1 sp, ch 1) 8 times) 4 times, sl st to top of beg ch-3. (5 PIS, 45 GC, 50 ch-1 sps)
- Round 13: Sl st into first ch-3 sp, ch 3, (2 dc, ch 3, 3 dc) into same ch-3 sp, ch 1, (GC into next ch-1 sp, ch 1) 9 times, (PIS into next ch-3 sp, ch 1, (GC into next ch-1 sp, ch 1) 9 times) 4 times, sl st to top of beg ch-3. (5 PIS, 50 GC, 55 ch-1 sps)
- Round 14: Sl st into first ch-3 sp, ch 3, (2 dc, ch 3, 3 dc) into same ch-3 sp, ch 1, (GC into next ch-1 sp, ch 1) 10 times, (PIS into next ch-3 sp, ch 1, (GC into next ch-1 sp, ch 1) 10 times) 4 times, sl st to top of beg ch-3. (5 PIS, 55 GC, 60 ch-1 sps)
Fasten off and weave in ends.
Checkpoint: Your back panel should measure approximately 22 inches (56 cm) from point to point vertically and 24 inches (61 cm) across the widest horizontal spread.
Front Panel Instructions
The front panel is worked similarly to the back panel for the first 4 rounds, then splits to work flat for the button opening. (Note: Specific flat row instructions for the front panel split are not detailed in the source text, but the panel is completed to match the back panel dimensions before seaming.)
Seaming the Panels Together
Place back panel and front panel with wrong sides together and right sides facing outward. Align all 5 star points carefully.
Using a yarn needle and matching yarn, slip stitch seam through the top loops of the outer edge GC stitches around the entire perimeter. Leave the top opening unseamed. This creates your 3D sack with the front opening running from top to bottom.
Work the seam starting at one side of the top opening, going all the way around the perimeter across all 5 star points, and stopping at the opposite side of the top opening. Fasten off.
Hat Instructions
The hat is worked in joined rounds from the crown down.
- Round 1: MR, ch 3 (counts as dc), 11 dc into ring, sl st to top of beg ch-3. Pull ring closed. (12 dc)
- Round 2: Ch 3, dc into same st, 2 dc into each st around, sl st to top of beg ch-3. (24 dc)
- Round 3: Ch 3, dc into same st, dc into next st, (2 dc into next st, dc into next st) 11 times, sl st to top of beg ch-3. (36 dc)
- Round 4: Ch 3, dc into same st, dc into next 2 sts, (2 dc into next st, dc into next 2 sts) 11 times, sl st to top of beg ch-3. (48 dc)
- Round 5: Ch 3, dc into same st, dc into next 3 sts, (2 dc into next st, dc into next 3 sts) 11 times, sl st to top of beg ch-3. (60 dc)
- Rounds 6 and 7: Ch 3, dc into each st around, sl st to top of beg ch-3. (60 dc)
- Round 8: Sl st into next st, ch 3, 2 dc into same st (GC made), ch 1, sk 2 sts, (GC into next st, ch 1, sk 2 sts) 19 times, sl st to top of beg ch-3. (20 GC, 20 ch-1 sps)
- Rounds 9 through 11: Sl st into first ch-1 sp, ch 3, 2 dc into same sp, ch 1, (GC into next ch-1 sp, ch 1) 19 times, sl st to top of beg ch-3. (20 GC, 20 ch-1 sps)
- Round 12 (brim): Sl st into first ch-1 sp, ch 1, 3 sc into same sp, 3 sc into each ch-1 sp around, sl st to first sc. (60 sc)
Fasten off and weave in ends.
Hat Ear Instructions (Make 2)
- Ch 4, sl st to form a ring.
- Rnd 1: Ch 3, 2 dc, ch 2, 3 dc, ch 2, 3 dc, ch 2, sl st to top of ch-3.
- Rnd 2: Sl st into first ch-2 sp, ch 3, (2 dc, ch 2, 3 dc) into same sp, sc into next ch-2 sp, (3 dc, ch 2, 3 dc) into last ch-2 sp, sl st to top of ch-3. Fasten off, leaving a 12 inch (30 cm) tail.
Fold each ear slightly for dimension. Position ears on top of the hat approximately 2 inches (5 cm) apart. Sew each ear securely with a whip stitch around the base.
Assembly
Wet blocking is strongly recommended for this project. Soak the completed panels in cool water with a small amount of baby-safe fabric wash for 20 minutes. Gently press out excess water in a clean towel. Do not wring.
Lay flat on blocking mats, pin each star point outward to shape the arms clearly, and allow to dry completely (24 to 48 hours). Block the hat separately over a balloon or hat form inflated to the correct circumference.
Tips
- For a larger sack (6 to 12 months): Continue working Rounds 15 through 17 on both panels. Each additional round adds approximately 1.5 inches (3.8 cm) to the tip-to-tip measurement.
- For a smaller sack (preemie or tiny newborn): Work only through Round 11, producing a panel approximately 18 inches (45.7 cm) tip to tip.
- For the hat: Increase to 72 dc by Round 5 for a larger size, and add 2 more rounds of granny cluster pattern.
FAQs
What type of yarn is best for this pattern?
A size 3 light DK weight or light worsted variegated yarn in a pastel rainbow colorway works best. Self-striping yarns like Lion Brand Mandala Baby or Paintbox Yarns Simply DK Prints are ideal because they create the rainbow effect without needing to cut yarn.
Is this pattern suitable for beginners?
This is considered an intermediate level pattern. You should be comfortable working granny clusters in the round, managing increases at multiple points, and seaming pieces together. However, the stitches themselves are familiar to those who have made granny squares.
How do I adjust the size of the sack?
To make the sack larger for older babies, continue working additional rounds (15-17) on both panels. For a smaller size, stop at Round 11. The hat can also be adjusted by increasing the stitch count in the early rounds.
How do I care for the finished baby sack?
Machine wash cold on a gentle cycle. Lay flat to dry. Do not tumble dry, iron, or dry clean. Air drying helps maintain the softness and prevents pilling.
Why is blocking important for this project?
Blocking helps set the shape of the star points and ensures the fabric lays flat and even. It is strongly recommended to soak the panels and pin them out to dry to achieve the best finish.
Pin This Crochet Pattern!